Thursday, December 30, 2010

Year End Thoughts

Here it is, the day before the end of 2010. What a year it's been. So many ups and downs, twists and turns. But all in all it's been a good year for us here. Of course our greatest blessing has been our little grandson that we love dearly. Thought you'd like to see how much he's grown in 7 months, so here's a pic with him and his proud grandpa. My sister got him the plushy Santa suit and he looked just adorable. Don't you agree? For some reason he was the center of attention throughout the day, and he seemed to really enjoy it!


OK, on with something to share with you. Each year I have customers that want a gift certificate for a friend or family member. And each year I come up with one that I make from scratch. (I also make birthday and thank you certificates, but that's for another time! ) Since everyone probably has received their gift certificates by now, I figured it would be safe to share and not mess up the surprise.

This year I chose to use the Candy Cane Christmas Designer Series Paper for the main theme of the certificates. The prints were all very cute and playful, but there really wasn't a problem deciding which one I wanted to use. The print with the trees and birds fit the size of my certificate very well, so that's what I chose. Here's a picture of one that I'm sharing with you...

Stamps: Occasional Quotes (hostess) and A Cute Christmas

Cardstock: Whisper White, Real Red, Wild Wasabi, and Candy Cane Christmas DSP
Ink: Wild Wasabi
Accessories: 1/4" Circle Punch, Designer Label Punch, Wide Oval Punch, Small Oval Punch, 1/4" Real Red Grosgrain Ribbon, Bone Folder, and Dimensionals

The holly leaves were punched with the small oval punch, then trimmed up with Paper Snips. I don't have a holly punch that's the right size, but it worked out well this way anyway. The inside of the gift certificate is printed on my computer on our white cardstock, then trimmed up and layered. This all fits into a small open-end envelope that's been stamped with the trees from A Cute Christmas to match.

That's it for today. Don't know if I'll get anymore stamping in this year as we're sort of running out of time. My best wishes to each of you for a happy and healthy new year. May God bless the next year for you with pleasant surprises and many warm memories with your family and friends. Happy New Year!
Sharon

Friday, December 24, 2010

'Twas The Night Before Christmas...

But we haven't gotten to the part where nothing was stirring, etc. I just finished wrapping the gifts and making the last gift card holders. The cookies and candies are all finished. At least, I've quit whether I was actually finished or not. And it's almost time to get ready for church. So what's left to do tonight? Share one more post with you! In fact, I should have called this the ornament edition. Yes, I've spent time during the past week or so making a slew of ornaments. My cat chews on the fake tree and then steals stuff off of it, so my delicate glass ones didn't even come out this year. Some I gave away before I got pictures of them, but these are a good representation of what was made.
There were a bunch of the snowflake snowglobe type of ornaments made this year. Those were really fun to make. These two just have glitter for shaking and none on the outside. Others have been glittered all over the place inside and out! Gotta make sure they shine on the tree, ya know!

I used both the Chunky Glitters and the Glass Glitter on the ornaments. It just depended on the look I wanted.


This was my favorite ornament when it was finished. The image has added glitz from the Champagne Mist Shimmer Paint that was used over the bells. There was also some Frost White Shimmer Paint accents on the berries, holly, and ribbon. So very pretty!!


This picture might give you a better idea about the shimmer on the image. Like I said, this one's my favorite of all that I made this year. As you can see, I raided my stash of retired DSP's to make these ornaments. I was looking for certain colors to use, and this fit the bill.


My daughter will only put blue and silver ornaments on her tree, so these are for her. I also did a few of the snowflake style (1st one shown) done up with blues for her.

On the backs of the ornaments I used a retired gold/silver Zig Painty pen to add the names and/or years depending on who they're for. It surprised me that my pen was still in working order after sitting around since last Christmas. What a nice surprise for me!

Well, that's it for tonight. Time to get redy for the candlelight service at church tonight. I think this is always the loveliest service in the whole church year and something I never want to miss.

Wishing you a very Blessed Christmas! Take time to thank God for the gift of His Son, Jesus, who was born in Bethlehem. He came so you and I can be redeemed and and become children of God. This is the most glorious gift ever!
Sharon

Wednesday, December 22, 2010

Top Note Gift Box

Hi there! Today I've got a really quick post for you. One of my downline ladies, Phyllis Dahlstrom, made some of these cute little boxes for our Christmas party. Inside she had some homemade fudge. Yummy!! I can't give you too many details on how the box was made, because I've never made one of these. But I'm going to give it a try after Christmas. Hmmm..... The wheels are turning..... Wouldn't it be the perfect size for a Valentine box??? That means I've got to figure out how it's made. I'll get back to you on that later.
Stamps: Bells and Boughs, Serene Snowflakes
Cardstock: Crumb Cake, Cherry Cobbler, Always Artichoke, Very Vanilla
Ink: Crumb Cake, Basic Black
Accessories: Big Shot with Top Note Die, Old Olive Satin Ribbon
Not sure for the ovals just what was used. I guess you need to use your imagination here.
Isn't it pretty? I think she did a great job on both the box and the fudge!! Hope you like Phyllis' idea as much as I do. After I track her down for some dimensions after Christmas, this is one of the first ideas I'm going to try my hand at. Check back later for another version for another occasion.
Hurry up now. Only 3 days left til Christmas! Hope you're not too frazzled to think about the true meaning of this holiday - when the Christ Child was born and God came to earth to live with us. What a blessing and honor to serve Him!!
Merry Christmas and God bless you and your family in the coming year.
Sharon

Tuesday, December 21, 2010

Last Minute Christmas Cards

What a week this is turning out to be - sheesh!! Yesterday I had an appointment to get my teeth cleaned. I know, who in their right mind would plan that for the week before Christmas. Me, that's who! Unfortunately I had to cancel my appointment twice in the previous 6 weeks, and I was determined to get it done before the end of the year. So my gums were sore from that. Then today while eating something quite innocuous, a section of one of my teeth just broke off. I called and they'd had a cancellation - could I come right now. So I spent part of this afternoon getting a temporary crown put on my tooth. Doesn't that sound like fun??? My jaw and gum area around the tooth still hurts. Boo hoo little me :( Oh well, I get to look forward to getting the permanent crown put on right after the first of the year!! Hooray! What a way to start out the new year! Well, I am thankful they could get me in today and I didn't have this happen over the holidays. Wouldn't that be the pits? Alright, enough whining here and let's get on with the cards!!

Ok now, I know it's only 4 days til Christmas and you've had all your cards in the mail eons ago, but I ran out of cards that I'd made and had to whip up a few more on Sunday. Seems to happen every year. I should know better by now and just make twice as many as I think I'll need. Anyway, I thought I'd use up a few segments of dsp that I had left and make up some super-quick cards. Here you go....


Materials for all three cards are as follows:

Stamps: Peaceful Season (hostess)
Cardstock: Crumb Cake and either Always Artichoke or Cherry Cobbler with Deck the Halls Designer Series Paper
Ink: Crumb Cake, Cherry Cobbler, and Always Artichoke on #3
Accessories: White Pearlized Smooch Accent Ink, Sponge Dauber, Early Espresso Taffeta Ribbon, and the Ticket Corner Punch on card #3


These three cards are very basic, but because of the lovely Deck the Halls DSP used they are still gorgeous. I added the sponging on the DSP on each card to give them more of a vintage look.

On the first two cards, I used touches of the Smooch Accent Ink to give them a hint of luxury and opulence. Even if they only took moments to make, I still think they look quite nice. The Bells and Boughs Designer Paper has been one of the easiest to use with the prettiest results!!


This last card also used the slot punch for the ribbon to slide through. Then a tied bow was attached with a Mini Glue Dot.

Now aren't you glad you took a minute to check these cards out? Simple, but I'm still very happy with them.

Thanks for stopping by today. Hope your Christmas preparations are going better than mine!

Sharon

Thursday, December 16, 2010

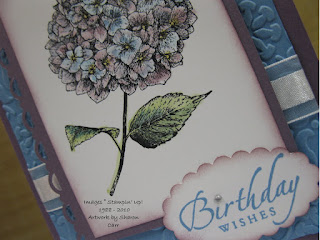
Birthday Hydrangea

Ok, today I have another class project for you. One of the nicest sets in the catalog can't be purchased, but you can get it free when you're a hostess. Can you guess which set I totally love?? It's called 'Because I Care', and I'm really excited about using it. I've done several cards with it already that I like, but I've always veered toward using very subtle colors. This time I got a bit bolder and used richer versions of my beloved subtles. See what you think of it....

Stamps: Because I Care and Sincere Salutations
Cardstock: Perfect Plum, Marina Mist, and Whisper White
Ink: Stazon Jet Black, Marina Mist, Perfect Plum, Daffodil Delight, and Certainly Celery
Accessories: Big Shot with Vintage Wallpaper Embossing Folder, Scallop Trim Border Punch, Scallop Oval Punch, Sponge Dauber, Striped Organza Ribbon, Basic Rhinestones, Aqua Painter, and Dimensionals


For this card, the ladies also got to choose whichever sentiment they wanted. Most all of the stamps in the Sincere Salutations set fit nicely into the scallop oval punch, so there was alot of switching around and changing minds of what stamp they really wanted to use. Sometimes having choices just makes it harder to make a card. (At least that's what they tell me!)
Seems like I cut a few too many cardstock sets of this sample, so I think I'll get them stamped up today before I get everything put away. Yeah, I know, I should have put it all away last night after class, but I got lazy. Oh well. That just means it's time to stamp today before I get on with getting my own cards finished, addressed, and mailed. And it's not even 3 days before Christmas yet!! Wow - this might be a new record for getting cards out on time! I'll let you know if they actually get finished today!
Have a great day! Take a deep breath, you still have 8 days before Christmas to get everything finished!!! Help.......
Sharon

Wednesday, December 15, 2010

Happiness Shared Case

Hey there! It's snowy outside and Christmas is just around the corner, but this week's classes were focused on just about anything but Christmas! The ladies all said they'd already decided on their cards and didn't want any more ideas to make them want to change their minds at this late date. So instead we had birthdays, sympathy, thinking of you, etc., etc. It was a fun break from everything holiday.


The first class project was very feminine and elegant. This card was sent to me by my sister Connie. She had used it for a class project a couple of months ago and it was a big hit for her. So, why reinvent the wheel when you've already got a winner?? Of course, there was a little tweak or two, but not many changes. It definitely looks harder to make than it is as long as you have some directions. And that's what I'm here for!


Stamps: Happiness Shared
Cardstock: Basic Black, Pink Pirouette, Pretty in Pink, and Whisper White
Ink: Stazon Jet Black, Wild Wasabi, Pink Pirouette, Rose Red, and So Saffron
Accessories: Corner Rounder Punch, 1 3/8" Circle Punch, Curly Label Punch, Aqua Painter, and Striped Organza Ribbon

I had thoughts of dry-embossing the Pink Pirouette layer, but decided I liked the simplicity and clean lines as it was. Instead of the sentiment from the set across the front, several ladies chose to use either a birthday or sympathy sentiment. Each of those worked equally well with the card design and colors, so I'd say this was one very versatile design and I'll probably be making more or these to keep on hand. Thanks Connie for sharing such a fabulous card idea with me!!! The ladies in class all loved it!

Hope you give this idea a try too. Clean, simple, and absolutely lovely! Thanks for stopping by. Have a cozy evening and try to stay warm.
Sharon

Monday, December 13, 2010

Welcome Baby

A good friend of mine from church is a new grandmother!! Her daughter had her baby this past week, and my friend is walking on air right now! Having a new baby in the family can really do that to you. Believe me, I know what I'm talking about! lol So, I sat down to make her a card and thought I'd share it with you. I'm sure you've seen lots of the onesie shaped cards already, so it really isn't anything super-special. But I've never made one before and didn't have a pattern for one either. Therefore the dimensions might be a bit different. I just started with a regular sized top-fold card and started in with my punches. Actually it wasn't as hard as I thought it'd be. I only have one big problem. Now that the card is done, I can't send it! It turned out waaaaay too girlish for me 'cuz the new baby is a little boy. I thought I'd be okay with the colors, but I sure was wrong. It's back to the drawing board for a more boyish version.

Stamps: retired "welcome baby" and Itty Bitty Backgrounds
Cardstock: Very Vanilla, Pacific Point and Real Red
Ink: Real Red and Basic Black
Accessories: Paper Snips, Word Window Punch, 1 3/8" Circle Punch, Scallop Circle Punch, Large Oval Punch, and Star Punch


Like I mentioned earlier, I thought these colors would be boyish enough, but the scalloped edges really sends a different message. They do make the onesie cuter, but takes away the masculine appearance. Not sure what I'll figure for the next one. Maybe I should give up on the idea of a shaped card altogether and do something much more traditional. Not as much fun, but at least I know how to make it look like it's for a baby boy!!


Here's another shot for you. I just loved the idea of the pocket! But way too cutesie for a little fella.

In case you're wondering, I used the Word Window Punch to get started on the arm sections. I punched at an angle a couple of times to give me the shape I thought it should have. Then I trimmed the shape nicely with my snips.

Ok, that's it. I'm off to try this card again. Wish me luck with this one. Otherwise I'll end up with a stash of new baby cards and nothing to send!
Thanks for stopping by today.
Sharon

Saturday, December 11, 2010

Latte Love Remake

Last month I was working on a Valentine card for our stamping night at church. I posted the card for you here, but thought I'd do a remake on it. Sort of caseing myself I guess. I liked the layout, but wanted to punch it up a little. I had just read an article in a stamping magazine that said that gray was the new black. Soooo...... Why don't you check the two and let me know what you think. Which one do you like better? The original, more traditional colors and look, or a more updated version??
Stamps: Pun Fun
Cardstock: Blushing Bride, Basic Gray, and Very Vanilla with Lap of Luxury Designer Series Paper
Ink: Stazon Jet Black, Blushing Bride, and Chocolate Chip
Accessories: Aqua Painter, Two Step Owl Punch, Heart to Heart Punch, Pinking Hearts Border Punch, Basic Rhinestones, Very Vanilla 5/8" Satin Ribbon, Subtles Flower Brads, Piercing Tool and Mat Pack, and Dimensionals


So what do you think of the changes? I have to admit I like them both myself and I'm having a horrible time choosing which I like better. They both have their good points. Awww shucks, guess I just can't choose! I can like both of them!!

Well, that's it for tonight. I have to get cracking on the last project for classes next week. I seem to be hung up on the last project. Nothing seems to be coming together. Who knows, after playing around with this card, maybe something might click and everything will fall into place. At least that's what I'm hoping for anyway!! When I get the class projects taken care of I'll be back to share them with you.

Take care out there! We've got a winter storm heading this way later tonight. Hope it's not too bad out there in the morning and I can get to church. Stay snug!!
Sharon

Thursday, December 9, 2010

Change of Pace

Today I'm sharing something with you that I don't normally do. This card was made with two contraband stamps. Oh, no, treason!! Shhhhh, don't tell anybody that I'm actually using something other than Stampin' Up! So if you're a SU! purist, stop reading right now and come back tomorrow!

Actually this stamp and the sentiment have been in my stash for close to 18 years. It was one of my go-to stamps when I just wanted to cheer someone up. But it's been tucked away for years and really needed just a little touch of love before it gets tucked away again. And horrors!, the golden yellow cardstock is not SU! either!! It was given to me by one of the ladies from church that come to make cards for the soliers last month. She thought I could find a use for it. When I saw the color, I immediately thought of this stamp to go along with it. So here's one of the cards we made on Tuesday night....


Stamps: non-SU!
Cardstock: Whisper White and non-SU!
Ink: Basic Black
Accessories: Colored Pencils, 2-Way Glue Pen with Dazzling Diamonds Glitter, Word Window Punch, Regals Mini Brads


Isn't this chubby little bee cute? It always brings a smile to my face, so I hope the soldiers that choose this card will love it too!

There was something a little quirky that happened when I made this card. Can you see on the wings where I used the 2-Way Glue Pen and glitter? I used only white pencil lightly on the wings to keep them transparent looking. Yet each time we used the glue pen it left a rosy mark on the card. I checked the glue pen and there was no red on it at all. So where did the rosy color come from???? Very strange indeed.

Well, hopefully I'll get a chance to stamp today for a little bit and then I'll have something using Stampin' Up! stamps and products tomorrow. Keep your fingers crossed that I can actually get to it! Toodles...
Sharon

Wednesday, December 8, 2010

Beary Nice Birthday

Ok, I sat down yesterday and worked on the little girl's birthday cards. For some reason, little girls (and big girls too!) seem to be much easier for me to plan out. Don't know why, but it just is! I hadn't played with my bear stamps in quite a while. In fact, all the stamps I own in the "Growing Up" category are sadly avoided. Maybe with that little grandson in our lives those stamps will get used more regularly now. At least that's the plan. So, on with the card I worked on yesterday. The ladies did a wonderful job of coloring the bears with chalks and I think they had fun doing something a little out of the ordinary for us.

Stamps: Beary Best Friends and Beary Nice Wishes
Cardstock: Whisper White, Tempting Turquoise, and Apricot Appeal (sadly retired) along with a retired Designer Paper that I don't remember the name of - sorry!
Ink: Tempting Turquoise and Apricot Appeal (retired), and Basic Brown (also retired!)
Accessories: Stampin' Pastels


It's been awhile since I had my chalk pastels out too. So it was fun sharing with the ladies how to use them, and they did a great job coloring the bears. It's always fun to try 'new' products when you're still sort of a new stamper and not a totally addicted stamper the has just about everything already!! Hope the little girls that get these bears for their birthday cards like them as much as we enjoyed making them.

Just a quick update on our stamping for the soldiers last night. Because of everything going on at church this month (including a MOPS Christmas Party tonight that 4 of my regulars were at!) we still accomplished quite a bit for only 5 of us that were there. Out of the 5, four of us had worked on the Ladies Guild Christmas Dinner Monday night so we were all exhausted and just a little bit slap-happy. We laughed so much last night it's a wonder we got anything made at all. Surprisingly, we actually finished 117 cards!! Woo Hoo!!! Now it's time to get them all boxed up for the "From Our Hearts" ladies and off to the Post Office.

Thanks for stopping by today. Relax, enjoy your day, and find some time for stamping!
Sharon

Tuesday, December 7, 2010

Choo Choo Birthday

I know Christmas is right around the corner and all, but today I'm taking a break from all things Christmas. At least for this post anyway! Many of you have read that I make cards every month with a group of ladies from church. We send these to From Our Hearts for the military personnel to use. Since the last of our Christmas cards were sent in early October, we've been concentrating on Valentine cards. But all the mushy red and pink stuff has really been a bit much lately. So this month we're taking a break and making more general style and birthday cards. Don't you think this little train card will be perfect for some little boy that's crazy about anything with trains?
Stamps: Choo Choo and On Your Birthday
Cardstock: Whisper White, Bashful Blue, and Basic Black
Ink: Not Quite Navy, Riding Hood Red, and Going Gray (retired)
Accessories: Spiral Border Punch, 1/2" Circle Punch
This card is very straight forward - what you see is how you make it! My friend Michelle Glennie suggested using the Spiral Border Punch to give the black layer a look of train tracks. It was the perfect touch!
Those of you that have used the sentiment stamp (look who's...) know how hard it is to get a clean impression with no residual ink inside the parenthesis, so I got around that by adding a 1/2" circle of Bashful Blue cardstock. It fits in the parenthesis just like it was made for it. (hmmm, maybe it was!) Anyway, for the stack of cards we'll be making tonight, it will be a big help!! And it helps to focus on the number that the user can write in there. All in all it works out well.
Thanks for stopping by today. It's back to the creating table to get another card idea planned out and all the materials cut and packed. I think this time I need to find something for a little girl to even out the cards alittle. Don't you agree? Have a great day...
Sharon

Saturday, December 4, 2010

Tiny Gift Bags

It's been said that good things come in small packages, and I've got just the right sized package for some wonderful gift. One of the first things I learned to make when I became a SU! demonstrator fourteen years ago was a bag-a-lope. I was totally blown away that you could make a gift bag from a 10x13 envelope. How cool was that?! Fast-forward a bunch of years, and I'm making a little tiny version with a handle. And I still think they're cool!!
Stamps: A Cute Christmas stamp set and Christmas Chatter Jumbo Wheel
Cardstock: White Medium Envelope, Cherry Cobbler, Always Artichoke, and Whisper White cardstock with Jolly Holiday Designer Paper
Ink: Basic Black, Cherry Cobbler, Always Artichoke, and Basic Gray pads with Always Artichoke Marker
Accessories: Aqua Painter, Jumbo Handle, Old Olive 1/8" Taffeta Ribbon, 1 3/8" Circle Punch, Scallop Circle Punch, 1/8" Hole Punch, Tag Punch, White Gel Pen
Sure seems like a lot of materials to make a tiny gift bag, but it's well worth it. And while you've got everything out to make one, why not make several more? This little bag is perfect for a gift card, or why not tuck in one of our Simply Adorned Charms and Chain for a truly Stampin' Up! Christmas gift?
Since we don't have any Always Artichoke ribbon of this style, you can just make your own. I ran a line of Always Artichoke ink with a marker right over the center portion of the taffeta ribbon. So easy and you've got whatever color you need.
If you haven't made one of these little bags yet, it's very simple. Start with an envelope, seal it well - it helps to use SNAIL adhesive along the edges of the flap. Wheel or stamp your background design. Score along both sides and the bottom at 3/4". Punch down along one side edge with the Tag Punch in as far as you can. Slide it out partially to take out the rest of that side. Do this again on the other side so you've created the handle. Fold and crease the score lines with a bone folder. Then it's time to manipulate the sides and bottom to make it look like a paper grocery bag. Add any embellishments you like and you're almost done.
The last touch is the crinkle shreds for the bag. Can you believe it's just the kraft packing paper from your SU! order boxes? I folded several layers of paper and cut skinny strips. Then I crumpled them up in my hands really tight. Shake them loose a bit and stuff your bag. Fun!!
Hope you give this idea a try. You never know when you're going to need one of those tiny little gift bags for something special! Thanks for stopping by today.
Sharon

Monday, November 29, 2010

Making Valentines Already?

Can't believe it's been a week since I've had a chance to chat and share. And what a week it's been! Hope you had a wonderful Thanksgiving with your family and friends. We had the dinner at our home so we were up early getting the turkey stuffed and in the oven. Our son was home from Louisianna where he's been working on the oil spill cleanup. It was good to have him around for a few days. Especially since his birthday was Friday and we were able to celebrate with him! Then our daughter and I spent time on Friday at a funeral home for a viewing and then the service on Saturday. This was a rather hard time for us. The young woman was only 33 years old and died of Huntington's Disease which is a horrible debilitating disease. So this past week has had so many ups and downs I feel like I've been on an emotional rollercoaster! But things are back to normal today with our grandson showing up here bright and early. Oh yes, I forgot another highlight of the weekend - he got his first tooth!

Alright, that's about enough of the personal stuff. On to the stamping part of this blog!! With making cards for the military every month and needing to send cards way ahead of the calendar, we've been working on Valentines already! It's so hard to think two holidays ahead all the time. Very confusing!! But I think you'll like this card and the two different versions we made.


Stamps: Pun Fun
Cardstock: Whisper White, Pretty in Pink, and Real Red with retired DSP
Ink: Basic Black, Chocolate Chip, Pretty in Pink, and Rose Red
Accessories: Big Shot with Perfect Details Texturz Plate, AquaPainter, Small Heart Punch, and Owl Two Step Punch


Sorry I can't give you the names of the DSPs that I chose to use. Unfortunately I had some strips of different designs left over and they were all in the pink and red print families. I figured they would get used up for valentines so I just stuck them off to the side in a cello bag til they were needed. Now I can't remember where they came from!! I think one was from a Christmas set a year or two ago, not sure about the other one at all. No matter, they worked out well for this layout very nicely.

When you look at the next sample, you'll see it's slightly changed. The white cardstock has
different dimensions than the first one - shorter and fatter. This is me using up leftover cardstock from class projects or whatever. Anyway, I thought it would look better if the hearts were escaping off the card like steam.

That's also the rational behind the embossing on the Pretty in Pink layer. This is as close to steam as I could get.

Hope you like the ideas. They're very clean and simple, but everyone liked them. Hope the recipients like them too!

Ok, got to get back on track with my own Christmas cards. It's almost December so that means I can start making mine now. And then hopefully get them in the mail before the 25th!! lol

Sharon

Tuesday, November 23, 2010

Paisley Christmas

Two things in the Holiday Mini I thought were nice, but just wasn't sure about. That Deck the Halls fabric and the Paisley Prints stamp set. Could I actually figure out a cute way of using these two items? Well, maybe not cute, but could I really use them? Here's what I came up with. Please let me know what you think, but be nice...
Stamps: Paisley Prints and Christmas Wishes
Cardstock: Crumb Cake and Very Vanilla
Ink: Always Artichoke
Accessories: Deck the Halls fabric, Cherry Cobbler Seam Tape, Sticky Strip, and Dimensionals
Do you ever get that intimidated about something that you just can't visualize it used in any way shape or form? That chunk of fabric just paralyzed me! It's been sitting there staring me down for a couple weeks now and I figured I had to do something with it or go crazy. So this is it. So far anyway. Now that I've cut into it, maybe it won't be so daunting anymore. I mean, it is just fabric! Granted, it is quite nice fabric. And I like to sew. Sooooo, maybe I need to get out the sewing machine and whip something up with it instead of trying to finagle it onto my cards.
And maybe I'll try my hand at a few more ideas with the Paisley Prints stamps too. They really are cute and I like paisley. Just need to find some time to play around with them a little. That's it.
Thanksgiving is coming soon. Hope you're spending the holiday with people you love and care about. Our son will be back in town on Wednesday evening (tomorrow!) for a short 3-day visit. That means I'll probably not even make it down to the stamping cave over the weekend. Oh well, you'll probably be so busy trying to figure out what to do with all those turkey leftovers you won't be checking in here anyway.
Have a very blessed Thanksgiving and remember to thank God for all His many gifts!
Sharon

Monday, November 22, 2010

Gingerbread Couple

Oh, I have the absolutely cutest little card to share with you today! It just puts a silly grin on my face when I see it! :) I had seen a card made by Jackie Topa here that I fell in love with. But you know me, I just had to make a few changes here and there to fit what I wanted. Jackie had some little tiny "gingerpeople" (is that a word?) on her card, but since it's just hubby and me around here nowadays, I thought I'd only do a couple. Now isn't that cute?? I also changed around the clothes a bit too. Ah well, hope you like mine after you go check out Jackie's.


Stamps: Sweet Season
Cardstock: Whisper White, Crumb Cake, Real Red cardstock with Candy Cane Christmas Designer Series Paper
Ink: Real Red and Crumb Cake pads and Basic Black Marker
Accessories: Big Shot with Tasteful Trim Die, Fancy Flower Punch, Star Punch, 1" Circle Punch, Jewelry Tag Punch, Boho Blossom Punch, Two-Step Bird Punch, Decorative Label Punch, Sponge Daubers, White Gel Pen, 2-Way Glue Pen, Dazzling Diamonds Glitter, and Dimensionals


Didn't I tell you that this card was cute? I just love these gingerbread people with their cute little clothes.

Don't you like the Candy Cane Christmas DSP? All the patterns are so cute. And this candy cane striped pattern is the absolute best. I can almost taste the peppermint! I just love candy canes!! That reminds me - they'll be in the stores soon. I'm gonna have to stock up for my holiday fix! Other times of the year chocolate is king, but at Christmas I need my peppermint candy canes!

Thanks for stopping by. Hope you enjoyed my take on Jackie's idea. Why not try this yourself and add your own twist to it? I'd love to see what you make!
Sharon

Sunday, November 21, 2010

Joyful Snowflakes

My goodness! I can't believe how the days keep flying past and I seem to get farther and farther behind! I had hoped to get something posted every day last week, and that sure didn't happen. Guess that's gonna be my plan for this week again. Maybe I'll do better. We'll see!!!
Since today is Sunday, I thought I'd share something with a Christmas theme that is rather peaceful and serene. At least that's how it looks to me!
Stamps: Word Play
Cardstock: Bashful Blue, Marina Mist, and Shimmery White
Ink: Marina Mist Classic and Whisper White Craft Ink
Accessories: Big Shot with Northern Flurry Embossing Folder, Northern Frost Decorative Strip Die, Basic Rhinestones, Decorative Label Punch, Frost White Shimmer Paint, 2-Way Glue Pen, Dazzling Diamonds Glitter, Sponge Dauber, and Dimensionals
Hmmm, with all those accessories that were used, you'd think this card was hard to make. But that wouldn't be true at all. It's simple without being too plain. The shimmery paint sponged over the embossed snowflakes is a wonderful counterpoint to the Shimmery White cardstock used to diecut the elegant snowflake accents. Of course a few rhinestones and a touch of Dazzling Diamonds dress it up nicely too.
This card has been demonstrated at several workshops lately, and everyone ooohs and aaahs over it. There's just something perfect about shades of blue and snowflakes for winter. Hope you enjoyed this card. Thanks for stopping by today.
Sharon

Friday, November 19, 2010

Traditional Red and Green

Yes, I always have to make a few of the more traditional style of cards each year. And what could be more traditional than evergreen boughs and ornaments all done up in red and green. Yep, that's just spells Christmas to me! This year I was in a quandary about my lack of greenery stamps to use for a card like this, then I started seeing that others were co-opting the Lovely As A Tree evergreen to use for branches instead of a full tree. What a novel idea! That stamp set has been in my stamping arsenal for ages - probably since it's inception! And I've used it many times for many, many different cards over the years. But this is one idea I had never thought of, and probably never would. I love it when some creative person is thinking outside the box and comes up with a winning idea like this one! I have no idea who came up with this first, but I love it!! Hope you do too. Now go get that set off the shelf and dust it off. Time to give it a little love.

Stamps: Lovely As A Tree, Grateful Greetings, Tags Til Christmas
Cardstock: Real Red, Very Vanilla, and Brushed Gold
Ink: Garden Green, Real Red
Accessories: Ornament Punch, Real Red 1/8" Taffeta Ribbon, Basic Pearls, and Dimensionals


Once the idea and layout are there, this is an incredibly clean and simple card to put together. This was one of the class projects the ladies made this month, and a couple decided on this one for their Christmas card this year. The CAS (clean and simple) lines make this a good choice for making multiple cards at Christmas time. I know we're all in a time crunch this time of year, so I like to give you lots of CAS cards to choose from for your holiday greetings. In fact, I'm sure I'll be sending out a few of these to my family and friends.


If you'd like to make this or any other of the many cards I've shared with you, you can get all your stamping supplies by ordering online. How quick and simple is that? Just click on the "Order Online Button" on the right side and you can get your shopping done in minutes! Of course if you ever have any question about any card I've shared, just leave a comment and I'll get in touch with you. Have fun stamping your Christmas cards this year. You can do it!

Sharon

Wednesday, November 17, 2010

Peaceful Deck the Halls

Just have a wonderful quick card for you today. Have I mentioned how much I love the Deck the Halls Designer Paper? The colors and prints are so very vintage and make it soooo easy to make lovely cards. Or use just little bits for accents on cards or other projects. Anyway you use it, you'll love it! Because it's so gorgeous, it makes for a super-quick card! For this card I'm sharing today, I used one of the designs that looks to me to be made for an elegant and quick scrapbook page. I hated cutting into it because it is so gorgeous, but it makes a great background layer for a card too, so cut away!


Stamps: Peaceful Season
Cardstock: Crumb Cake, Always Artichoke, Cherry Cobbler with Deck the Halls Designer Series Paper
Ink: Cherry Cobbler, Always Artichoke, Crumb Cake
Accessories: Sponge Dauber, Cherry Cobbler Seam Tape


After adding the DSP to the card, there really is very little else needed on this one! I love the soft look of the poinsettias as a backdrop for the elegant script sentiment. About the only thing extra was sponging with just a smidge of ink around the edges. (in fact, it's very hard to tell that I even did that!) Add on the awesome shimmery seam tape along the side, and you're done.

I'd say this was arguably the quickest card I've ever made in my whole stamping life of about 35 years. Now that's saying alot!!

Have a great day. Thanks for stopping by.
Sharon

Sunday, November 14, 2010

Bells and Boughs Again

This has got to be one of my very favorite stamp sets in the Holiday Mini. Oh, what? Did I say that already about another set? Or two, or three maybe??? Yeah, I can't help myself! This mini has been the absolute worst one for my pocketbook in awhile! I just want it all!! Hey SU!, can you just ship me one of everything?? Ok, let's be serious now for just a moment. As much as I would like it, I really can't have one of everything. But I can sure have fun with what I did get, right?
While planning for class, I just hit a brick wall with the last card for them to make. Urgggghhh! I just hate when that happens! But ta-da!! Stampin' Connection to the rescue! There was a totally fabulous card there by Jennifer Weide that would be perfect for my ladies. Of course I had to give it a little tweak here and there, but the colors, design, stamps used, and layout was all hers. I just made it a bit simpler so my class ladies wouldn't lynch me and refuse to stamp anymore 'cuz they thought it was too hard for them. It still remains true to her idea. Thanks Jennifer - it's so lovely!

Stamps: Bells and Boughs and A Cardinal Christmas for the words inside
Cardstock: Soft Suede, Crumb Cake, Cherry Cobbler, Always Artichoke, and Very Vanilla with Deck the Halls Designer Series Paper
Ink: Stazon Jet Black, Cherry Cobbler, Always Artichoke, Wild Wasabi, and Crumb Cake
Accessories: Sticky Strip, Champagne Glass Glitter, Scallop Border Trim Punch, Aqua Painter, Mini Glue Dots, Sponge, and Dimensionals


Isn't it pretty? The changes I made were minor. Jennifer had stamped two of the poinsettia & pine images on the layer and I only did one. I added the scalloped edges on the sentiment. See, very minor changes.

You know I'm a sucker for anything with watercoloring, so I had to do this card. First touch with the Aqua Painter to the poinsettia, and yikes I thought I'd blown it with color way too dark. But as more color was added in, I loved the different depths of color on the petals. I'd love to get this whole card framed for a Christmas accent piece. Hmmm, I'll have to look into that....


This is the first time in ages that I'd done a strip of tape and glitter on a card. This Glass Glitter in the Holiday Mini is just beautiful. It's chunkier than normal, but didn't feel sharp. That sounds odd, but it was very smooth to the touch. And the Sticky Strip holds in onto the card like magic. Anyway, I'm now hooked on this stuff and I'll have to find more places to use it! Hope this glitter makes it into the catalog - it's the best!

Inside I added a light image of the holly and berries tucked over the sentiment. It seemed to be just enough to offset all the old-fashioned elegance of the card.

Well that's it for today. Maybe I can check in on one of the Challenges and get some stamping in today. Have a great Sunday!
Sharon

Saturday, November 13, 2010

Another Bethlehem Card

There are so many new products available in the SU! Holiday Mini Catalog that I just didn't know what to try out first. I mean, you just can't put one of everything on a single card, now can you? Nah, probably not if you're older than 5 years old anyway. So I've been picking and choosing what to play with first. I had ordered the Waffle Paper Assortment early on 'cuz it looked so interesting, but then couldn't figure out what to do with the stuff. Finally there was a glimmer of an idea. And after a bit of tweaking, this is what we have..... Just elegant gorgeousness!! (Yep, that was me patting myself on the back a little, but I really am happy with it!)

Stamps: Come to Bethlehem
Cardstock: Always Artichoke, Cherry Cobbler, Very Vanilla, and the Waffle Paper Asst.
Ink: Gold Encore, Cherry Cobbler, and Always Artichoke
Accessories: Heat Tool, Gold Embossing Powder, Piercing Tool and Mat Pack, Gold Mini Brads, Big Shot with Petals A Plenty Embossing Folder, and Victoria Crochet Trim
The gold embossing of this image just mades it so elegant. I love the simplicity of the design - not too much detail, but very recognizable. I chose to not emboss the sentiment so it would stand out a bit. And that Waffle Paper, what can I say?! It just adds a pop of wow to the whole look. There's so many layers of texture and richness going on, that it takes another look or two to really appreciate the whole thing.

I even added a little left over strip of Cherry Cobbler cardstock to the inside to give it a finished look. The words inside were stamped with Always Artichoke to contrast.
Yes, I'm happy with this one. Lately so little time can be spent on just creating that I'm so tickled when I come up with a good one! Just bear with me! I'll try not to toot my own horn too much tomorrow!
Find time for stamping - it keeps you sane and happy. And thanks for dropping by...
Sharon

Friday, November 12, 2010

Candy Cane Holidays

My goodness! What a week this has turned out to be! This was class week at the stamping cave, so we had ladies coming and going for the different class times and days. That always makes it hectic as far as I'm concerned, but lots of fun seeing everyone!! Add in the funeral and a workshop tonight, and I'm one tired little stamper. Can't believe all the ladies left already and it's not even 9:30. They all either have something major going on tomorrow or have to work later tonight. So that means the rest of my night is free and I get to catch up a bit on my blog.

Since it was class week, I need to share the projects that everyone made. I think there were some awesome cards this time around, and hope you enjoy them. Today's post is a fun, modern style card. This isn't usually the type of card I send out myself, but it went over really big with my students.

Stamps: Big on Christmas, A Cute Christmas, and Many Merry Messages
Cardstock: Whisper White, Wild Wasabi with Candy Cane Christmas Specialty Designer Paper
Ink: Stazon Jet Black pad, Baja Breeze, Wild Wasabi, So Saffron, Soft Suede, and Real Red markers
Accessories: Ticket Corner Punch, Jumbo Brads, Real Red 5/8" Grosgrain Ribbon, Mat Pack and Piercing Tool, and Dimensionals


I've totally fallen in love with this striped DSP. The glittery red stripe makes it so darn cute - I wish I had a whole pack of just that one design!! Now I'm trying to figure out what to do with the other patterns so I can use them up and order some more! LOL Any ideas? Or anybody want to trade??? Oh well, not to worry, I'm sure I'll be thinking of different ways to use them up.

I always like to stamp a little something extra on the envelope and inside of the card. Had a little trouble finding something that would work, but I think these candy canes worked out just fine.

Thanks for stopping in today for a look-see. Hopefully, if all goes well I'll be back with another class installment. For now though, I think it might be time for an early night as we're getting the little munchkin (aka grandson) at 8:00am. I really, really need to catch up on my beauty sleep!!
Sharon

Tuesday, November 9, 2010

Sympathy for a Friend

Today was a sad day. The mother of a dear long-time friend of mine died from cancer. It had been a long fight, but now it was finished. Since my friend and I raised our kids together, I had to make a special card for her and one for each of the girls too. So that's what I did during baby's nap time today. He was such a good boy and let me actually get something done today!!
Here are two of the cards I came up with for them. The first one is for my good friend Linda....
Stamps: Charming, French Foliage, and Teeny Tiny Wishes
Cardstock: Sahara Sand, Chocolate Chip, Bashful Blue, and Very Vanilla
Ink: Bashful Blue, Sahara Sand, and Early Espresso pads, Marina Mist and Old Olive Markers
Accessories: Eyelet Border Punch, Kraft Taffeta Ribbon (retired), and Big Shot with Little Leaves Sizzlit Die
I didn't use the same color of marker as cardstock on the flowers because the Bashful Blue Marker was just too pale. And I also went with a darker ink for the sentiment because it's so tiny. I thought it might be easier to read if the ink was darker. You know, something funny happens to our eyesight as we get older and we just have the craziest time trying to read that little teeny tiny print!!
My second card is for one of my friend's daughters. She likes things bold and bright and has a very outgoing personality. I thought this next card would be something that she would appreciate. Hope so anyway!
Stamps: Autumn Splendor, Teeny Tiny Wishes, and Itty Bitty Backgrounds (retired)
Cardstock: Very Vanilla, Rich Razzleberry
Ink: Cajun Craze and Rich Razzleberry
Accessories: Word Window Punch, Modern Label Punch, Aqua Painter, Sponge Dauber, and Orchard Originals Ribbon(retired)
Totally different look to this card than the last, but I think it will still convey my feelings. It's hard to say goodbye to a woman that was such a gregarious and fun-loving person who would be the first one there to help anyone in need. Grandma Kelly, you will be missed by many. God has called you home. Rest in peace.
Sharon

Monday, November 8, 2010

Christmas Greetings

First off I have to apologize for being out of commission lately. Seems like these past several months we've been having more than our share of computer snafus. Luckily none have necessitated buying a new computer yet. Just don't have the cash on hand to want to do that right now. Oh well, this computer stuff is crazy. It's funny how it invades your life so much you can't live without it! Now on to the good stuff that you came by to see.

For those of us that are lucky enough to be demonstrators, Stampin' Up! sends us a magazine with lots of ideas and useful information each month. This past magazine I loved the look of the front cover with about a dozen card ideas. Now I don't have all the stamps they used or all of the lovely embellishments. But after looking at the cover awhile, I was inspired to make a card. I went over to my work table and started playing around. Pulled this out, and grabbed some of that, no that didn't work. Fiddled around with materials, colors, and stamps some more. Hmmmm, that's better. Add a few snowflakes..... oh yeah, now I like it! And here's what I created...
Stamps: Serene Snowflakes, Grateful Greetings
Cardstock: Crumb Cake, Cherry Cobbler, Old Olive, Very Vanilla, and Shimmery White
Ink: Crumb Cake, Cherry Cobbler
Accessories: Big Shot with Northern Frost Die, Decorative Label Punch, Cherry Cobbler Seam Binding, and Dimensionals
Funny thing about this card is that it doesn't look like any of the cards featured on the front cover of the magazine! I love the look, but it sure isn't what I had started out making. Don't you love those happy occurrences? That's what keeps life interesting. Well, that and a whole lot more!! lol
I love the lacy look of the snowflakes from the Northern Frost Die. Much more detail than with a simple punch. In fact, I like them so much I've been tucking them everywhere - including inside the cards too! This is one of those accessories that I'm finding I can't live without.
Another new accessory used here is the seam binding ribbon. That ribbon is sooooo pretty! There's a bit of a shimmer to it, and it's so thin and pliable. It makes the prettiest knots or bows, and lays so nicely. It's definitely a winner! Now I need to get the other two colors it comes in!! You'd think with everything I own that I wouldn't need or want anything else. Ah, the lovely addiction of stamping!! Can I help you with your addiction? If you'd like to order anything, I'd be happy to help you.
Thanks for stopping by today. Hope you enjoyed your visit. Come back soon...
Sharon