Monday, May 27, 2013

Oh Whale Will Be Missed

Here it is, getting down to the wire for getting those last minute orders in from the retiring catalog.  There are so many stamp sets that I'll miss, so I thought the ladies that make cards for the soldiers should use some of these.  Plus I had some of those Cute Clip whales left over, so why not?  So I planned a card, got it made (with a few changes on the way), and then realized I hadn't used the little whales!  How funny!!  So I sat back down and made another card making sure the whales were used this time.  So you get two totally different cards today just because I lost my focus on those little whales.  What a bargain - grin...

Stamps:  Oh Whale and Label Love(new)
Ink:  Marina Mist
Paper:   Whisper White, Bashful Blue and Marina Mist cardstock with Sunshine & Sprinkles Designer Series Paper
Accessories:  7/8" Scallop Circle Punch, 1 1/4" Scallop Circle Punch, Modern Label Punch, and Dimensionals

Simple and to the point.  The Paper is the focus on this card.  Too pretty to hide!  A quick sneak peek of a new sentiment set too!
Stamps:  Oh Whale
Ink:  Not Quite Navy
Paper:  Whisper White, Crumb Cake, Tangerine Tango cardstock with Sycamore Street Designer Series Paper(ret)
Accessories:  Big Shot with Happy Whale Clearlits Die, Word Window Punch, 1 3/8" Circle Punch, 1 3/4" Scallop Circle Punch, Cute Clips Elements (whale), Simply Scored with the Borders Scoring Plate, Sponge quarter, and Dimensionals
I love this cute little whale and the Clearlits Die that makes it so easy to cut out and pop it up.  The Borders Scoring Plate was used to give it some wavy water for the whale to swim in.  There's sponging around the edges of the Crumb Cake layer and on the waves.  It really shows up better in real life.

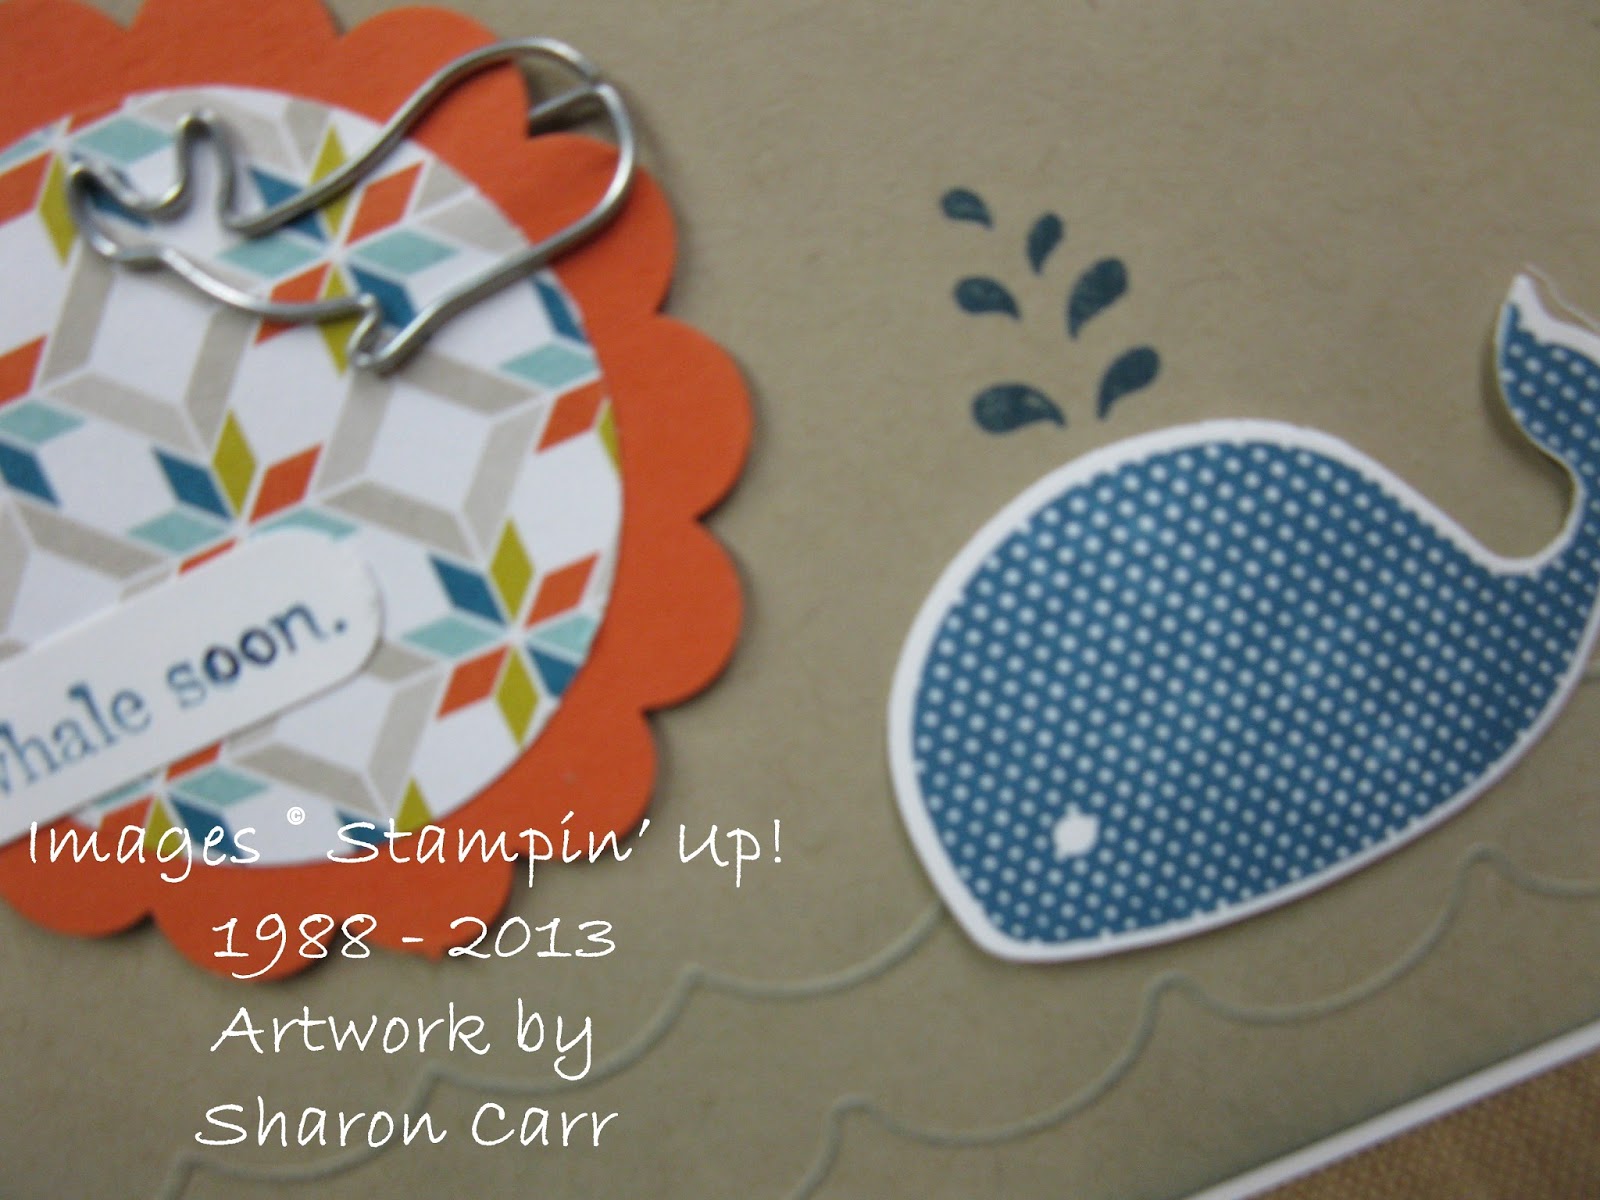
Whale, hope you liked these last minute cards.  Both were easy to make and fun to send.  The ladies at church will be making more of these on the first Tuesday of June.  I had to cancel out on them this month because I was so sick.  So that means they've got lots and lots of cards ready to stamp and put together.  Hope the whole group can make it!  We always have so much fun stamping and jabbering away.  When listening to all the chatter and laughing, I'm sometimes amazed at all that gets accomplished in those two hours every month!  Thanks ladies! You're all the greatest for taking time out to fulfill my dream of sending cards for our military to show our love and support!  You know I could never do this without each and every one of you!!   Hugs, Sharon

Thursday, May 16, 2013

Last Call

In many ways I don't like this time of year.  When all the changes and retirements are listed for all the stamps and products I've used and grown to love in the past year.  This year is no different than any of the others.  I'm so disappointed to see some of my old favorites ( and some new favorites) be retired to make room for all the fun, new items coming up.  Today's card uses a stamp set and a Sizzlit from the Spring Mini that won't make it to the new catalog.  I thought they were lots of fun to use and have used them several times this spring.  So I needed to share these items quickly before they were gone for good.  If you like them too, you've only got til the end of the month to get them before they're gone!  Here you go.....

Stamps:  Wishes Your Way
Ink:  Pacific Point
Paper:  Pacific Point and Whisper White cardstock and Sunshine and Sprinkles Designer Series Paper, and Polka Dot Parade DSP
Accessories:  Big Shot with Pinwheel Sizzlit, 1/8" Silver Mini Brads, Marina Mist Striped Organdy Ribbon, Dimensionals, and either a wooden skewer (or cute little coffee stir sticks that are white with primary color stripes)
I love how fun this card is!  Don't you remember having those twirly pinwheels and running around so there was enough 'wind' to make them go around as fast as possible.  Anyway, doesn't this bring back memories and make you feel young again? 

I'll be honest and tell you the first time I tried to make one of these pinwheels, it was a real struggle.  But now I've got an easy trick.  Put the brad in through the back, fold in each point onto the brad all the way around, hold it tightly.  Now for the trick - pull the brad out from the back and put into the front so you can see the head.  Easy peasy.

I thought all these prints and colors just lent themselves to the whole pinwheel look.  Very lighthearted and springy.  Hope you have fun with this idea.  If you like pinwheels, this sizzlit makes it soooooo easy.  It cuts it and puts in all the holes needed to make it.  Takes all the trouble out of it and leaves in all the fun.  Get it while you can!

Ok, that's it for today.  Thanks for all the lovely comments that have been left.  I appreciate any input and comments you have for me.  Happy stamping, Sharon

Wednesday, May 15, 2013

Card for My Daughter

My daughter is a wonderful mother.  And I'm so very proud of her.  It amazes me that she holds a full time job, keeps her house up nicely, and makes each of her two boys feel so very special.  She takes them for walks and to the park every day that the weather allows.  And they love spending time outside with her.  I wanted to make her a special card for Mother's Day to let her know how proud I am.  Thought I'd play with some of the new In Colors that will be available in another couple of weeks.  I hadn't felt up to doing much stamping lately, so I hadn't even looked at the new colors.  But I gotta tell you, you're going to LOVE them!  Yeah, that might have been a little shout there.  Sorry, I just got carried away with how much I love these new colors.  Soft pastels and warmer brights - yippee!  Can't wait til you can use them too.

Stamps:  Secret Garden, Betsy's Blossoms,  Papillon Potpourri, and Wonderful Favorites(ret)
Ink:  Crisp Cantaloupe, Pistachio Pudding, Strawberry Slush, and Pink Pirouette
Paper:  Whisper White, Pink Pirouette, and Crisp Cantaloupe
Accessories:  Big Shot with Secret Garden Framelits, Elegant Butterfly Punch, 2-Way Glue Pen, Dazzling Diamonds Glitter, Rhinestone Basic Jewels, and Dimensionals
Aren't these new colors fabulous?  I think the Crisp Cantaloupe will be my favorite, but the Pistachio Pudding is coming in a close second.  I stamped the large flower on Pink Pirouette cardstock with the new Strawberry Slush ink.  I then stamped the solid stamp with Pink Pirouette ink right in the center to add color.  Nice look, right?  Then used the matching Framelits set to cut it out. It's hard to see in the photos, but there's touches of Dazzling Diamonds glitter on the center of the flower.  The  background was stamped with Pistachio Pudding, Cantaloupe Crush, and Pink Pirouette.  All really soft, pretty colors for spring.  Love them together!!

The butterfly was stamped with the same Strawberry Slush ink, but on white cardstock and punched out with the Elegant Butterfly Punch.  I added the rhinestones to give it a little more bling.

Decided it was time to get this posted.  Seems like I started writing this two days ago and got sidetracked sometime along the way.  Life is getting crazier as I go on.  My doctor is referring me to an allergist and immunologist since I'm not really getting back to normal (whatever that is!!).  Where will it all end?  Who knows.  I'll just try to keep posting when I can.  Hope you keep coming back to see what's new and don't give up on me yet.  Thanks for stopping by and I'll be getting some more stamping done soon.  Have a great day - Sharon

Saturday, May 11, 2013

Today's card is a little different than my normal offerings.  This card came about because a friend ordered the Ex Libris background stamp and wanted me to help her come up with an idea for it.  This stamp is so not anything I would ever choose myself, so this was a real challenge.  And after fooling around several days trying to get something to work, all at once I had an idea and it came together so easily I was surprised.  Here's the card I made with it...

Stamps:  Ex Libris, Four Frames, and Fabulous Phrases
Ink:  Versamark, and Cajun Craze
Paper:  Cajun Craze, Crumb Cake, and Very Vanilla
Accessories:  Clear Embossing Powder, Heat Tool, Decorative Label Punch, 3/16" Metallic Brads, Piercing Tool and Mat, Sponge, and Dimensionals
I wanted to make the card look like it was an antique book with a tooled leather cover.  After a few tries, I hit on using Crumb Cake cardstock and Versamark ink to emboss the image.  It was then heavily sponged with Cajun Craze ink to enhance the lovely detail on the stamped image.  It was fun seeing the detail come to life the heavier I sponged.  Yes, it was a little work, but it was definitely worth it!

I chose the Four Frames for the 'title' on the book.  It was punched out with the Decorative Label Punch that mimicked the label on the main stamp.  It was popped up with Dimensionals to make it stand out.

The final touch was some metallic brads in the corners to go with the 'tooled leather' look.  All in all I'm very happy with how this turned out.  It was a struggle and a challenge to work with something so different than my style, but it was fun getting stretched and stamping outside of my little comfort zone.  Thanks for stopping by today.  Hope you enjoyed this look.  See you soon!  Make time to stamp this weekend - it's what I wanted for Mother's Day!!  Sharon

Friday, May 10, 2013

Frilly Feminie card

I do love to make cards that are soft and feminine looking.  They're my very favorite kind of card to make, and you can probably tell from what I post the most of.  At least I think that's what I mostly post.  Who knows, I'm not going to go back and count.  How about you just take my word for it, ok?  Today's card is going to be one of the projects for next week's class.  It has several different elements that all together scream girlie-girl card.  Hope you like it!

Stamps:  A Round Array
Ink:  Crumb Cake, Primrose Pink
Paper:  Crumb Cake, Lucky Limeade, Very Vanilla cardstock with Tea For Two Designer Series Paper
Accessories:  Big Shot with Lacy Brocade TIEF, 5/8" Flower Trim, Primrose Petals Stitched Ribbon, 7/8" and 1 1/4" Scallop Circle Punches, Sponge, and Dimensionals
Ok, does it get very much more frou-frou than this?  I don't think so.  I am in love with the Flower Trim accents.  Just cut off as many flowers as you need and you're good to go.  To coordinate more with the flowers on the DSP, I lightly squished the flowers onto the Primrose Petals ink pad.  This gives color to the edges of the flowers, but still keeps them mostly the soft Vanilla color so they have a vintage feel.

I lightly sponged the embossed Vanilla cardstock with Crumb Cake ink to highlight the embossed design.   This also softened the harsh Vanilla cardstock to a more vintage look.

Stampin' Up! is having a Spring Special of the A Round Array stamp set and the coordinating 7/8" Scallop Circle Punch right now.  They will both be in the catalog coming out in another few weeks (I can hardly wait to see it!!!), but you can get them now bundled together for a 15% discount.  If you're interested, contact me or click on the right to order.  The set is really versatile and I've found a few things to use it on already!

Ok, I need to get back to getting cards ready for next week's classes.  Thanks for stopping in today to see what's new.  Hope you were inspired to get out your stamps and play.   Have a great day and get creative - it makes you happy!!  Sharon

Wednesday, May 8, 2013

Polka Dots and Cupcakes

The card I have to share with you today is CASEd from a fellow demonstrator, Kendra.  Isn't it wonderful having such creative friends that share ideas with you?  That's one of the very best things about the Stampin'Up! community of stampers - they are wonderful, caring, creative ladies that are happy to share what they love to do.  I thank God that I joined this company over 15 years ago.  Who knew that a love of crafting would lead to making so many friends and a business that is so much FUN!  Can't beat it!  Oops, seems like I'm digressing a bit here.  You came to see the latest stamping idea, didn't you?  Well, I certainly wouldn't want to disappoint, so here we go...

Stamps:  Create A Cupcake
Ink:  Pool Party, Pink Pirouette, and Early Espresso
Paper:  Pool Party, Pink Pirouette, Early Espresso, and Whisper White
Accessories:  Big Shot with Square Lattice TIEF, Cupcake Builder Punch, 1 3/4" Circle Punch, 1 1/4" Circle Punch, 3/4" Circle Punch,  Large Oval Punch, Scallop Oval Punch, 2 3/8" Scallop Circle Punch, 2-Way Glue Pen, and Dimensionals

"
Whew!  Did you catch all those punches?  When I got done with the card, it looked like a punch invasion on my work table!  grin  But having all those punches to use makes this card so easy peasy to make.

Have you embedded cardstock pieces into a cardstock layer before?  It's really simple and looks so cool.  Just punch whatever shapes you want to use, attach them to the white cardstock base, then emboss with the Square Lattice embossing folder.  (other embossing folders will work, but this one works the very best!!)  After embossing, the cardstock pieces really seem to be embedded and all just one piece of printed paper instead.  In fact, it almost feels like a piece of fabric!

The darkness of the Early Espresso cardstock used here really makes the two light colors look really sweet together.  Yes, I know I've never seen a cherry that color of light pink, but who cares.  That's where artistic license comes in.  You could change around the colors used to be brighter and it would totally change the look of this card.  Oh the joys of playing around with color and design.  The possibilities are pretty much endless!

That's it for today.  Thanks for stopping in again.  I appreciate any comments you might care to leave.  It always makes my day to hear from you!

Sunday, May 5, 2013

Birthday Wishes card

My birthday was one week ago today.  One of my friends I've made through Stampin'Up! sent me a card that I thought was simple, but really pretty.  I thought I'd make a similar card to share with you.  Since I'd already used up the exact print papers she used from the Print Poetry DSP, I changed around the colors and give you my version.  Thanks for the idea Michelle!

Stamps:  Bring on the Cake
Ink: Raspberry Ripple
Paper:  Very Vanilla cardstock and Print Poetry Designer Series Paper Stack
Accessories:  Raspberry Ripple Stitched Ribbon, Scallop Edge Border Punch
I think this might very well be the easiest card I've ever made in my whole life!  Everything was attached to a 4" x 5 1/4" layer of Very Vanilla cardstock.  This was then attached to a folded half sheet of Very Vanilla cardstock.  Add a little edge punching on one of the strips of print DSP, and wrapping the ribbon around it and tying into a square knot.  What could be easier?  Since you don't need many supplies for the card, this would be a great basic card sketch if you're a new stamper just getting started. 

Another great thing about this card sketch is how easy it would be to make this into any kind of card you need by just changing the sentiment.  I can see this would be great for all your thank you, thinking of you, get well, etc, etc, etc.  As long as you've got a sentiment, you're all set!

Hey, just wanted to remark that this is two days in a row that I've gotten a post in.  Is it time to start celebrating yet?  Oh yes, it is Cinco de Mayo, so why not celebrate anyway???  Have a fabulous day.  I need to get outside and get some Vitamin K (sunshine).  Happy Sunday!  Sharon

Saturday, May 4, 2013

Dapper Dad Watch Card

Well, I can start this out one of two ways - either complain about being sick again, or get right into sharing the card for today.  Since I'm so tired of being sick and complaining about it, let's get right into the fun stuff and forget about the not-so-fun stuff.  Today's card used those fun Soda Pop Tops.  Don't you love them??  If you haven't used them yet, you really ought to give them a try.  I'm pretty sure you're gonna love them too!  Here's the card for you...

Stamps:  Dapper Dad and Delightful Dozen 
Ink:  Cherry Cobbler, Soft Suede, and Not Quite Navy
Paper:  Cherry Cobbler, Very Vanilla cs with Parker's Patterns Designer Series Paper
Accessories:   Big Shot with Apothecary Accents Framelits, Soda Pop Tops, Natural Trim Ribbon, 1" Circle Punch,  Sponge, and Dimensionals
I had seen someone else use the flattened Soda Pop Top for the watch face and thought it was such a cool idea.  So of course I had to try it too. It  looks so much like those watches with the oversized watch face that seems to be popular right now.

I used the Natural Trim Ribbon as an accent to tie in with the Soft Suede ink on the watch band.  Thought they went well together.  The Father's Day sentiment is stamped in Cherry Cobbler ink to tie in with the DSP print color.   I sponged the one layer with the Cherry Cobbler ink also.

This is a simple card to make, especially when you have the tools to make it easy like the Apothecary Accents Framelits.   Love being able to quickly die-cut the shapes I want to use for a project. 

That's it for today.  Hope I'll be back soon.  Thanks for sticking with me and my very erratic posting lately.  I'm trying to post regularly, but if I'm too sick to stamp there's just nothing to post.  Boohoo!  Have yourself a great weekend.  Sharon