Wednesday, April 28, 2010

Sneak Peak

If you're one of the lovely ladies that come to classes here, I'm giving you a little sneak peak of one of the projects you'll be making in a couple weeks. This one showcases a stamp set that will be available to you on May 1st and it's simply gorgeous! I've made a few things with this set already, and I find it to be very easy to work with. The set lends itself to many vintage style applications, but this time I thought I'd try something more English garden style with the softer colors and not giving it any sponging or antique colorings. Hope you like the look and are excited about making this card yourself! And just a little hint - you'll be using more new items from the very new Summer Mini Catalog on your other projects too! I can hardly wait! Hope you're as excited about this as I am!!! LOL


Stamps: Elements of Style
Cardstock: Gable Green, Pretty in Pink, and Whisper White
Ink: Basic Gray, Gable Green, Melon Mambo, Crushed Curry, and Bermuda Bay
Accessories: Pink Striped Grosgrain Ribbon, AquaPainter, Filigree Designer Brads, Sending Love Pink Designer Brads, Frost White Shimmer Paint, and Dimensionals


This card is just so shimmery pretty in person, I really wish you could see it. I tried several different picture angles, but it was very stubborn and wouldn't sit and look pretty for me! You'll just have to take my word for it that this is really delicately pretty.

I'm kind of bummed about it though. I actually was using a Stamping 411 Sketch Challenge to make the card, but I missed the deadline for posting. Some days you win, some days there's just too many distractions and things don't get posted in time. Such is life. I'll take my slightly damaged ego and give the next challenge a try. Maybe starting a little sooner than the morning of the last posting date this time! lol

Have fun stamping!
Sharon

Happy, Happy Birthday

...to me that is. Looks like another year has come and gone. Not much has changed other than a few more wrinkles and more gray hair. But it's a great day - the sun is shining and I'm healthy, so life is good. God has blessed me in so many ways with wonderful friends who I treasure immensely. When birthdays roll around, I tend to take stock of my life and where I'm headed. Do you do that too? Most of the time I'm happy with how I've been living my life and the people I've surrounded myself with. But there's always room for improvement - hence the soul searching.

Now before I get too deep and philosophical, I think I'd better get back on track with what you came here for, right? A few days ago I was working with Bashful Blue cardstock and that cool houndstooth patterned paper from the Sweet Pea Designer Series Paper Pack. There were a few extra pieces sitting around and I finally did something with them. Here's what I created.


I just love Chocolate Chip with almost any of the soft subtle colors we have. And Bashful Blue is right up there near the top as a favorite. No matter what elements are put together with these two colors, I seem to gravitate towards them.

Stamps: For All You Do
Cardstock: Bashful Blue, Chocolate Chip, Very Vanilla cardstock with Sweet Pea Designer Series Paper Pack
Ink: Chocolate Chip and Bashful Blue
Accessories: Scallop Trim Border Punch, new Itty Bitty Shapes Punch Pack, Chocolate Chip Narrow Grosgrain Ribbon, Silver Mini Brads, Ice Round Rhinestone Brads, and Dimensionals


I have to admit that the little flowers didn't really fit the new punch, but I was in a hurry and it seems to have worked out just fine. Unless you're really looking at those little blossoms, you don't notice that they don't quite match up. Does it bother you? I hope not. I would really hate to cause any 'unmatched punching' anxiety out there. lol In fact, if I hadn't mentioned it to you in the first place, you'd probably be running to quickly make something using that set and punching out the flowers and wondering why they didn't match up. So now you'll just have to buck up and deal with this nicely!! As you get older (and hopefully wiser!) you'll find some things just aren't that big of an issue anymore.

Now about all those gray hairs and wrinkles... That's really something to get all worked up about!! LOL

Wishing you many hours of happy stamping for another year!
Sharon

Sunday, April 25, 2010

Lots of Thank Yous

Yes, the baby shower is over and things are getting back to normal, sort of anyway. What's normal you ask? Well, normal is when my daughter stops by and says, "You know, I really got to get started on all those thank you notes, mom. How soon can we get about 50 of them made?" So down to the stamping dungeon we trek and start looking at ideas. She loves to go through my current basket of set samplers to get ideas. Then she's just like me and says - can we do this layout but change the colors, and maybe the sets too? I find it really hard to totally copy someone else's idea exactly. Somewhere along the line, something has to be changed! I seem to be really weird about that, and that's one of those crazy things we have in common.
So what she chose does not look at all like a thank-you-for-the-baby-shower-gift card, but it is definitely her style. This is what she chose. We quickly measured and cut, stamped and punched, embossed and taped until we got them finished. But I draw the line at writing out all the cards - that's definitely her job! lol I only helped her out with the easy part - making the cards!!
This is her creation. What do you think? Very classy, right? Very baby, NOT! Oh well, as long as she's happy, all is well!
Stamps: I {heart} Hearts, and Many Thanks (retired)
Cardstock: Whisper White, Bordering Blue, and Kraft
Ink: Bordering Blue
Accessories: Big Shot with Textured Impressions Square Lattice Embossing Folder, Scallop Border Punch, Kraft Taffeta Ribbon, and Dimensionals
Like I said, this is a very basic card which I really prefer. I keep coming back to simple layouts that use textures to make an impact. And this new embossing folder is quickly becoming a favorite of mine (and my daughter's too!!). Now while everything is out and scattered around, maybe I need to make a few of these for myself too. With those soft colors, it could really work for many different occasions. Ok, I've talked myself into it. I'm off to stamp a small stack while it's fresh in my mind.
Toodles. Have a relaxing, and reflective Sunday afternoon.
Sharon

Friday, April 23, 2010

Sending Loving Thanks

Ok, you know how it goes - you're always running short of 'thank you' notes to send out. And that's the case for me right now. Since it's almost the end of the Occasions Mini and I have some Sending Love Specialty DSP left over, I thought it would be a good idea to quickly make up some cards using this paper. If I get them in the mail right away, they would still be current when people receive them. Whew, that's pretty convoluted thinking on my part, but I think you're still with me. Right? So I got out my tools and put together several cards, and now I've got to write the notes and get them in the mail before I forget!!


The cards are pretty straight forward, nothing out of the ordinary here. But I thought they did turn out nicely, and I'll be happy to use them. And since I was using dsp from the mini catalog, I thought I'd go all the way and use a stamp set and accessories too so it's all coordinated.

Stamps: With All My Heart
Cardstock: Pretty in Pink, Chocolate Chip, and Very Vanilla
Ink: Pretty in Pink and Close to Cocoa
Accessories: Pink Corduroy Buttons (just love these!!), Extra Large Fancy Flower Punch, and Sponge quarter

Now that this paper is almost retired, I'm finally getting around to using the flip side of it. So far, I had concentrated on the glitzy, glittered sides of this paper pack. But now I'm finding that the plainer sides really are quite nice. Hmmmm.....maybe I might need to get another pack to use later for my personal correspondence. It's really growing on me.

Thanks for stopping by today. Hope you're having a terrific Friday and getting all geared up for the weekend. Don't forget to take some time for stamping!
Sharon

Thursday, April 22, 2010

Sneak Peak

Today I took some time off to just play with a new set and embossing folder that have been sitting here for a whole week! Oh my, how could some totally new stamps not have been touched and given some love yet? Wow, guess I've just been way too busy lately, and I'd better do something about that right away!
My favorite new set coming in the Summer Mini Catalog was the totally gorgeous Watercolor Trio! I just had to have it!! lol Come on, I know you've been drooling over your favorites too! So today I got it put together and kissed it with a bit of ink. Oh yes, I really do like this new set. Here's my first attempt with this set. What do you think?
Stamps: Watercolor Trio
Cardstock: Pretty in Pink, Sahara Sand, Chocolate Chip, and Very Vanilla
Ink: Close to Cocoa pad and Always Artichoke, Regal Rose, and Chocolate Chip markers
Accessories: Big Shot with Square Lattice Textured Impressions folder, Modern Label Punch, Large Oval Punch, Designer Label Punch, and 5/8" Neutrals Brads
I gotta tell ya, the texture on this embossing folder is just awesome! It's so nice I find myself reaching out and touching it all the time! lol What can I say, it's fabulous!
So remember - this great new stamp set and embossing folder will be available on May 1st. You want to get it ordered right away so you'll have plenty of time to play with them!
Happy stamping and thanks for stopping by today.
Sharon

Take one stamp idea....

... add some fun Designer Series Papers, and what do you have??? Why multiple cards that are the same, yet different! That's what I did with this idea I'm sharing today. I wanted to make this one card in class, but it turned out that there wasn't enough of the one print of Razzleberry Lemonaid dsp that I needed. So I figured I'd change the choice of print. Well, looks like I used way more of that package of dsp than I thought I did! For each night of class, there was a different dsp print used. And these are what I came up with...
This is the original card that I planned for classes. It's still my favorite, I think. Sometimes I change my mind. Just not sure - it depends what day it is or something silly like that!
Stamps: Flower Fancy and Whimsical Wishes (retired, so sad)
Cardstock: Melon Mambo and Whisper White cardstock with Razzleberry Lemonaid Designer Series Paper
Ink: Basic Black and Melon Mambo pads with Crushed Curry, Melon Mambo, and Garden Green markers
Accessories: Scallop Border Punch, Melon Mambo Polka Dot Ribbon, Stamp-a-ma-jig, 2-Way Glue Pen, and Dazzling Diamonds Glitter
Here it is with a different print paper. It really changes the look as far as I'm concerned. On these first two prints, the class ladies made the card as I offered it. (I did change up the sentiment for someone, but that's pretty normal during my classes.) But the last group of ladies is where they started a mini revolt and everyone was doing their own thing.
First of all, each one of them decided to use the polka dot side of the ribbon for this card. I guess they wanted more diversity in the prints that were showing.
Then one of the ladies wasn't paying attention to the directions at all and ended up stamping the flower stem 3 times. Then complained she didn't want to use the markers and huff that many times, so she used markers to color in the images directly on the cardstock. Then there was no room for the sentiment, so we used one of the Teeny Tiny Wishes, the Word Window Punch, and added the sentiment on the bottom right of the card. I wish I would have taken a picture of her finished card, because it really was cute. Not at all what I had planned, but that's the fun of stamping. Make a few changes and you have something that looks entirely different.
Thanks for stopping by. Hope you find a bit of inspiration for one of your very own stamped masterpieces. Have a wonderful week!
Sharon

Tuesday, April 20, 2010

Challenge Time

Well, the shower is behind me now and I can get back to creating. This week there is a punch class that I'm teaching, so Monday was devoted to finishing up on that. Today I was bound and determined to join in with the Stamping 411 Saturday Challenge this week. Yes, I know it's Tuesday already, so I had to get it made and posted soon. I loved the look of the sketch and thought it would be fun to work with. And was I ever right! Funny thing is, when I finished making the card, I realized that I hadn't exactly followed the sketch. Oh my, what to do? Rip it apart and do some corner punching like the sketch?? No, I decided to let it stay as it is. So be it. It seems like no matter how hard I try, I can never follow a sketch exactly. But anyway, it is a wonderful sketch to work with and will definitely be added to my stash of sketches for those dry times when there are no ideas to be had rolling around in this old brain of mine.

Here's what I ended up making for this week's sketch. I just love the look of Bashful Blue and Chocolate Chip together. And I had a 4" strip of this cool houndstooth pattern left from the quite awesome Sweet Pea Designer Series Paper Stack. So let's play with it! And I did!! The Occasions Mini is 0nly current for a few more days, and there's so many things I still want to make using these sets and accessories! Oh my!! Where has the time gone?

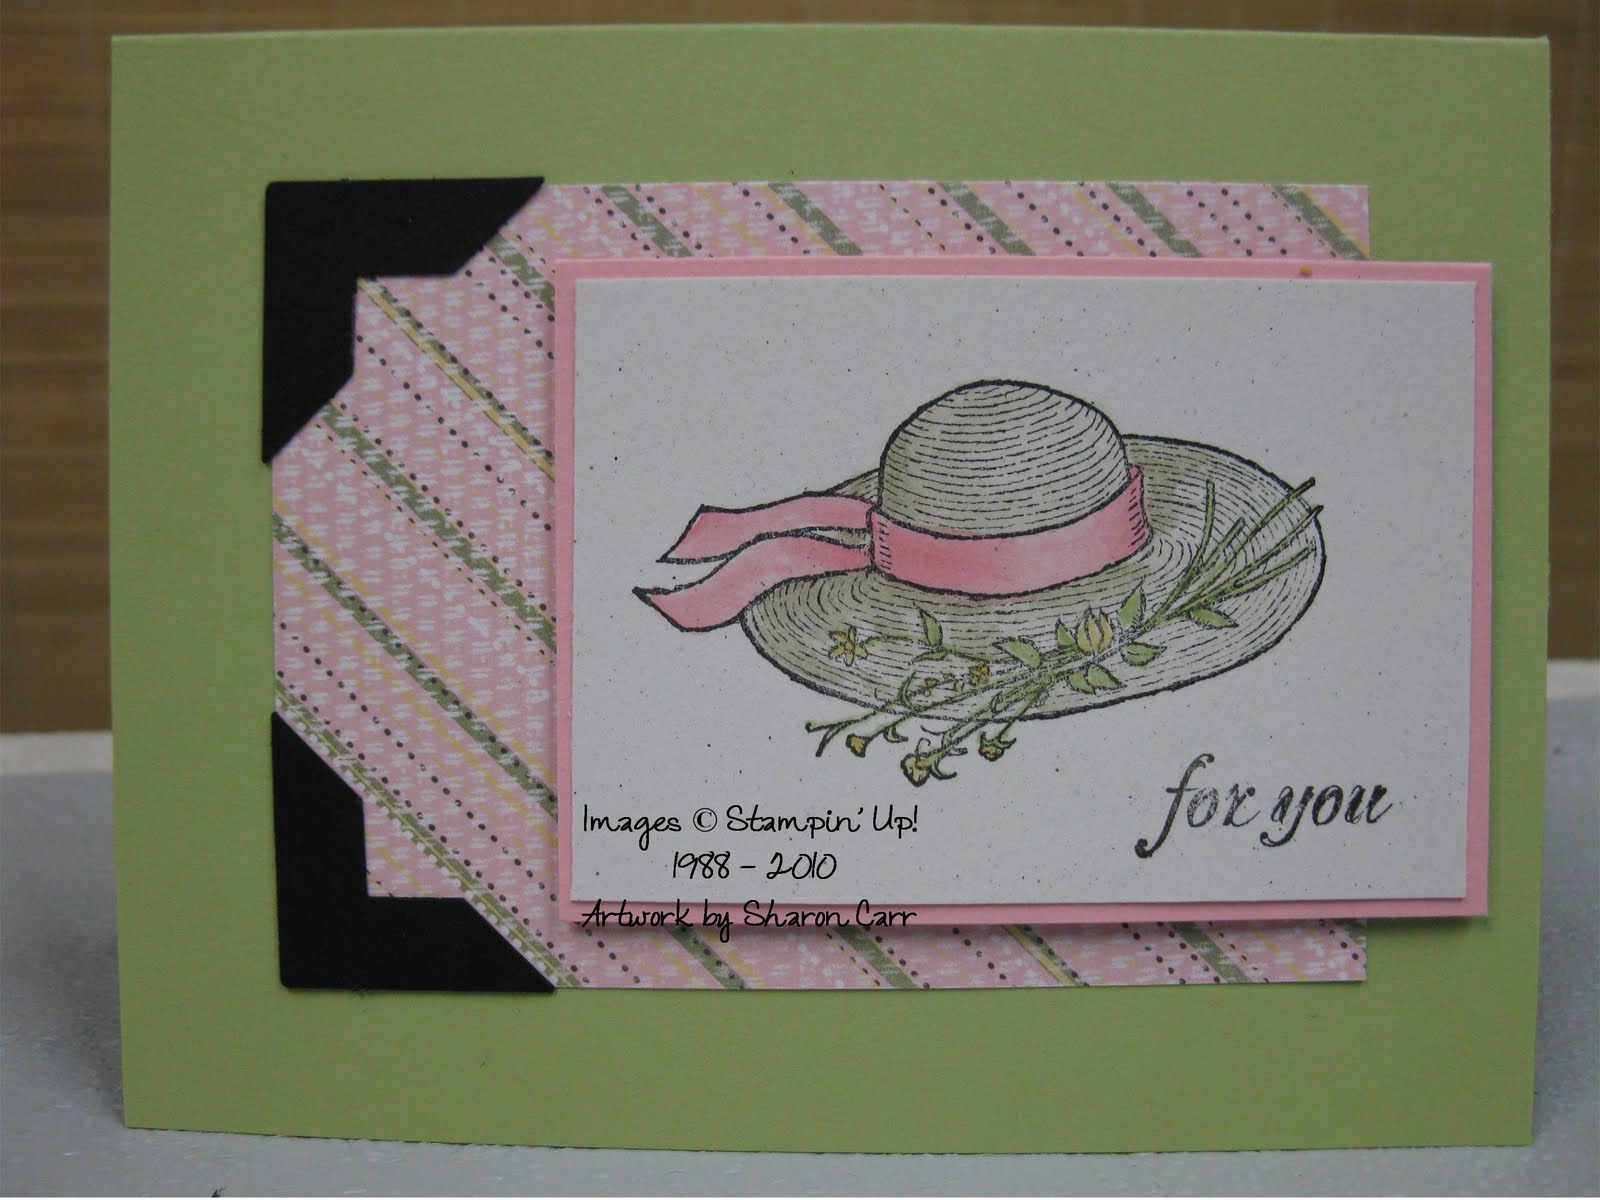
Stamps: Vintage Vogue and On Your Birthday
Cardstock: Bashful Blue, Chocolate Chip, Very Vanilla cardstock with Sweet Pea Designer Series Paper Stack
Ink: Certainly Celery, Bashful Blue, and Chocolate Chip
Accessories: Scallop Trim Border Punch, Modern Label Punch, Vanilla Taffeta Ribbon, Paper Snips, Dimensionals, and glitter glue


I wish the glitter was showing up better in the pictures (don't know why it's not?) But I think the card is really lovely in person and I'm quite happy with it. I felt that I'd hit a drought of creativity lately, and this sketch really helped get me back on my feet again.
Thanks 411 ladies! You have awesome sketch ideas each week and really keep the creativity flowing! If you haven't tried your hand at their challenges yet, go give it a try. You'll have fun, trust me!


Thanks for stopping by! Have a great week and make sure you take time to stamp!
Sharon

Saturday, April 17, 2010

Multiplying Bunnies

Well, here it is. Saturday morning already with the baby shower only a couple of hours away. I can't believe that everything is under control and there's actually free time for me to post! Will wonders never cease?! My sister Connie flew in and is staying here and my other sister Barb was over all day yesterday, so we got everything arranged, wrapped, organized, set-up, blah, blah, etc., etc. Whew! What a long and tiring day that was! But everything is all ready to go - just need a shower and a bit of primping and we're out the door.

When I attended Leadership last January, Pam Morgan showed some baby shower ideas working around our products. One of the ideas she shared was a little washcloth bunny. I thought it was the cutest thing I'd ever seen, so took notes and two really awful fuzzy pictures so I'd remember and we could recreate them for shower favors. Would you like to visit my very own little Bunny Patch USA?


Aren't these just the cutest little guys around??? Even after making 24 of them, I still think they're adorable - and easy to make too!

Stamps: Eggcoutrements (Occasions Mini - available only til the end of April!)
Cardstock: Whisper White
Ink: Tempting Turquoise, Green Galore, Summer Sun, Only Orange, Melon Mambo
Accessories: 1 1/4" Circle Punch, 1/8" Circle Punch, Assorted Ribbon to match (some retired), and White Crochet Cotton


I call these 'multiplying' bunnies, because we thought they were all out of the bag and stacked on the table. But when we went to put them away, there were 3 more in the bag that didn't make it into the picture. So you know what those little bunnies were doing in that bag, don't you? Making more little bunnies, of course! lol

With the bright ribbons and tags used on these, the bunnies look so fun and cheerful! (Maybe I need to remember this to make one for little Carson's first Easter next year. Good idea?)


Hope you're all having a wonderful weekend. If all goes well, I'll be back to posting on a more regular basis. Somehow I seem to get all off track when there's lots of deadlines looming ahead. Now that the baby shower is upon us, I can settle down and get back to creating and joining challenges. Happy weekend to all of you out there!
Sharon

Wednesday, April 14, 2010

SU! Case

Yes, it's class week so I can start sharing class projects from this month. The first card I'm sharing is cased pretty much from the Stampin' Up! publication for demonstrators called "Stampin' Success". Each month there are great ideas and tips, encouragement and incentives to keep us focused and energized in our business. It really is a goldmine of inspiration! I did make a couple minor changes to my card - like cardstock color for one! Just a minor change! lol And my camera seemed to have a hard time getting the cardstock color to show up right anyway! What's up with that I wonder?
Stamps: Awash with Flowers (sneak peak this month!!)
Cardstock: Apricot Appeal, Pretty in Pink, and Whisper White
Ink: Basic Black, Pretty in Pink, Apricot Appeal, and Sage Shadow
Accessories: Big Shot with Perfect Polkadot Embossing Folder, Clip Assortment, Pretty in Pink Taffeta Ribbon, and Acrylic Block asst.
I'm so hooked on these smaller square cards - this one measures 4 1/4" x 4 1/4". Just the perfect size for a little note to cheer someone up. The ladies had a choice of several sentiments for the inside of their card - about 12 choices in all. This is such a versatile card that it's easy to use for just about any reason.
Thanks SU! for the idea. It was fun changing around one of your fab ideas and turn it into mine! See how many ways you can use these same few stamps and create something fabulous for yourself!
Sharon

Saturday, April 10, 2010

Oops, I forgot...

I posted earlier, but forgot to show you the last two cards that the ladies at church made last Tuesday. How terribly forgetful of me! Sorry about that. Time to set the record straight then. (before I forget again! lol) Here they are. Tada!
The ladies did a great job making this first card. The main image was colored with markers directly onto the stamp, huffed on it, then stamped. When you do this 24 times, it takes a bit of hot air, and she was getting a little light-headed. Everyone was teasing her. But she stuck it out and got them all stamped. Great job, Sue!!
These colors seemed bright and cheerful to me, so I thought they'd be great to send off to the men and women serving overseas in Iraq and Afghanistan. Then they'll choose these (hopefully) to send back to the states to their family members. Isn't that a terrific way to bring some sunshine into someone else's life??
Stamps: Hello Again
Cardstock: So Saffron, Garden Green, Rose Red, and Whisper White with Rose Red Patterns Designer Paper
Ink: Garden Green and Rose Red markers
Accessories: Big Shot with Beautiful Butterflies Embosslit, White Narrow Grosgrain Ribbon, 1" and 1 1/4" Circle Punches
This next card was quick and easy to make. The ladies used a VersaMark Pad which they hadn't seen before. They thought it was cool that the ink is clear so it can be used on any color cardstock. I'll have to let them use it again so they can learn all the wonderful techniques this pad can do! Who knows, they might become totally hooked on this fun craft!!
Stamps: Always and Wellness Wishes
Cardstock: Sahara Sand, Bermuda Bay, Rose Red, and Whisper White with Thoroughly Modern Designer Series Paper
Ink: Bermuda Bay, Rose Red
Accessories: 1 1/4" and 1 3/8" Circle Punches, Mat Pack and Piercing Tool, Vintage Brad
Ok, I think I've remembered to post everything I had planned for this week. It's just been crazy around here this past week, and next week will be even worse!! Next week is class week, plus my sis is coming to visit on Thursday. The downline meeting is Thursday too. Then we'll have one day to finish up any items needed for my daughter's baby shower on Saturday. Whew, I got worn out just thinking about it all!! Next week Sunday I'm putting my feet up and not moving at all! Yeah, right. Oh well, I can dream, can't I??
Have a wonderful weekend!
Sharon

Sweet Saturday

Good afternoon! Hope you're having a wonderful day today. I've been working on the projects for next week's classes and I've been running into roadblocks at every turn! You ever have one of those days? It's getting a bit frustrating, but I'll deal with it I'm sure. lol This card is one I'd been working on, but then realized there wasn't enough DSP left for everyone to make this one. So instead I'm sharing it with you and then it's back to the drawing board for me. (shrug)


I guess it's just as well that the ladies won't be making this one, because I think it needs something else. Trouble is, I'm just not sure what that something else is. I've tried buttons and ribbons and wasn't happy with what I tried. If you've got any suggestions, I'd sure love to hear them!!

Stamps: Garden From the Heart and Fresh Cuts
Cardstock: Certainly Celery, Basic Black, Pretty in Pink, and Naturals White cardstock with Sweet Pea Designer Series Paper
Ink: Stazon Jet Black and Regal Rose, Sahara Sand ink pads, So Saffron and Certainly Celery markers
Accessories: Photo Corner Punch, Aqua Painter, and Dimensionals

Ok, now you've seen the card. What kinds of changes or additions would you make? All suggestions and comments are very welcome!

Enjoy the weekend!
Sharon

Thursday, April 8, 2010

Father's Day - early edition

I'm back to share with you more of the cards we made on Tuesday night that we'll be sending on to our soldiers. Because of time constraints for shipping, deadlines for sending holiday cards are really early. This week we focused on making Father's Day cards that can be sent back home to our soldiers' fathers. I planned two different styles of cards, one a bit more formal and the other one for all the baseball fanatic dads out there. Wish we could have made literally dozens of these cards, but it was closer to 18 of each version. Still not too bad - the ladies all stamped their hearts out to make these to send on and give someone else some happiness.


This first card is pretty straight forward, not a lot of doo-dads or anything. I had to use a retired set on this one, because I really like the image of all the tools. I know this would really fit my hubby to a 'T'.

Stamps: For Father (retired) and Teeny Tiny Wishes
Cardstock: Whisper White, Soft Suede, and Taken with Teal cardstock and Thoroughly Modern Designer Series Paper
Ink: Soft Suede and Taken with Teal
Accessories: Tag Corner Punch, Word Window Punch, Vintage Brads, AquaPainter

One of the young ladies that came had never used the AquaPainter before, but once I showed her how it works she just did a great job on coloring the images. If a novice can do this well, just think how much you could enjoy using this tool. For me, having an AquaPainter handy is an absolute necessity! It's one of my favorite tools to use!!


Here's the second card for fathers. Isn't it bright and cheerful? I kept thinking about an 'All Star Dad', but I didn't have a stamp that said that. Too bad, it would have been perfect!

Stamps: All Holidays, Sanded, and Just Baseball
Cardstock: Whisper White, Brilliant Blue, Real Red, and Night of Navy
Ink: Brilliant Blue, Real Red, Close To Cocoa
Accessories: Star Punch, Sponge quarter, Paper Snips, and Dimensionals

The ladies that worked on this card were real troopers. They had to do a lot of cutting! When you make 18 cards that have components cut out, it just takes awhile to get all the pieces cut out. When they came in the room, they looked at the samples, sat down and started cutting right away. You can't ask for any better friends than that!! Thanks ladies, you did a super job on all the cards you made and packaged up!!

Thanks for stopping by and hope you enjoyed the cards for today. I know we sure had fun making them!
Sharon

Tuesday, April 6, 2010

Stamping for the Soldiers

Yes, it's the first Tuesday of the month already, so the gang will all be at church stamping cards for the soldiers tonight. I've been busy making up samples and cutting cardstock to get ready for tonight. I really didn't think very many would actually come this month because of Easter vacations and kids home from school, etc. But it soulds like there might be 13 tonight. That will officially be the biggest group so far, but who's counting? I just hope I have enough cardstock cut to keep everybody busy. lol
Since the two cards I'm sharing with you today use retired sets, I won't be giving you a big rundown on the supplies used. Suffice it to say - it's all Stampin' Up! This one uses the Big Shot and the Pindot Embossing Folder on one of the layers. This has turned out to be one of my favorite tools to give interest and texture to a card.
Of course, there is sponging on these cards. I don't feel like a card is finished if it doesn't have some sponged edges somewhere! The layouts are good basic sketches. So feel free to use them for yourself any time!
This first one is colored by using markers on the stamp. I've always loved this Petal Prints stamp set, and could never part with it. I'm so glad it's getting some inky love tonight!
The second card uses retired DSP along with the retired stamps. Not sure what the name of it was - sorry! I've also cut a batch of Regal Rose cardstock and DSP to make some a little more feminine graduation cards too. Again, the layout is very basic, but one I go back to often. Especially whenever there is a loooong layer you have to do something with! lol
Hope these two ideas give you some inspiration. I'll have a few more to share with you tomorrow and let you know how many cards we actually finished tonight.
Happy stamping. Share a little sunshine with someone and watch a smile light up their face!
Sharon

Thursday, April 1, 2010

Are you ready for Easter?

Of course, I'm not ready yet - there's still salads and dessert to make yet. But you'll be happy to note that I actually got my Easter cards mailed yesterday! For me that's a really big woo-h00!! I always get the cards made and then not mailed til the last minute. This time, I'd say I had a minute or two to spare! lol I know, there's just no hope for me at all, is there?

Anyway, I have a silly chick card to share with you today. We made this during the punch class in March. Everyone thought the little chick might have had just a little too much of something, but I think she's just so dog-gone happy it's Easter that's she's got to dance around. I guess you can decide for yourself what's going on here, but it was fun to make and we all had our laughs.


Stamps: Inspired by Nature
Cardstock: Whisper White, So Saffron, Taken with Teal, Certainly Celery, Pumpkin Pie, Pretty in Pink, and Barely Banana with Welcome Neighbor Designer Series Paper Pad (SAB)
Ink: Certainly Celery and Basic Black pads, Regal Rose, Summer Sun, and Basic Black Markers
Accessories: 1 3/8" Circle Punch, 5 Petal Flower Punch, Large Oval Punch, Paper Snips, White Gel Pen, Sponge quarters, Distressing Tool, and Dimensionals

I've got to admit, there was quite abit of cutting and trimming to get everything to work out. You can't tell from the picture, but the grass was all snipped down anywhere from 1/2" to 1" so it would be flexible and stand away from the clouds a little. The beak, ears, chick, and sentiment all have line work done with markers to make them more interesting and not so flat looking. And the chick's body was heavily distressed to give her a 'fluffier' look.

Hope this gets you happy about Easter being right around the corner. And if I don't talk to you before then, let me wish you a very blessed Easter as you celebrate the resurrection of our Lord and Savior Jesus Christ! He is risen! He is risen indeed, hallelujah!!
Sharon