Monday, September 16, 2013

Gently Falling Leaves

I just love autumn with all the radiant colors of sky and leaves, crisp weather, and wonderful food associated with fall.  The card I have to share today reminds me of the many colors of the leaves.  This is another card the ladies made for our service personnel earlier in the month.  I tried to design something that was colorful, but still simple enough to make them quickly.  Now, if you ask the four ladies that were cutting out all these maple leaves, it wasn't quite as quick as it could have been!!  (We all really love our stamps that coordinate with punches or Framelits now and have gotten really, really spoiled!)  But anyway, on to the card...

Stamps:  Gently Falling, and Banner Greetings
Ink:  Crushed Curry, Pumpkin Pie, Cajun Craze, and Soft Suede
Paper:  Very Vanilla and Cajun Craze and a retired DSP
Accessories:   Paper Snips and Dimensionals


Here's the card we made together.   Isn't it nice?  The layout is simple, but the colors and main leaf make it gorgeous.
All of us making these cards thought the colors on this card were fabulous - just as bright and glorious as the real thing!  If you  notice, the leaf that is cut and popped up has a little extra coloration to it.  I did a little rock & roll on each one with some Cajun Craze on one half and Soft Suede on the other half.  All of the extra leaves were stamped before we got together, so there was only lots of cutting and groaning to do.

Like I mentioned, there was a lot of cutting with needing 20 or these maple leaves - one for each card.  And then they cut out 20 of the little sentiment banner too.  Yikes!  There were a few sore hands after all that cutting.  But it was worth it for our soldiers!

That's it for today.  If you own this set, get it out and give it some love.  If you don't own it yet, why not?  It makes simple fabulous cards!  Happy stamping!            Sharon


Friday, September 13, 2013

Harvest of Thanks Times Two

In keeping with the cooler weather today, thought I'd slip into a thankful mode and share two card versions of the Harvest of Thanks stamp set that I did recently.  We made lots of Thanksgiving cards for our service men and women a week ago and I really got into the autumn colors and all on the cards.  Here are two of the cards we made this last time...


Stamps:  Harvest of Thanks
Ink:  Crushed Curry, Cajun Craze, and Early Espresso markers, and Early Espresso pad
Paper:  Cajun Craze, Crumb Cake, Early Espresso, and Very Vanilla
Accessories:  Big Shot and Deco Labels Collection Framelits, Woodgrain TIEF, Sponge Daubers, Paper Snips, and Dimensionals

It was fun coloring the turkey on this stamp with markers.  What made it really interesting is that I really don't know what color a turkey actually is.  Hmmmm.  Does anyone really care?  I figured as long as I stuck with autumn colors it would be ok.  So that's my story and I'm sticking to it!

 
This version is a little different in layout and color.  I used a retired DSP but I don't remember the name - sorry.  Wish I had more of it though, because the colors and prints are so pretty. 
The little flag of DSP on the side of the image is from the current Sweater Weather Designer Series Paper.  Just love the prints and color combo on this paper - it's so perfect for fall!

I die-cut a layer of Chocolate Chip cardstock to frame the main image.  It seemed a little plain so I added a some dots & dashes with a gold marker from last year's holiday catalog and I liked the look.   The gold added a subtle sheen of glitz to the card.   The sentiment was stamped with Basic Black ink using the Thankful For... stamp set from last year.

That's it for my offerings today.  Hope you like the layouts and try using them for some of your cards soon.  Happy stamping.    Sharon

Sunday, September 8, 2013

August Paper Pumpkin Bicycle

Here it is September and it's time to start thinking of fall and all that goes with it.  But today is sort of a last hurray for summer.  This card was inspired by my grandson and his love of riding any and all of his riding toys be they tricycles, hot cycles (is that what they're called?), or bicycle.  His favorite pastime is going really fast!  So while the weather is getting cooler, we still have lots of time to play outside.  Here's my take on the Paper Pumpkin kit for August.  I seem to get stuck in needing to follow the idea that comes in the package.  Now, how silly is that?!  Today I've stepped out of the box and created something totally different.  Hope you let me know what you think...

Stamps:  Pedal Praise (Aug Paper Pumpkin), Gorgeous Grunge, and Pennant Parade
Ink:  Pool Party, Calypso Coral, and Real Red
Paper:  Pool Party, Calypso Coral, and Whisper White
Accessories:  Petite Pennants Builder Punch, Calypso Coral Baker's Twine, Subtles Candy Dots, and Dimensionals
If you've seen the Paper Pumpkin kit for August, you know this looks absolutely nothing like the suggested card to make.  That's what is so very much fun about these kits.  You can go simple and follow the idea, or go crazy and do whatever you want.

When I first saw the Gorgeous Grunge set in the catalog, I wasn't too sure about getting it.  Now that I have the set, I seem to use it all the time.  It has some great background filler stamps that work great for so many different things.  I used 2 of them on this card to signify clouds in the sky.  And the skinny lines make a great roadway to ride a bike on.  You just need to use your imagination a little bit.

Thanks for stopping by today.  Hope you've had a relaxing weekend and you're ready to get back to it tomorrow!  How come the weekend always flies by so fast?  I can never get everything done that I think I should.  Oh well, do the best you can and wing the rest!!  Have a great week...   Sharon


Wednesday, September 4, 2013

Fabric Accent for Thanksgiving

Today I have another card to share that was made last night with a fabulous group of ladies.  One of the ladies loves sewing and quilting, so every once in awhile she gives me some little quilted blocks for our cards, or as on today's card, just bits of gorgeous fabric to play with.  So this is a card I came up with using some lovely pumpkin fabric touched with gold.  Oh, I guess I should warn you up front that just about everything used on today's card is already retired.  So sorry!!!   But if you're still interested in looking, I think you might like the idea.  Ok, here we go...

Stamps:  Thankful For(retired)
Ink:  Basic Black
Paper:  Dusty Durango(retired), Basic Black, and a retired autumn print from SU! that I don't remember the name of
Accessories:   Big Shot with Deco Labels Framelits, and Dimenisonals

Isn't this fabric Diane gave me to play with absolutely gorgeous?  To give it some stability, I adhered it to Basic Black cardstock and then die cut it.  I framed it with the next size larger die with more of the Dusty Durango cardstock.  Of course, this idea could work equally well with current cardstock, but these colors really enhanced the colors of the pumpkins in the fabric.   And since they're just sitting around gathering dust, why not use them?

Just a different take on our usual cards.  Hope it inspires you to look around and see what's available to use on your next project.   Sharon

Tuesday, September 3, 2013

Too Kind Thank You

It just drives me crazy when I see a gorgeous card and it sticks in my head until I sit down and do something about it.  Unfortunately, most of the time I don't save the link or pay attention to where I'm seeing this card.  So I've just spent half an hour trying to find the original that I CASEd.  Well, at least I think I followed what I saw.  If you know who is responsible for the original idea, please let me know so I can give credit where credit is due.  Now, all that said, let's look at the card...

Stamps:  Too Kind and Another Thank You
Ink:  Wisteria Wonder, Elegant Eggplant, and Old Olive
Paper:  Wisteria Wonder, Elegant Eggplant, and Whisper White
Accessories:   Big Shot with Fancy Fan TIEF, Apothecary Accents Framelits, Bitty Butterfly Punch, Smoky Slate Chevron Ribbon, Pearls Basic Jewels, Sponge Dauber, and Dimensionals
First of all, I remembered the embossed layer of white behind the die-cut layer of white on the original card.  Usually I love white-on-white cards.  But after looking at my card pieces for awhile, I decided I'd like a touch of color sponged onto the main layer.  There's just a bit of Wisteria Wonder sponged around the edge to make it stand out a little more.

I don't remember what sentiment the original card had, but I thought this tiny thanks from my new Photopolymer set called Another Thank You fit perfectly.  If you haven't tried any of these new sets from Stampin' Up!, you really should.  They're so easy to use and cling to our blocks like crazy.  Plus you can see exactly where you're placing the stamped image which is an awesome help!!

The other thing I think I added to the CASEd card is the butterfly and pearls.  I really don't remember seeing them.  But I could be wrong on that, don't quote me!  I just thought the added color and dimension of the butterfly was a great accent.

Thanks for coming over again today.  Leave a message - I'd love to hear your comments!   Sharon

Monday, September 2, 2013

Autumn Accents

Wow!  Can you believe it's September already?  We're getting our oldest grandson ready for preschool starting on Thursday.  Oh my, I'm not sure I'm ready for that!  Didn't think this would be a problem with grandkids, since I'd already done all this before with my own kids.  But it's funny how this is dredging up those memories and I feel I'm reliving them all over again.  Those grandkids are sure growing up fast!  But I guess that's what it's all about.  And since it's autumn time again, I've been focusing on Thanksgiving for the cards the ladies will be making tomorrow night for our soldiers.  Since Thanksgiving is one of my very favorite holidays, it hasn't been a problem coming up with ideas.  Thought I'd share with you...


Stamps:  Tags for You
Ink:  Pumpkin Pie, Cherry Cobbler, Always Artichoke, and Gold Encore
Paper:  Really Rust(retired), Always Artichoke, Daffodil Delight, Pumpkin Pie, Cherry Cobbler, and Very Vanilla
Accessories:  Big Shot with Autumn Accents Bigz Die, Holiday Frame TIEF(retired), Label Bracket Punch, Corrugator(retired), Champagne Shimmer Mist Paint(retired), Sponges, Copper Cording(retired), and Dimensionals

Did I ever mention how much fun it is to design these cards because I can use all kinds of current and retired materials together.  Just play around with whatever looks good together and not worry about whether it's current or not.  It's good to get out the retired items that I couldn't bear to part with and give them a new chance to be special again.

On this card, I love the leaf accents that are corrugated and then sponged to bring out the texture.  And with this card, it seems to be all about texture with the embossed layer, the leaves, and the punched sentiment with a tiny bow embellishment. 

Hope you enjoyed this look at some current items and a little blast from the past.  Thanks for stopping in today.  Come back soon.  There's more I'd love to share with you.  Sharon

Thursday, August 29, 2013

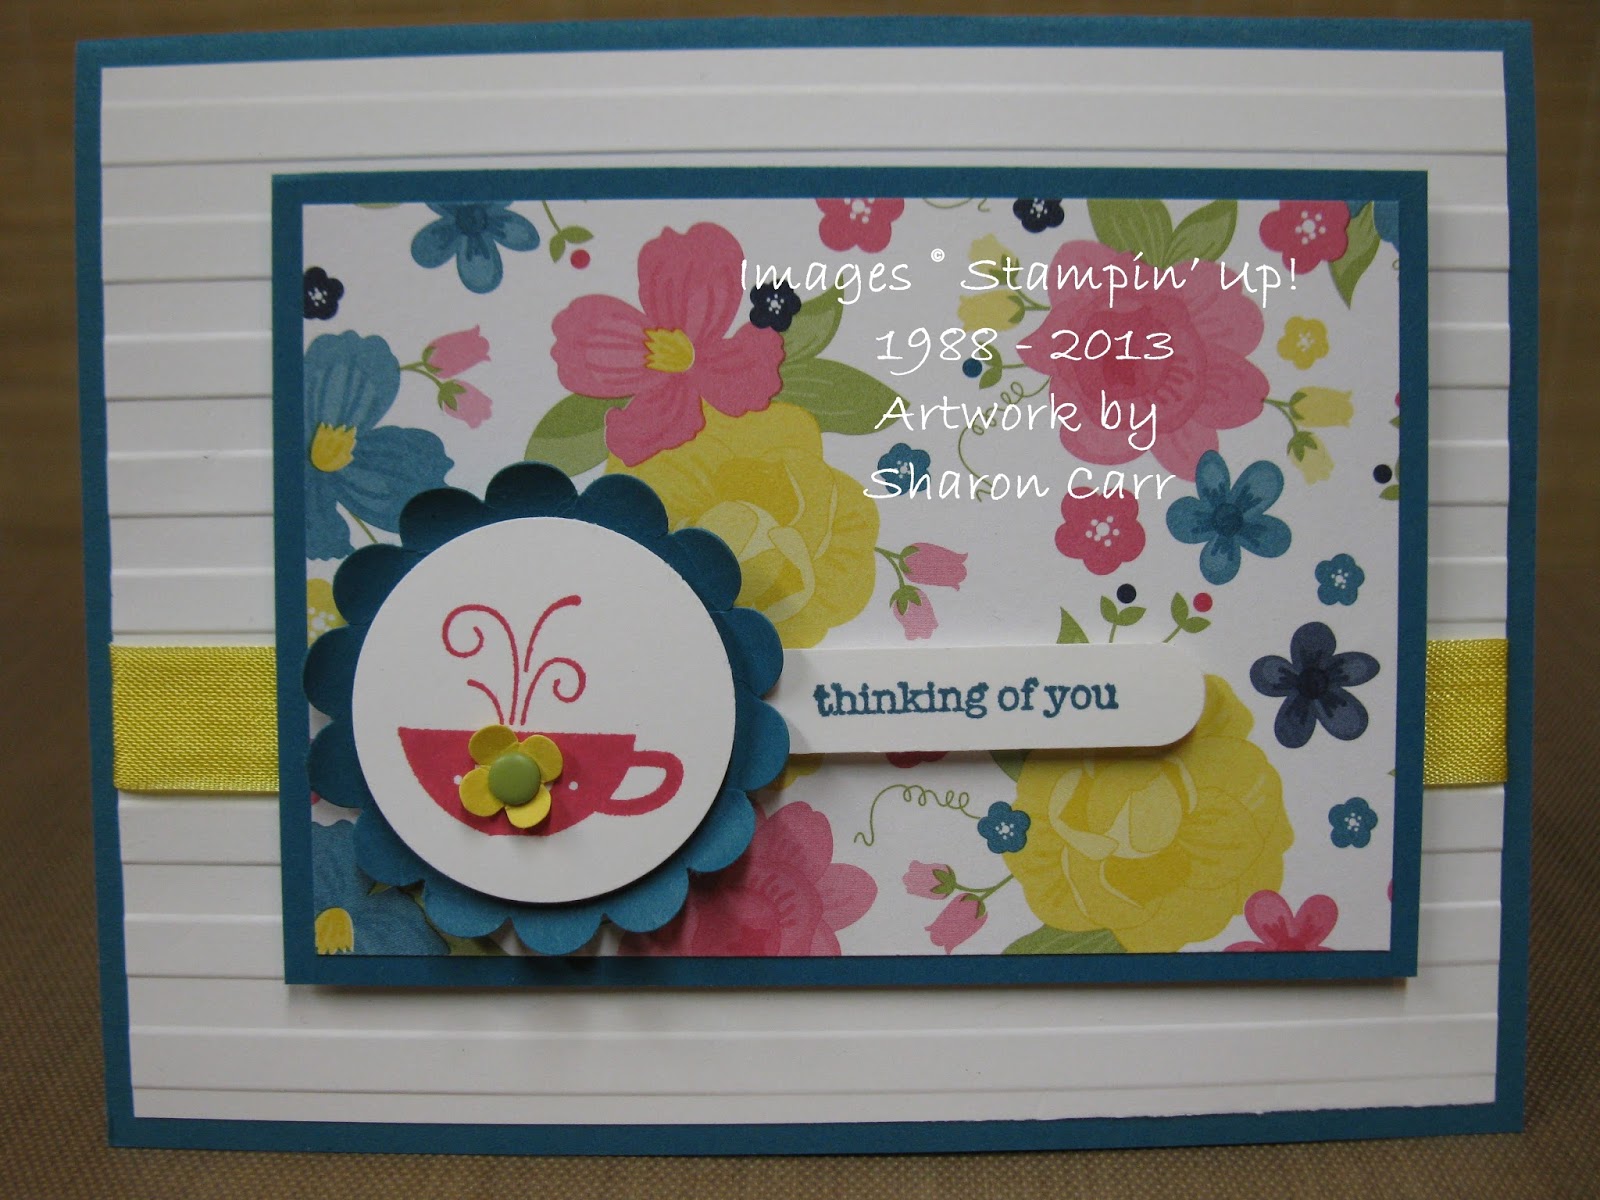
Country Cozy Card

Hello there.  Today I've got a simple cozy little card for you.  The sketch layout is very simple and I've used it often because it's so easy to get the components to work together.  There's  something good about a sketch that works every time you try it.  And this is definitely one of the good ones.


Stamps:  Kind & Cozy, and Teeny Tiny Wishes
Ink:  Island Indigo and Melon Mambo
Paper:   Island Indigo, Daffodil Delight, and Whisper White cardstock with Gingham Garden Designer Series Paper
Accessories:  Big Shot with Stripes TIEF, Word Window Punch, 1 3/8" Circle Punch, 1 3/4" Scallop Circle Punch, Itty Bitty Shapes Punch Pack, Subtles Candy Dots, Daffodil Delight Seam Binding Ribbon, and Dimensionals
The colors of the Gingham Garden Designer Paper were my guide for the colors used here.  I love how crisp and clean the colors of the print paper are, so everything was left plain without any sponging to soften the layers.

The scallop circle of Island Indigo were curled up with my bone folder, then the teacup layer was added with a Dimensional under to raise it up. 

The little flower doodad was added to inject a softer color onto the Melon Mambo teacup.  Then I debated about using a rhinestone for the flower center, but decided I liked the touch of green with the Candy Dot.  (If you haven't gotten any of the Candy Dots yet, what are you waiting for?  They are sooooo much fun!)

Hope to see you back again soon.  I've definitely got more ideas to share with you!  Thanks for stopping by.  Sharon