Monday, February 28, 2011

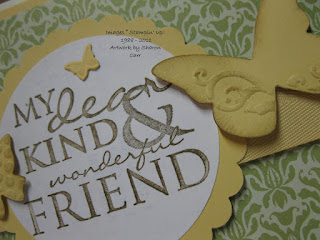
Green and Yellow Again

Here it is - the end of February already! Wow, hope this means next month is a little more like spring is on the way. Right now the temps are almost balmy. That is if the higher 40's is considered balmy. And right now, this feels wonderful! Ok, back to the stamping....

I just can't seem to get away from this whole green and yellow theme. It just seems to work so well for so many different cards! So I just keep reaching for those colors again and again! Hope you're not bored with these colors yet, 'cuz I'm not done using them just yet! lol

Stamps: Apple Blossoms (hostess set)
Cardstock: Whisper White, Certainly Celery, and Daffodil Delight
Ink: Certainly Celery, Daffodil Delight, and Wild Wasabi
Accessories: Big Shot with Perfect Details Texturz Plates, Scallop Oval Punch, Daffodil Delight 1/4" Grosgrain Ribbon, Paper Snips, Sponge quarters, and Dimensionals


I don't know if you can tell very well from the photo, but the Certainly Celery layer has been embossed with an open lattice look. It's very subtle, but it adds alot to the final look of the card.

On this card, I only used one of the smaller flowers as an accent. On another card like this, I added two other flowers attached directly to the card and one with a Dimensional. Either way, I really liked making this card and thought it worked out nicely. Hope you like the idea.

Thanks for stopping by today. Have yourself a great day!
Sharon

Sunday, February 27, 2011

More Chocolate

I used the Eat Chocolate set again. This time I wanted to make a box to hold chocolates to give to a friend. I used the Matchbox Die to cut the box out, and that makes it so quick to get these boxes together. Here's what I used to make these boxes....


Stamps: Eat Chocolate, and Daisy Dash Jumbo Wheel
Cardstock: Regal Rose, Early Espresso, and Very Vanilla
Ink: Early Espresso and Regal Rose
Accessories: Decorative Label Punch, Chocolate Chip Satin Ribbon, Basic Pearls, Jumbo Handle, Big Shot and Matchbox Die XL, and Dimensionals


I was pleasantly surprised that 4 Nuggets fit inside nicely. Thought only 3 would fit in there. Of course, if you use the Dark Chocolate nuggets, 4 of them can't fit. They must be just a tad bigger, because no matter which way I tried, 4 just didn't fit. So that means I get to keep all the dark chocolate nuggets for ME! woo hoo!

Oh, ummm, sorry. Ah yeah, I was making these to share with my friends, wasn't I. Maybe I'll have to figure out another way to use these dark chocolates to share with others instead of keeping them all for myself. Guess I'll have to work on that later.....

Have a great week ahead. And get those stamps out and play!
Sharon

Friday, February 25, 2011

Artistic Etchings for Mother

I mentioned yesterday that I'd been getting cards cut and organized for stamping on Tuesday. Today I thought I'd share another card that the ladies will be making. Again I used one of the prints from the Greenhouse Gala DSP pack. I just love these prints and want to use them on everything! Here's a collage style card for Mother's Day.
Stamps: Artistic Etchings, En Francais, and Teeny Tiny Wishes
Cardstock: Very Vanilla, Daffodil Delight, and Old Olive with Greenhouse Gala Designer Series Paper
Ink: River Rock, Daffodil Delight, and Old Olive
Accessories: Scallop Trim Border Punch, Word Window Punch, Modern Label Punch, and a retired Summer Sun Corduroy Button, and Dimensionals
I thought this card might be just right for any mom that loved to travel. The card seemed to have a slightly carefree look about it. Hope some soldier thinks it's just right for their very own special mom.
After I had the card planned and everything cut and packaged, I realized I had drifted towards the yellow/green color spectrum again. Since we received several inches more of that cold white stuff that sticks to everything again last night, I guess my subconscious was busy trying to create a little sunshine around here! I'm so tired of the cold and snow!! Isn't it about time for spring soon?
Thanks for looking in. Love the comments you've been leaving. It's nice to know you're out there! Have a wonderful day and take time to play this weekend. It keeps you young at heart!
Sharon

Thursday, February 24, 2011

Gala Greenhouse Cards

It's that time of the month for me. No, no, no. Not that time of the month! It's time to get rolling on the cards we'll be making next Tuesday night when we get together to stamp cards for our military overseas. It takes a good week for me to come up with enough ideas to keep all the ladies busy and get everything cut and organized. We try to make about 150 cards in a two hour time frame, so there's a ton of planning that goes into it. Here's a couple of ideas that we'll be doing.
I had a couple sheets of this lovely green pattern paper from the Greenhouse Gala DSP pack. I like the looks of the green and yellow together - so spring-y, and with all the snow we've been getting around here we need all the help we can get!! The card is very generic so can be used for any kind of note home. I'd been planning mostly Mother's Day cards, and just needed a break for something a little different.
Stamps: All Holidays
Cardstock: So Saffron and Very Vanilla with Greenhouse Gala Designer Series Paper
Ink: Soft Suede
Accessories: Beautiful Wings Embosslit, Big Shot, 2 1/2" Circle Punch, So Saffron Ribbon (retired)
I had two long strips of DSP left over from the other card idea, so they needed to be put to use. Here's how I used the pieces. I was able to get only 4 of these cards made, but I'm sure that'll be alright.
For this card I used a retired SU! set called Never Ending Joy. I always liked this set and it's one I dig out every once in awhile just because. I added a punch of color with Rich Razzleberry that just made it 'sing'!
It's really fun planning these stamping marathon nights for the ladies at church. We've been getting together once a month for over a year now. What a great way to spread God's love to others and encourage each other along the way. Hope the soldiers enjoy sending these cards home as much as we enjoy making the cards for them. If you'd like to learn more about the "From Our Heart" group that heads up this endeavor, just click on the button on the side to get to their blog.
Thanks for taking time to stop here. Hope these ideas give you a smidgeon of inspiration to get out there and stamp!!
Sharon

Monday, February 21, 2011

Chocolate!

When I saw the set "Eat Chocolate" in the new Occasions Mini, I knew this was one set I had to have. Chocolate and I have had a strange love/hate relationship for many years, and it's still going on. Sometimes I can go a month or two and not have a single piece of chocolate. (Can you believe that??) Then the cravings will hit and I'll want chocolate in any shape or form I can find it. Definitely addicting!! But I digress. This blog is about stamping, not chocolate. Of course it does help to have chocolate nearby when you're stamping and run into a problem. It helps with the creative process, you know!! LOL Anyway..... I was blog surfing earlier and found a really cute idea using this set. I didn't have the right accessories to copy her outright. So I played around with her idea and made a softer, smoother version of Geneva Chapin's Chocolate!


Stamps: Eat Chocolate
Cardstock: Crumb Cake, Baja Breeze, Early Espresso, and Very Vanilla with Elegant Soiree Designer Series Paper
Ink: Early Espresso
Accessories: Early Espresso 3/8" Taffeta Ribbon, and Dimensionals


This was such a quick card to make, it actually surprised me! I hope you take the time to visit Geneva's blog and see her original design. It really is charming! It's fun to take someone else's idea and change up the components to make it look very different. You can use the same sketch design hundreds of times, but it always looks different depending on the colors and stamps you choose to use. Go ahead, have fun with this design and let me know what you've come up with!

Thanks for stopping by today. Gotta run. I have a workshop tonight and I'm all excited about seeing these ladies. They're great and I know we're gonna have fun tonight!!
Happy stamping...
Sharon

Sunday, February 20, 2011

Perky Today

Well, at least my card is "perky" today! I finally got a chance to check out the Stamping 411 blog today. As soon as I saw the sketch they had posted for this weekend, I just knew what I wanted to make with it. For some reason it really got my mojo in gear and I really wanted to get downstairs and stamp today. Besides, it was snowing and blowing again outside, so who wanted to go out grocery shopping on a day like this? So, down to the stamp cave I went and started poking through my stash of designer papers to see what was there. Oh, this was fun today. Matching stamps and colors to a sketch - what could be better than that? Here's what their sketch inspired me to make....

Stamps: Morning Cup
Cardstock: Baja Breeze, Cherry Cobbler, Whisper White with Greenhouse Gala Designer Series Paper
Ink: Stazon Jet Black, More Mustard, Cherry Cobbler, Baja Breeze
Accessories: Aqua Painter, Neutrals Watercolor Crayons, Word Window Punch, White Striped Organza Ribbon, Sponge Daubers


Of course, I had a little problem following the sketch as it was. You know I just have to play around with ideas! I stood the sketch up on end, and changed around the ribbon idea. Instead of tying the ribbon around the card, I just cut the ends fish-tail style. I added the little sentiment to the corner of the main layer to 'perk it up'!

I love these colors together. Truthfully, I would never have chosen them to go together. Instead I needed to check in the Color Coach to give me a wow color combo, and this really seemed to work great.

Hope you like this idea, and I appreciate you stopping by to see it. Have a great Sunday and get a little time set aside to stamp. It really does 'perk' you up! OK, enough about the perky comments. I'll try to get them under control before my next post. lol
Sharon

Wednesday, February 16, 2011

Pink Petals

I finally got a chance to get downstairs today. Carson went out like a light right this noon. Sure do love those long naps every once in awhile. Too bad they don't happen every day at a regular time so I could make plans! Oh well, I just need to take advantage of the opportunity when it presents itself. My thought today was to do something with my new Build a Blossom stamp set and the coordinating punch that goes along with it. My, my, they sure do work well together!! I've been purposely not looking at what others are making with this so I could come up with something myself. Now that it's made, I'm not sure about it. Please let me know what you think.
Stamps: Build a Blossom and Teeny Tiny Wishes
Cardstock: Certainly Celery and Whisper White with Certainly Celery DSP
Ink: Pink Pirouette, Wild Wasabi, Daffodil Delight, and Basic Gray pads and Pink Pirouette marker
Accessories: Blossom Petals Punch, 1" Circle Punch, Eyelet Border Punch, Small Oval Punch, Antique Brads, White Taffeta Ribbon, Sponge quarter, and Dimensionals
I didn't realize just how many punches I'd used on the card until I started cleaning up and my table was littered with them! But I must tell you how easy it is to punch out the stamped images. It really made putting this flower together quick as a wink.
Don't know if you can tell from the pics, but I did some shaping on the leaves so they puffs up in the middle of each petal. When putting the flower together, I added a Dimensional in the center of each petal so they would stay pouffed up.
I colored the taffeta ribbon with a marker again. I just love the soft color that gives and then I can have ribbon in any color of the SU! rainbow!!
Ok, now that I've got one card made from the set, it's time to go peruse the Stampin' Connect site to see what everyone else is making. I'm sure they're creations will put mine to shame. But I had fun making it none the less. Thanks for stopping by. You know, I thoroughly appreciate any comments you might care to leave. Have a great day...
Sharon

Sunday, February 13, 2011

Blessings Card

Life has been crazy lately. Our little grandson is pulling himself up on the furniture now and crawls quicker than I do! Whew, grammy's gettin' worn out. But I wouldn't miss this for anything. Nothing brings out the sunshine quicker than one of his smiles! But that doesn't help me get any cards made now, does it? Seems like the inspiration bug hasn't hit in awhile. Of course, not being downstairs in my stamping cave might just have something to do with that little problem. I've been trying to come up with some great ideas for a workshop next week. This is an idea that I've been playing around with. Whatd'ya think??


Stamps: Herb Expressions
Cardstock: Whisper White, Rich Razzleberry with Brights Patterns Designer Series Paper
Ink: Stazon Jet Black, Old Olive, and Rich Razzleberry pads, and Rich Razzleberry marker
Accessories: Big Shot with Finial Press Emboss Folder, Pretty in Pink Taffeta Ribbon, Aqua Painter, Basic Pearls, Sanding Block, and Dimensionals


I love the look of embossed and sanded designer papers. Sort of a print on top of a print look. The polkadot print is so subtle that you really have to pay attention to notice it.

And what do you think of the ribbon? I just ran the Razzleberry marker across the pink ribbon. It dried almost instantly and came out almost as an ombre look. Really neat when you see it in person.

I added just a little strip of the designer paper on the inside to give it a little more interest. All in all, I'm happy with the look and think I'll be sharing this with the ladies next week. Hope they like it too!

Thanks for stopping by today. I appreciate you taking the time to leave comments. They always make my day!!
Sharon

Wednesday, February 9, 2011

Cupcake Variations

For those of you that are demonstrators, this idea is a slight variation of one of the samples in our Stampin' Success magazine. (This magazine is one of the awesome perks of being a demo!) Of course, I needed to tweak just a bit. The plan was to use the idea for classes this week and I didn't have enough of the satin ribbon that was used on the original. Not a problem. Just switch it with something that I had enough in stock for everyone to use. Here's the first version.....
Stamps: Create A Cupcake
Cardstock: Old Olive and Very Vanilla with Neutrals Patterns Designer Paper
Ink: Soft Suede pad and Cherry Cobbler marker
Accessories: Build A Cupcake Punch, Old Olive 1/4" Grosgrain Ribbon, and Dimensionals
I was really pretty happy with the results, but the first person that made the card in class ended up with an ink 'halo' around the sentiment on the bottom. Not a pretty sight. What to do..... Alright, here's a quick fix. Stamp the sentiment on Vanilla cardstock and punch out with the Word Window Punch. Still needed something to cover that 'halo' problem. Ah hah! The Modern Label Punch with Cherry Cobbler cardstock to layer behind the sentiment. Oh yes, I even like this better than the original! (Oh oh, is that blasphemy???)
And here's a shot of the inside of the card. I carried on the hearts ascending theme and added a few here and there. Now I'm really happy with this card idea. Hope you enjoy the changes I made. This new stamp set with coordinating punch is really fun to use. They are 2 of the many featured items in the new Occasions Mini Catalog. If you haven't gotten it yet, let me know and I can send you one. The stamps and accessories available right now are awesome. And you might want to get a few items for yourself before they're gone!!
Thanks for stopping by to check what's new. All I can say is I'm trying as hard as I can to faithfully post, but I know I'm really falling behind. Bear with me, I'll keep on trying to post on a more regular basis!
Sharon