It's the last time to share a card using the "Rev Up The Fun" stamp set that is retired. I'm so sorry to see it leave the line-up as it's a great card both for men and teens. My 4 year old grandson likes it too. He stamped up a few sheets of paper for his own race cars! The card I have to share with you is from last week's class. It was pretty much a class to say goodbye to colors and stamps that would no longer be available. So here goes...
Stamps: Rev Up The Fun
Ink: Real Red and Basic Gray pads, Real Red and Bermuda Bay markers
Paper: Real Red, Bermuda Bay, Basic Gray, and Whisper White, with I Am Me Designer Series Paper
Accessories: Big Shot with Circle Collection Framelits, 2 1/2" Circle Punch, Neutrals and Brights Candy Dots, and Paper Snips
I used the colors from the DSP to decide the card colors. I loved all the arrows in the DSP to suggest movement on the card. The tire tracks fit nicely on the punched white layer and the sentiment fit perfectly underneath them. The Candy Dots were just added for fun.
Everyone seemed to like this card even though they had to cut out the card! Yes, I know we're all getting spoiled by all the wonderful punches and framelits that do all the work for us!! But sometimes you just need to get out those snips and do some fussy cutting to make the card perfect.
This card was made earlier in the month when we got together to make cards for the military. I chose to use a combination of Whisper White, Pacific Point, and Smoky Slate. The Arrows Textured Impressions Embossing Folder was used to give the background some interest. (Guess I really like arrows and Candy Dots with this stamp set, don't I ?)
Anyway, there you go for today's share - and it's a two-fer-one deal at that! Hope you have this set already because it's totally sold out. Bummer! Thanks for stopping in today to see what's new. (or old, I guess) I have more coming up later in the week, so come on back again. Happy stamping, Sharon
Tuesday, May 20, 2014
Tuesday, May 13, 2014
Sunny Birthday Flip Card
Don't you love making flip cards now that Stampin'Up! has made the Thinlits to die-cut them? It's so easy to do them now that you don't have to get out your ruler, Exacto knife, cutting mat, pattern, etc, etc. I always loved the look, but they just took too much time to put together. Today's card is one of my favorite birthday cards. Hope you like it too.
Stamps: Sketched Birthday, and Really Good Greetings
Ink: Stazon Jet Black, Daffodil Delight, Chocolate Chip, Island Indigo pads, and Island Indigo marker
Paper: Daffodil Delight, Whisper White, with Gingham Garden Designer Series Paper
Accessories: Big Shot with Label Card Thinlits, White Chalk Marker, Gingham Garden Washi Tape, AquaPainter, 2-Way Glue Pen, and Dazzling Diamonds Glitter
I used cardstock measuring 8 1/2" by 5 1/2" for the card base. The extra end of the cardstock is tucked over the Thinlit while it is being cut. This way you get a slight line for folding another whole flap on the card. I love when you end up with an easy tri-fold card this way.
The card base is Daffodil Delight, so it's very bright and happy looking. The Gingham Garden DSP is a perfect match for the card. I thought the front of the card needed some attention, so I added a strip of the pretty Washi Tape and then added stitch lines with the White Chalk Marker. Doesn't it show up nicely on the Daffodil cardstock?
The slice of cake was colored in with an AquaPainter and coordinating ink colors. I added a bit of sparkle on the decorative frosting on the cake edge and the candle flame. I also continued with the stitching line around the white layer using the Island Indigo marker to frame it in a little.
Hope you like today's card idea. I didn't get outside to get pictures of the playscape like I had planned because it started raining yesterday. Maybe tomorrow - we'll see how the weather goes. Sure can't get it finished if the weather won't cooperate. Thanks for stopping by today. Sharon
Stamps: Sketched Birthday, and Really Good Greetings
Ink: Stazon Jet Black, Daffodil Delight, Chocolate Chip, Island Indigo pads, and Island Indigo marker
Paper: Daffodil Delight, Whisper White, with Gingham Garden Designer Series Paper
Accessories: Big Shot with Label Card Thinlits, White Chalk Marker, Gingham Garden Washi Tape, AquaPainter, 2-Way Glue Pen, and Dazzling Diamonds Glitter
I used cardstock measuring 8 1/2" by 5 1/2" for the card base. The extra end of the cardstock is tucked over the Thinlit while it is being cut. This way you get a slight line for folding another whole flap on the card. I love when you end up with an easy tri-fold card this way.
The card base is Daffodil Delight, so it's very bright and happy looking. The Gingham Garden DSP is a perfect match for the card. I thought the front of the card needed some attention, so I added a strip of the pretty Washi Tape and then added stitch lines with the White Chalk Marker. Doesn't it show up nicely on the Daffodil cardstock?
The slice of cake was colored in with an AquaPainter and coordinating ink colors. I added a bit of sparkle on the decorative frosting on the cake edge and the candle flame. I also continued with the stitching line around the white layer using the Island Indigo marker to frame it in a little.
Hope you like today's card idea. I didn't get outside to get pictures of the playscape like I had planned because it started raining yesterday. Maybe tomorrow - we'll see how the weather goes. Sure can't get it finished if the weather won't cooperate. Thanks for stopping by today. Sharon
Monday, May 12, 2014
Daughter's Mothers Day Card
Hope you enjoyed your Mother's Day yesterday. My daughter and I decided that we'd postpone our celebration for a couple of weeks as the entire weekend was spent getting started on this huge playscape they are building in our backyard. I'll try to get some pics to show you the project! The neighbors have all been by to comment on it and wonder when we're moving into our new house! Did I mention that it's huge!? Anyway, we'll get to our special dinner in the future, but we did exchange cards, so I can share with you the card I made for her.
Stamps: Wildflower Meadow, and non-SU! sentiment
Ink: Calypso Coral
Paper: Calypso Coral, Basic Black, and Naturals White
Accessories: Big Shot and Wildflower Meadow Embossing Folder, Sponge Dauber, Dimensionals, and retired fabric brad from previous catalog
I haven't shared anything using this coordinating stamp and embossing folder yet. But that doesn't mean I don't like them, or use them! In fact I made some cards for the military using the combo just recently. Since the stamp is so large, it's easy to make a bundle of cards very quickly and easily. Just stamp the full image, line it up in the embossing folder, and voila! It looks fabulous! The skinny layered black is a great accent to give the card a little contrast from all the Calypso Coral.
I didn't have a Mother's Day stamp that I liked for this card, so I borrowed one from a friend that fit perfectly. And the little fabric brad was just the right finishing touch for the card. It was fancier than a button, so it even dressed up the card a little bit more.
Thanks for stopping in to see what's new. Hope to have more to share tomorrow. Sharon
Stamps: Wildflower Meadow, and non-SU! sentiment
Ink: Calypso Coral
Paper: Calypso Coral, Basic Black, and Naturals White
Accessories: Big Shot and Wildflower Meadow Embossing Folder, Sponge Dauber, Dimensionals, and retired fabric brad from previous catalog
I haven't shared anything using this coordinating stamp and embossing folder yet. But that doesn't mean I don't like them, or use them! In fact I made some cards for the military using the combo just recently. Since the stamp is so large, it's easy to make a bundle of cards very quickly and easily. Just stamp the full image, line it up in the embossing folder, and voila! It looks fabulous! The skinny layered black is a great accent to give the card a little contrast from all the Calypso Coral.
I didn't have a Mother's Day stamp that I liked for this card, so I borrowed one from a friend that fit perfectly. And the little fabric brad was just the right finishing touch for the card. It was fancier than a button, so it even dressed up the card a little bit more.
Thanks for stopping in to see what's new. Hope to have more to share tomorrow. Sharon
Thursday, April 17, 2014
A Tree for Dad
I've had it with the snow lately, so thought I'd move on to a tree card for father. Trees in full leaf are a sure sign of summer, so let's do some pretending that there's no snow on the ground and it's warm and sunny outside. We needed to make cards for Father's Day already to send on to the military. I know, it's hard to think that far ahead, isn't it? But we already made a bunch and sent them last week. So today's card was one of the many styles that we stamped over a week ago. If you like the idea, you've got lots of time to make it for your dad! Or you could use the idea for any masculine birthdays you might have coming up.
Stamps: Look Up To Father
Ink: Early Espresso pad and Pear Pizzazz, Garden Green, and Early Espresso markers
Paper: Crumb Cake, Early Espresso, and Very Vanilla cardstock with Old Olive DSP
Accessories: Big Shot with Circles Framelits, Sponge Dauber, and Dimensionals
It's amazing what you can do with a single stamp! The stamp used is from the Occasions Catalog and is still available until the end of May. Both the tree and the sentiment are all on the single stamp. I cut them apart so they would be more versatile - either use them together or separately! The tree on this card was colored with markers to get the trunk colored in differently than the green leaves and grass. The leaves were colored with the Pear Pizzazz marker and then thumped with the Garden Green marker. I liked how the leaves looked with the two colors instead of just one. Can you just see how nice this would look with multiple colors for fall? Just gorgeous!
That's it for today. Short and sweet. I need to hustle and get ready for church this evening. I love all the services leading up to Easter. All these services are somber and then there's the grand celebration of Easter. Truly glorious!! Thanks for stopping in today. Hope your Easter preparations are well underway. I'll be doing lots of cooking and baking on Saturday to get finished. If I don't get another post in before Easter - I wish you and your family a very blessed Easter! Sharon
Stamps: Look Up To Father
Ink: Early Espresso pad and Pear Pizzazz, Garden Green, and Early Espresso markers
Paper: Crumb Cake, Early Espresso, and Very Vanilla cardstock with Old Olive DSP
Accessories: Big Shot with Circles Framelits, Sponge Dauber, and Dimensionals
It's amazing what you can do with a single stamp! The stamp used is from the Occasions Catalog and is still available until the end of May. Both the tree and the sentiment are all on the single stamp. I cut them apart so they would be more versatile - either use them together or separately! The tree on this card was colored with markers to get the trunk colored in differently than the green leaves and grass. The leaves were colored with the Pear Pizzazz marker and then thumped with the Garden Green marker. I liked how the leaves looked with the two colors instead of just one. Can you just see how nice this would look with multiple colors for fall? Just gorgeous!
That's it for today. Short and sweet. I need to hustle and get ready for church this evening. I love all the services leading up to Easter. All these services are somber and then there's the grand celebration of Easter. Truly glorious!! Thanks for stopping in today. Hope your Easter preparations are well underway. I'll be doing lots of cooking and baking on Saturday to get finished. If I don't get another post in before Easter - I wish you and your family a very blessed Easter! Sharon
Wednesday, April 16, 2014
Lovely Blue Floral
Hey, this makes 3 days in a row!! Woo Hoo! Are you sitting down, or did this knock you off your feet? Don't expect this too often cuz it probably won't happen all that often. But since you're here, let's get another card posted. Ok? Today's card features a blue and white theme with a touch of green added in. These colors always have such a fresh feel and are very appealing.
Stamps: Flower Shop and Express Yourself
Ink: Island Indigo
Paper: Whisper White, Garden Green, Island Indigo, and Pool Party cardstock with Gingham Garden Designer Series Paper
Accessories: Big Shot with Beautifully Baroque TIEF, Little Leaves Sizzlit, Pansy Punch, Large Oval Punch, Scallop Oval Punch, Itty Bitty Shapes Punch Pack, Brights Candy Dot, AquaPainter, 2-Way Glue Pen and Dazzling Diamonds Glitter, and Dimensionals
Isn't this pretty and fresh looking for spring? I really do love this color combo. And in case you can't tell, I really, really love the Flower Shop stamp set and punch combo. It makes it so easy to do a card like this. Just stamp, punch, and layer up. Can't get too much easier than that!
I wanted to keep the cards somewhat white, so I did a little watercoloring to soften the look. Of course, the flower centers needed the glitter to finish them off and add some sparkle.
The sentiment looked a little plain compared to the rest, so I punch one bitty flower in Pool Party and added it. Then added the Turquoise Candy Dot to accent it. (It's fun to use similar colors on the card, instead of everything matching perfectly) The embossing on the white background gives the card even more texture besides all the flowers and leaves.
This is one of my most favorite cards lately. Especially when you've got gray skies outside and the weatherman is warning of freezing temps and more snow! Yuck!! Remind me again when spring is getting here?! Hope you're having a great day and thanks for stopping in to see what's new.
Happy stamping - Sharon
Stamps: Flower Shop and Express Yourself
Ink: Island Indigo
Paper: Whisper White, Garden Green, Island Indigo, and Pool Party cardstock with Gingham Garden Designer Series Paper
Accessories: Big Shot with Beautifully Baroque TIEF, Little Leaves Sizzlit, Pansy Punch, Large Oval Punch, Scallop Oval Punch, Itty Bitty Shapes Punch Pack, Brights Candy Dot, AquaPainter, 2-Way Glue Pen and Dazzling Diamonds Glitter, and Dimensionals
Isn't this pretty and fresh looking for spring? I really do love this color combo. And in case you can't tell, I really, really love the Flower Shop stamp set and punch combo. It makes it so easy to do a card like this. Just stamp, punch, and layer up. Can't get too much easier than that!
I wanted to keep the cards somewhat white, so I did a little watercoloring to soften the look. Of course, the flower centers needed the glitter to finish them off and add some sparkle.
The sentiment looked a little plain compared to the rest, so I punch one bitty flower in Pool Party and added it. Then added the Turquoise Candy Dot to accent it. (It's fun to use similar colors on the card, instead of everything matching perfectly) The embossing on the white background gives the card even more texture besides all the flowers and leaves.
This is one of my most favorite cards lately. Especially when you've got gray skies outside and the weatherman is warning of freezing temps and more snow! Yuck!! Remind me again when spring is getting here?! Hope you're having a great day and thanks for stopping in to see what's new.
Happy stamping - Sharon
Tuesday, April 15, 2014
Punchy Owl Birthday Card
Today's tax day - uuuugh!!!! And to make matters even worse, we woke up with snow!! Oh my! We really need to do something fun to offset the snowy, tax grumpies I have. So let's have a little fun focusing on a kid's card. We haven't done one of those in awhile. Since we're running into a bunch of birthdays around here for kids in the 2-5 age range, I've been doing a bit of brainstorming to come up with different ideas. One of my class ladies asked me to come up with something using the Owl Builder Punch, so this was made with her in mind.
Stamps: Woodgrain, Teeny Tiny Wishes
Ink: Early Espresso, Wild Wasabi pads, and Basic Black marker
Paper: Wild Wasabi, Soft Sky, Soft Suede, Baked Brown Sugar, Daffodil Delight, Real Red, Pacific Point, and Whisper White
Accessories: Owl Builder Punch, 1 3/4"Scallop Circle Punch, 3/4" Circle Punch, Small Oval Punch, Word Window and Modern Label Punches, White Baker's Twine, sponges, and Dimensionals
The tree was slightly shaped by cutting along one of the growth lines. The outfit and heart were punched from a left-over piece of Brights DSP that was sitting around getting in the way. It could be switched to use the back side to look more girlie.
I cut and knotted the Baker's Twine and attached it to the wing with a glue dot. The balloons were just attached over the ends of the twine with either glue dots or a Dimensional.
The eyes of the owl had the pupils colored in with Basic Black marker. The added wing was punched with the 1 3/4" Scallop Circle Punch and trimmed to be a good size for this little owl. I thought he looked cute peeking out from behind the tree.
That's it for today's card. Just a cute little card for a kid for you. Some of the ladies were already talking about changing the colors to be more girlie for their other grandkids - you know, the little girls! Thanks for stopping in today. Hope you're having a great day and getting in a little stamping too. Sharon
Stamps: Woodgrain, Teeny Tiny Wishes
Ink: Early Espresso, Wild Wasabi pads, and Basic Black marker
Paper: Wild Wasabi, Soft Sky, Soft Suede, Baked Brown Sugar, Daffodil Delight, Real Red, Pacific Point, and Whisper White
Accessories: Owl Builder Punch, 1 3/4"Scallop Circle Punch, 3/4" Circle Punch, Small Oval Punch, Word Window and Modern Label Punches, White Baker's Twine, sponges, and Dimensionals
The tree was slightly shaped by cutting along one of the growth lines. The outfit and heart were punched from a left-over piece of Brights DSP that was sitting around getting in the way. It could be switched to use the back side to look more girlie.
I cut and knotted the Baker's Twine and attached it to the wing with a glue dot. The balloons were just attached over the ends of the twine with either glue dots or a Dimensional.
The eyes of the owl had the pupils colored in with Basic Black marker. The added wing was punched with the 1 3/4" Scallop Circle Punch and trimmed to be a good size for this little owl. I thought he looked cute peeking out from behind the tree.
That's it for today's card. Just a cute little card for a kid for you. Some of the ladies were already talking about changing the colors to be more girlie for their other grandkids - you know, the little girls! Thanks for stopping in today. Hope you're having a great day and getting in a little stamping too. Sharon
Monday, April 14, 2014
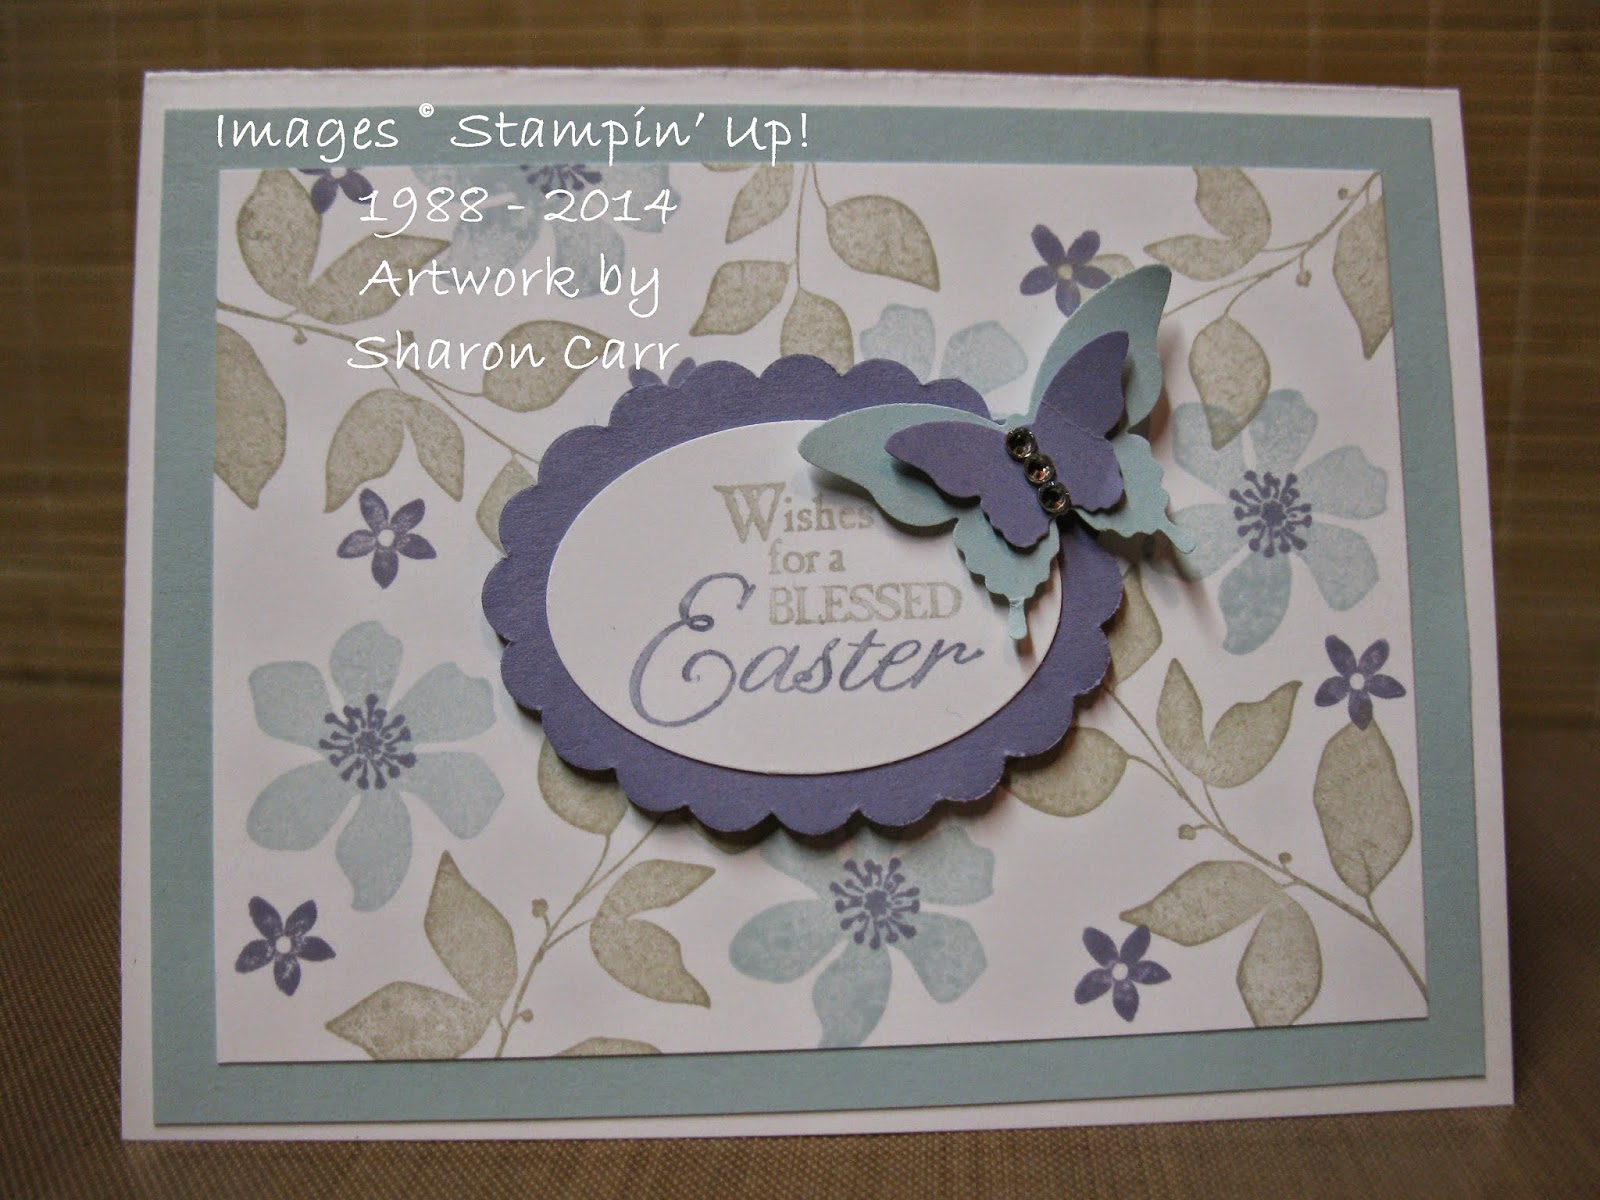
Easter Blessings Card
Have you ever had a week (or longer) that was crammed to the max with deadlines and you swore you couldn't fit another thing into your schedule? But then there was something else that needed doing, and then another thing, and still another!! That's the way it's been going for the last 14 days and I don't think I can hold out too much longer! There are so many cards I wanted to share with you that I hardly know where to start. Considering Easter is less than a week away, I guess we'll start with one of those cards today. Here's a simple card that I think is truly beautiful. Everyone in class just raved about it. So if you've got the 'ingredients' to make it, you might want to sit right down and make one for someone you care about.
Stamps: Blessed Easter, Summer Silhouettes
Ink: Soft Sky, Wisteria Wonder, and Sahara Sand pads, Sahara Sand and Wisteria Wonder markers
Paper: Whisper White, Soft Sky, Wisteria Wonder
Accessories: Elegant Butterfly and Bitty Butterfly Punches, Extra Large Oval Punch, Scallop Oval (non-SU!) punch, Rhinestone Basic Jewels, and Dimensionals
The pictures really don't do justice to the card. The colors are so soft and gentle-looking that it just makes you want to go ahhhhh. Changing the background layer to the Wisteria Wonder gives it a much more substantial look, but I really liked the airy look obtained with the Soft Sky layer.
Adding the two layers of butterfly in the same colors really makes it stand out. And of course, the rhinestones go with just about anything to give it a more elegant look.
Like I mentioned earlier, the ladies that made this in class last week were raving about the card, so it's really a winner in my book. I even went ahead and made a few more to get these in the mail to family members. I hope they like it as well. Enjoy your week ahead. Hope you find time to get everything done that you need done (without pulling out your hair in the process!!). Oops, I think I hear the little one. Break time must be over, so it's back to taking care of the grandkids. See you soon! Sharon
Stamps: Blessed Easter, Summer Silhouettes
Ink: Soft Sky, Wisteria Wonder, and Sahara Sand pads, Sahara Sand and Wisteria Wonder markers
Paper: Whisper White, Soft Sky, Wisteria Wonder
Accessories: Elegant Butterfly and Bitty Butterfly Punches, Extra Large Oval Punch, Scallop Oval (non-SU!) punch, Rhinestone Basic Jewels, and Dimensionals
The pictures really don't do justice to the card. The colors are so soft and gentle-looking that it just makes you want to go ahhhhh. Changing the background layer to the Wisteria Wonder gives it a much more substantial look, but I really liked the airy look obtained with the Soft Sky layer.
Adding the two layers of butterfly in the same colors really makes it stand out. And of course, the rhinestones go with just about anything to give it a more elegant look.
Like I mentioned earlier, the ladies that made this in class last week were raving about the card, so it's really a winner in my book. I even went ahead and made a few more to get these in the mail to family members. I hope they like it as well. Enjoy your week ahead. Hope you find time to get everything done that you need done (without pulling out your hair in the process!!). Oops, I think I hear the little one. Break time must be over, so it's back to taking care of the grandkids. See you soon! Sharon
Subscribe to:
Posts (Atom)