Thursday, October 28, 2010

Rejoicing in Christmas

Finally have a few minutes today to chat with you and share the latest card. Life's been busy around here, but I imagine all of you feel the same way. Life is just busy no matter who you are and what you're doing in your life. At least, that's what I've been hearing from so many people lately. Just the way life is. So since everyone is so busy, let's do something simple today.

One of my very favoritest stamp sets right now is the Rejoicing in Christmas set. Very simple with clean lines and words that fit nicely. I seem to be stuck on the blue and white color scheme for the set lately. Maybe next time I'll work on a different color scheme altogether and see how I like it.

Stamps: Rejoicing in Christmas
Cardstock: Marina Mist, Naturals Ivory. and Very Vanilla, with Elegant Soiree Designer Series Paper
Ink: Early Espresso, Marina Mist, and Crumb Cake
Accessories: Big Shot with Vintage Wallpaper Embossing Folder and Top Note Die, Antique Brads, Gold Lame' Pearlized Accent Paint, and Victoria Crochet Trim

Sponging the edges and embossed areas on the Naturals Ivory layer adds so much depth and contrast to the embossed layer. The Top Note layer was trimmed about 1/3 off because there simply wasn't enough room for the whole piece, and the image filled the smaller piece nicely. I didn't do any coloring on the image except for adding the Gold Lame' halos. That seemed to be all it needed to draw attention to it.

The little snippet of crochet trim was sponged with Marina Mist to give it a touch of color. And I love the small Antique Brad as an accent on the side. It is just the right accent piece for the card.

Hope you like this idea. I've got more ideas floating around up there in the gray matter, just haven't had time to see how they look in reality. Hopefully later today I'll have a little more time for stamping. Thanks for stopping by.
Sharon

Tuesday, October 26, 2010

Here Turkey Turkey

Okay, I think I've turned the corner on Halloween ideas and now we're moving on to turkey time! Yeah, my very favorite dinner - turkey and stuffing and all the trimmings, expecially that pumpkin pie! oooooh yummmmmy!! Wow, I think I've gained a few pounds around the middle just thinking about it!! So let's get our minds away from the loaded Thanksgiving table and on to a card idea.

I've seen some cute turkeys floating around out there in the blogosphere, and just played around with some ideas to get this chubby guy. Can't decide if he needs some tweaking or not. Usually there's a problem somewhere if I'm not satisfied and it's bugging me. I'll keep thinking on it and if you have any suggestions, they would be welcome. Maybe I could even send you a drumstick as a thank you for your help! lol


Stamps: Grateful Greetings (love this set!!!)
Cardstock: Peach Parfait, Chocolate Chip, Naturals Ivory, More Mustard, Pumpkin Pie, Cajun Craze, Crumb Cake, and Cherry Cobbler
Ink: Chocolate Chip
Accessories: lots of PUNCHES! Scallop Circle, Scallop Border, Ticket Corner, Boho Blossom, Horizontal Slot, 1/4" Circle, 3/4" Circle, 1 3/8" Circle, 1/4" Square, Owl Punch, White Gel Pen, Sponge quarter, Chocolate Chip Grosgrain Ribbon (retired), and Dimensionals


What a mess! It looked like most of the punches I owned were strewn across my table by the time this was made.

Looking at him, I'm thinking maybe the head is too big on this turkey. Okay, I know the head is too big for a realistic turkey, but is it too big for this one??? Maybe that's what's throwing me off on him?! I guess that's one I'll have to think on for awhile longer it seems. Or maybe I'm just making way too much out of this turkey altogether and I need to get over it!

Anyway, thanks for stopping by and sharing a few minutes of your day with me. See you soon!
Sharon

Saturday, October 23, 2010

A Different Type of Ghost

Yes, Halloween is almost upon us (only 8 more days if you're counting) and I'm trying to share everything with you all before it's too late. Well, I guess it's never too late to share an idea, but I'd prefer to share the ideas before the holiday has come and gone. So without further ado, on with the sharing! This card is a punchy ghost. He's almost completely punched with the large oval punch. Hope you like it...
Stamps: All Holidays
Cardstock: Naturals White, Whisper White, Basic Black, and Elegant Eggplant
Ink: Elegant Eggplant
Accessories: Big Shot with Top Note die, Large Oval Punch, Modern Label Punch, 1/2" Circle Punch, White Gel Pen, and Dimensionals
This scary dude was fun to put together. Once you got the pieces punched and everything sponged with the Eggplant ink, it was a snap to put together. By changing the placement of the eyes and eyebrows, you can get all kinds of expressions! Everything from mad, to scared, to surprised.
One little trick I especially liked was attaching the top of the nose directly to the card, but using a Dimensional under the end of the nose to make it stand out a bit. Just a little extra bit of whimsy to make someone smile.
Well, that's it for today. Thanks for dropping by and saying hi to my little scary dude!
Sharon

Friday, October 22, 2010

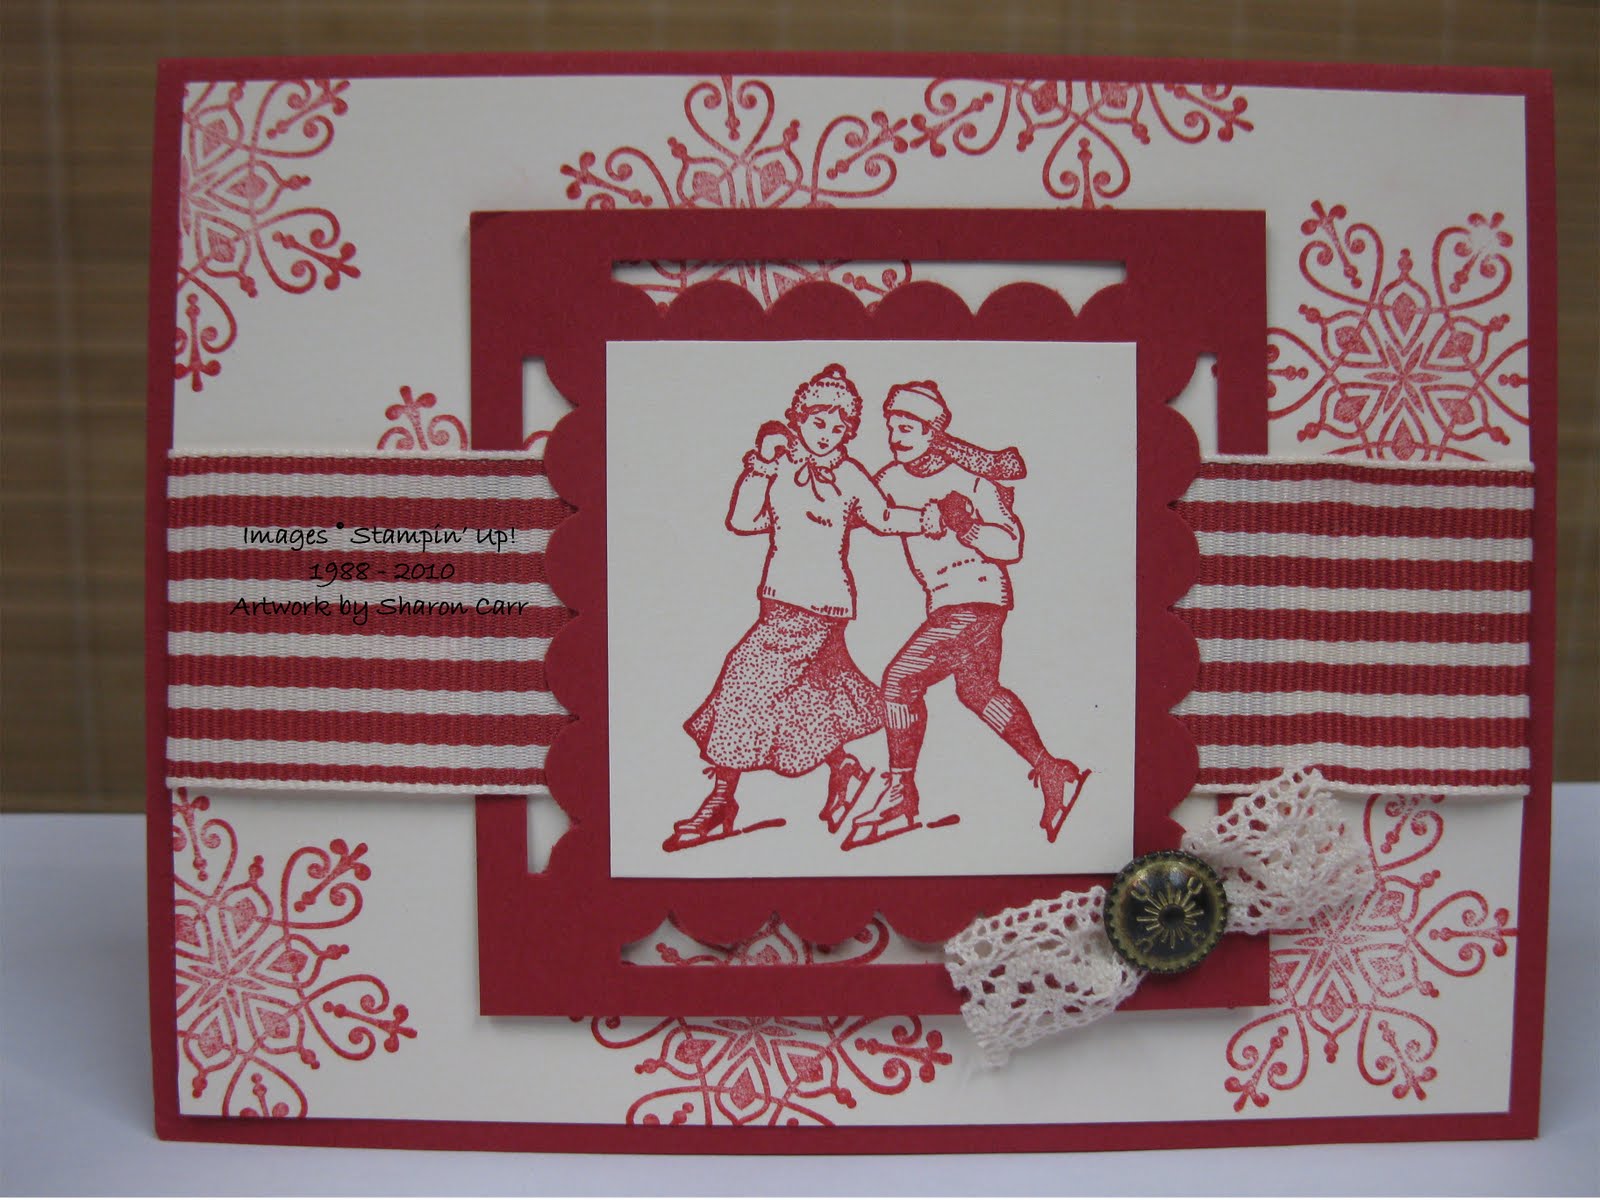
Winter Skaters in Reds

Well, after perusing my stamp shelves, I realized I've have been ignoring many of my Christmas stamps. It was really time to get busy and get them down from those cobwebby shelves. Today's plan was to use the Winter Post set. Ah, yes, those vintage skaters. You remember them, right? I decided to do something simple without a lot of fuss and little touch of the old fashioned to it. Here's what I came up with.....
Stamps: Winter Post
Cardstock: Riding Hood Red, Very Vanilla
Ink: Riding Hood Red
Accessories: Scallop Border Punch, Victoria Crochet Trim, Antique Brads, and Striped Red Ribbon
As you can see, there just isn't too much fussing around with this card. Pretty straight forward, but interesting looking anyway.
Last year a stamping friend, Terry Makelim used this frame idea for a card swap. I thought it was really classy looking and thought I'd use it for this. If you want to make something similar, the biggest challenge is gettting the size of the red frame right so the punching and the stamped image all works together. If you want to try this, the red cardstock measures 3" x 3" and the Vanilla piece is 2" x 2". That simple. Now go out and give this idea a try. It's always a classy look to frame up your main image like this.
Thanks for stopping by today. Hope to be back soon!
Sharon

Thursday, October 21, 2010

Scaredy Ghosts

A while back (when I had more time on my hands), I was blog surfing and saw such a cute idea that I had to case it. The creator of this cute idea is Carrie Gaskin. I remembered to get her name, but I omitted to get her blog address so I can't send you there - sorry! Needless to say, my card is similar to hers, but I did make a few changes like omitting the ribbon (I didn't think they needed any ribbon), changed the cardstock colors, and I changed the stamps I used. The ghosts are totally her idea though, and aren't they just the cutest?

Stamps: Circle Circus and All Holidays

Cardstock: Naturals White, Pear Pizzazz, Elegant Eggplant, Pumpkin Pie, Basic Black, and Whisper White

Ink: Elegant Eggplant, Basic Black Pads and Basic Black Marker

Accessories: Big Shot with Leaves #2 Die, Paper Snips, 1/4" Circle Punch, Dimensionals, and tiny googly eyes


Didn't I tell you they were cute? I wouldn't steer you wrong here. When I realized the ghost shape was the leaf die, that was a real 'duh' moment for me!! How quick and easy to get a great ghostly shape! All you need to do is get those cool eyes and just add the little lines around the mouth and eyes to get the bestest ghosties yet!


Hope you enjoy them. There's still time to make some of these quick cards for Halloween. Thanks for stopping by today.

Sharon

Wednesday, October 20, 2010

Get Well Owl

While at church on Sunday, we prayed for several people I know that have been ill. Thought it was time to get another batch of get-well cards made as my stash was pretty well depleted. I wanted an idea that would be quick and also could be used for either a man or woman. I think this little card is just the thing I needed and was quite happy with the results. What do you think??


Stamps: Teeny Tiny Wishes

Cardstock: Very Vanilla, Baja Breeze, Old Olive, Early Espresso, Whisper White, and Basic Black, with Elegant Soiree Designer Series Paper

Ink: Early Espresso

Accessories: Big Shot with Square Lattice Embossing Folder, 2-Step Owl Punch, 2-Step Bird Punch, and Early Espresso 1/8" Taffeta Ribbon


Well, I think I nailed the card on all the guidelines I set - quick and simple, gender neutral. And I replenished my stash of cards for the near future too! Now I hope nobody is in need of one of these cards for awhile. It's nice having them on hand, but I feel bad when I have the need for them!


I just have to mention how much I like the Elegant Soiree DSP that's used here. That little hint of Baja Breeze on the DSP really makes it cute. And the paper design makes it look like feathers! Just the perfect paper design for these little owls.


Hope you enjoyed this idea. Thanks for stopping by. You know I really appreciate all of your comments. (especially you Rhonda - you always make me smile!) Have a terrific week. And the grandbaby is awake so it's time to get back to work!!
Hugs,
Sharon

Sunday, October 17, 2010

Cheery Dasher

My goodness! Here it is already the middle of October and I haven't had Dasher off the shelf yet! Remember him - that cute little reindeer? He's still around you know. Last year I couldn't stop using the stamp, and this year he's been languishing on the shelf. Poor little reindeer!! Well, that means it's time to dust him off and ink him up. I'm sure he'll be much happier with a fresh coat of ink on him. And there's new Designer Papers to use, and new colors. That's just what he needs to freshen him up a bit. So off we go....
Stamps: Dasher, Snow Swirled, and Teeny Tiny Wishes
Cardstock: Sahara Sand, Early Espresso, Cherry Cobbler, and Whisper White with Deck the Halls Designer Series Paper
Ink: Cherry Cobbler and Early Espresso
Accessories: Word Window Punch, Modern Label Punch, Scallop Oval Punch, Scallop Square Punch, Cherry Cobbler 1/2" Seam Binding, Basic Pearls, and Dimensionals
This card looks very festive in an understated vintage way. I don't always want glitzy, bright cards. In fact, I usually go much more for the clean and simple look like this card.
If you haven't tried the new Seam Binding ribbon, you really need to give it a try. It's so soft and supple, you can easily make a nice bow. Too bad this card didn't seem to have enough room for a full bow, so it just has a little knot instead. And don't all these colors match nicely? From the ink and ribbon, to the cardstock and DSP, all of the Cherry Cobbler pieces look wonderful together. Stampin' Up! makes it so easy for all of you 'picky color people' to be satisfied and happy with the results! Come on, I know there's lots of us out there that just have to have everything match up just right!! lol So get your supplies out and start stamping. You're going to have fun and make a masterpiece, I'm sure of it!
Happy stamping!
Sharon