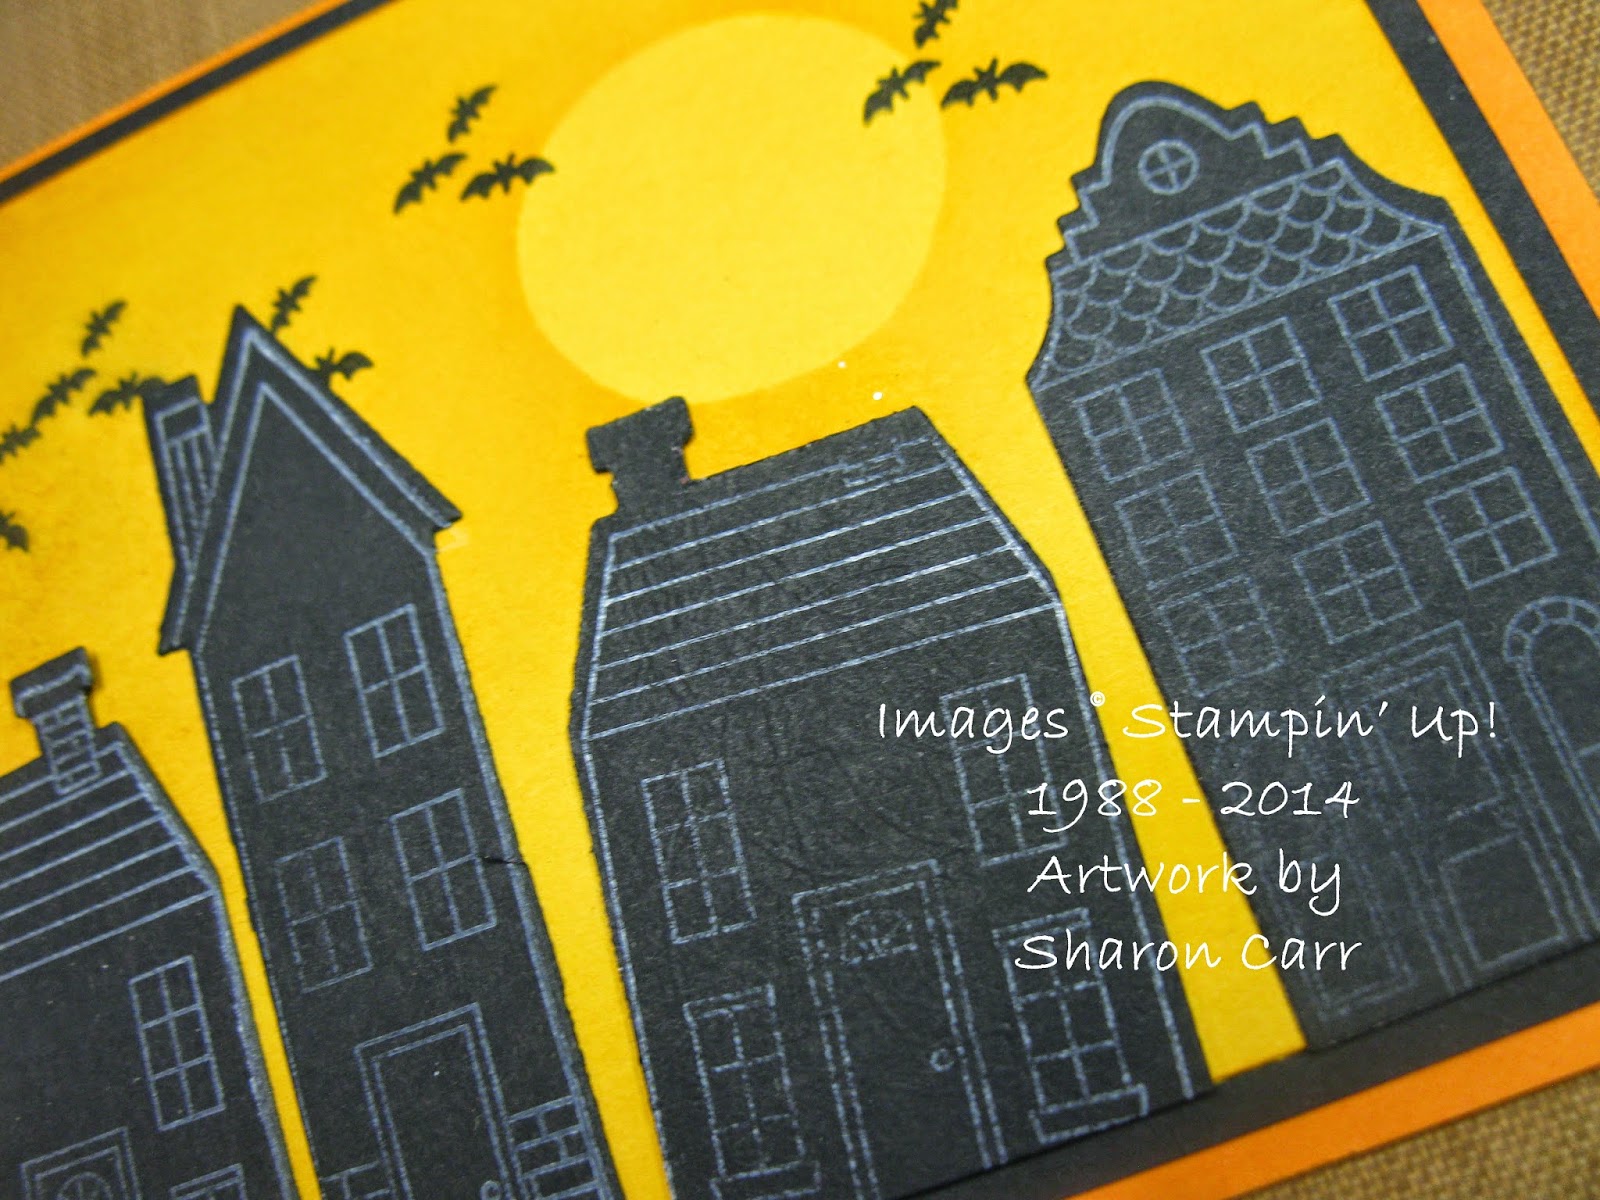
First off, I want to thank all of you who have continued to check in here even when I wasn't up to blogging. It's been hard lately dealing with everything going on, and I haven't been able to keep it all balanced and going forward for months now. Hopefully I can start getting back in the groove and enjoying life again. Ok, enough of that. Now it's time to share some card ideas, right? The card today is from a set in the Holiday Catalog that is so much fun. It's such a versatile stamp set, it was hard to decide what to make first. Hope you like this idea...
Stamps: Holiday Home and Frightful Wreath
Ink: Pumpkin Pie, Cajun Craze, Stazon Jet Black, and Craft White
Paper: Pumpkin Pie, Basic Black, Daffodil Delight
Accessories: Big Shot with Homemade Holiday Framelits, 1 1/4" Circle Punch, Sponge quarters, and a Post-It Note
Isn't this card fun? The circle was punched from a Post-It Note and used to mask in the moon. Both Pumpkin Pie and Cajun Craze were used to lightly sponge in the sky area so the moon would show. Then the bats were stamped in - maybe too many?? Or maybe just enough.
The houses were stamped with White Craft ink then die-cut with the Homemade Holiday Framelits. (love having framelits to match!!)
The inside sentiment I used is from the Frightful Wreath stamp set - nice big sentiments to fit across the whole card.
That's it for this easy Halloween card. Next time I use the set, I'm thinking I'd like to try a Thanksgiving card. We'll see. Thanks for stopping in one more time to check on me. Hopefully I'll be better equipped to post on a more regular basis. Talk to you soon... Sharon
Showing posts with label Halloween. Show all posts
Sunday, September 28, 2014
Wednesday, October 9, 2013
Bite Me Halloween
I mentioned how much I'm enjoying the clear Photopolymer stamps when using them, and today I have another example for you. As soon as I saw the new 'Bite Me' set, I knew I 'needed' to get it! It's just so dog-gone cute!! So of course I had to sit down and use it as soon as possible, right? I had the colors chosen and the layout settled on, but it didn't look quite finished. So I checked to see what other people had done with it. Imagine my surprise when I found something quite similar to mine already posted. But she had used the spatter stamp along the bottom with the cardstock colors. So I tried that with mine, and I love it!! Here it is...
Stamps: Bite Me Photopolymer set
Ink: Stazon Jet Black, Pear Pizzazz, and Elegant Eggplant
Paper: Pear Pizzazz, Elegant Eggplant, and Whisper White
I had thought of using the lines in the Gorgeous Grunge set along the bottom here, but I really like that the whole card is made with just one stamp set. I'm lovin' using these photopolymer stamps. You can see exactly where you're placing the stamp. It was easy to get the long spider webbing to come down right next to the wording without being on top of it.
And speaking about the words, there are 4 different sentiments in this set! WooHoo! I know I'm always looking for a sentiment to fit on a card and this set has four really cute ones! Sure makes me happy.
Had the 2nd class this afternoon. Only one more class this week and that's tomorrow night. This always seems like such a long week for me, but I love spending time with my friends and sharing what I love about Stampin' Up! That's it for today. Thanks for stopping in again today. I'd love to hear what you think of my stamping ideas. Please leave me a comment if you've got time. Sharon
Stamps: Bite Me Photopolymer set
Ink: Stazon Jet Black, Pear Pizzazz, and Elegant Eggplant
Paper: Pear Pizzazz, Elegant Eggplant, and Whisper White
I had thought of using the lines in the Gorgeous Grunge set along the bottom here, but I really like that the whole card is made with just one stamp set. I'm lovin' using these photopolymer stamps. You can see exactly where you're placing the stamp. It was easy to get the long spider webbing to come down right next to the wording without being on top of it.
And speaking about the words, there are 4 different sentiments in this set! WooHoo! I know I'm always looking for a sentiment to fit on a card and this set has four really cute ones! Sure makes me happy.
Had the 2nd class this afternoon. Only one more class this week and that's tomorrow night. This always seems like such a long week for me, but I love spending time with my friends and sharing what I love about Stampin' Up! That's it for today. Thanks for stopping in again today. I'd love to hear what you think of my stamping ideas. Please leave me a comment if you've got time. Sharon
Monday, September 30, 2013
Grunge Meets Halloween
Giving it a little thought, seems like Halloween and grunge would be a perfect match. So that's what I set out to do. I pulled out my grunge set first and then went searching for something that would compliment it. I found a couple items that seemed made to go together, so I sat down to play. Here's the results. I think it worked out nicely. What do you think?
Stamps: Six-Sided Sampler, Gorgeous Grunge, and Perfectly You(hostess set)
Ink: Early Espresso, Pumpkin Pie, and Crumb Cake
Paper: Crumb Cake, Early Espresso, and Very Vanilla
Accessories: Hexagon Punch, Witches' Brew Washi Tape, Sponge Dauber, and Dimensionals
I started out with the Pumpkin Pie and Early Espresso (off-stamped) stamped onto the folded Crumb Cake card. I liked the hexagon pumpkin from the hostess set and wanted to use that as the focal point. Seemed it was just too small by itself, so two of the hexagons from the Six-Sided Sampler set were added to it. Still not enough weight there, so I added the strip of Early Espresso cardstock to anchor the hexagons - perfect.
Now it needed something else - ribbon, brads, buttons - nope, not quite right. Oh yes, the cool Witches' Brew Washi Tape would be just the thing. I added a little strip of each of the tapes and there you have it. A quick and cute Halloween card using bits of this and that.
I'm off to do a workshop tonight. Looking forward to seeing everyone there. We'll be having lots of fun and showing off some new goodies and samples. So that means I'll have more to share with you later on in the week. Hooray! Happy stamping, Sharon
Stamps: Six-Sided Sampler, Gorgeous Grunge, and Perfectly You(hostess set)
Ink: Early Espresso, Pumpkin Pie, and Crumb Cake
Paper: Crumb Cake, Early Espresso, and Very Vanilla
Accessories: Hexagon Punch, Witches' Brew Washi Tape, Sponge Dauber, and Dimensionals
I started out with the Pumpkin Pie and Early Espresso (off-stamped) stamped onto the folded Crumb Cake card. I liked the hexagon pumpkin from the hostess set and wanted to use that as the focal point. Seemed it was just too small by itself, so two of the hexagons from the Six-Sided Sampler set were added to it. Still not enough weight there, so I added the strip of Early Espresso cardstock to anchor the hexagons - perfect.
Now it needed something else - ribbon, brads, buttons - nope, not quite right. Oh yes, the cool Witches' Brew Washi Tape would be just the thing. I added a little strip of each of the tapes and there you have it. A quick and cute Halloween card using bits of this and that.
I'm off to do a workshop tonight. Looking forward to seeing everyone there. We'll be having lots of fun and showing off some new goodies and samples. So that means I'll have more to share with you later on in the week. Hooray! Happy stamping, Sharon
Tuesday, September 17, 2013
A Little Halloween Happiness
Even though I love autumn, I'm not too crazy about all the spooky stuff of Halloween. If you've seen my Halloween cards over the years, you know that. If it's cutesy, I think it works, but none of the ghoulish type stuff. So today's card definitely fits in with that category of cutesy. I'll probably send this one off to one of my sisters or a friend. I think any of them would like this cute little card too.
Stamps: Halloween Happiness
Ink: Pumpkin Pie, Tangerine Tango, Cajun Craze, Old Olive, and Chocolate Chip markers
Paper: Very Vanilla, Pumpkin Pie, Chocolate Chip, and Sweater Weather Designer Series Paper
Accessories: Big Shot with Perfect Polka Dots TIEF, Ovals Collection Framelits, Magnetic Platform , Dimensionals, and a retired ribbon
These pumpkins are just too stinkin' cute! I love all the different texture and patterns here and just followed through on enhancing that with different markers to color them. To stick with the textured look, I chose the Polka Dot TIEF to give the background some texture too.
I love, love, love that Sweater Weather DSP and wanted to show it off a little. The colors and prints are just so yummy! So I off-set the oval instead of plunking down in the middle as usual. After trying several different ideas for an accent on the card, I raided my stash of retired ribbon and found just the right one. It has the texture of the grosgrain ribbon in the chocolate chip color with the added stitching in white to make it stand out. All in all, I love how the card turned out and can't wait to send it off..
Thanks for stopping in today. Hope your day is fabulous and you find time for stamping! Hugs, Sharon
Stamps: Halloween Happiness
Ink: Pumpkin Pie, Tangerine Tango, Cajun Craze, Old Olive, and Chocolate Chip markers
Paper: Very Vanilla, Pumpkin Pie, Chocolate Chip, and Sweater Weather Designer Series Paper
Accessories: Big Shot with Perfect Polka Dots TIEF, Ovals Collection Framelits, Magnetic Platform , Dimensionals, and a retired ribbon
These pumpkins are just too stinkin' cute! I love all the different texture and patterns here and just followed through on enhancing that with different markers to color them. To stick with the textured look, I chose the Polka Dot TIEF to give the background some texture too.
I love, love, love that Sweater Weather DSP and wanted to show it off a little. The colors and prints are just so yummy! So I off-set the oval instead of plunking down in the middle as usual. After trying several different ideas for an accent on the card, I raided my stash of retired ribbon and found just the right one. It has the texture of the grosgrain ribbon in the chocolate chip color with the added stitching in white to make it stand out. All in all, I love how the card turned out and can't wait to send it off..
Thanks for stopping in today. Hope your day is fabulous and you find time for stamping! Hugs, Sharon
Wednesday, August 14, 2013
Halloween Hexes
Hexes as in hexagons that is! This Six-Sided Sampler set is turning into one of my favorites lately. It can fit any occasion or season depending on what colors you use. How handy is that? Here's what I mean - it's my latest foray into playing with this set...
Stamps: Six-Sided Sampler, Wacky Wishes, and Autumn Apparitions(retired)
Ink: Early Espresso, Cajun Craze and More Mustard(retired)
Paper: Very Vanilla (and a retired DSP that I don't remember the name of from my stash)
Accessories: Hexagon Punch
In many ways, this is such a quick and easy card to make. The whole project is a mix of new and old, so this is a good reminder not to throw away the old just because it's old! The printed Designer Paper was just a small scrap left over that I liked too much to discard and knew it would come in handy one day. Well, this was the day. I'm sure the color was actually Really Rust, but it worked well with this project idea and the colors I had planned to use.
The different hexagon prints are all from the newer Six-Sided Sampler that I really love! There are just so many different possibilities available when you get this set in your hands. The small pumpkin and spider are from a retired set called Autumn Apparitions. I keep hanging on to this set because of the cool little spider. It's just the perfect addition to those Halloween cards and goodies I like to make.
Well, that's it for today. Just short and sweet and quick to stamp. Can't get any better than that. If you don't have the retired items I've used here, just peruse the catalog and pick up something that you can easily substitute for this idea. Have fun stamping! Sharon
Stamps: Six-Sided Sampler, Wacky Wishes, and Autumn Apparitions(retired)
Ink: Early Espresso, Cajun Craze and More Mustard(retired)
Paper: Very Vanilla (and a retired DSP that I don't remember the name of from my stash)
Accessories: Hexagon Punch
In many ways, this is such a quick and easy card to make. The whole project is a mix of new and old, so this is a good reminder not to throw away the old just because it's old! The printed Designer Paper was just a small scrap left over that I liked too much to discard and knew it would come in handy one day. Well, this was the day. I'm sure the color was actually Really Rust, but it worked well with this project idea and the colors I had planned to use.
The different hexagon prints are all from the newer Six-Sided Sampler that I really love! There are just so many different possibilities available when you get this set in your hands. The small pumpkin and spider are from a retired set called Autumn Apparitions. I keep hanging on to this set because of the cool little spider. It's just the perfect addition to those Halloween cards and goodies I like to make.
Well, that's it for today. Just short and sweet and quick to stamp. Can't get any better than that. If you don't have the retired items I've used here, just peruse the catalog and pick up something that you can easily substitute for this idea. Have fun stamping! Sharon
Sunday, September 30, 2012
Mummyfied Treat Card
What a great day it's been today! I got lots of stamping and planning done for our stamping at church on Tuesday night. It's always quite a production getting the different cards planned and then cutting all the cardstock, ribbons, etc and gathering everything needed to make 120-150 cards each month for our military personnel overseas. This is really a labor of love for myself and all the ladies that come every month to make the cards. It's wonderful to be able to do something to let our soldiers know that we appreciate them and all they do. Anyway, since this time around I was using so many retired items, I thought you wouldn't be interested in them. So I've got a cutesy Halloween treat card to share with you instead. I'll be honest and tell you I've seen a good number of versions of this idea out there on the net, but you can always use one more. Can't you?? Hope so, 'cuz here it comes!
Stamps: Googly Ghouls and Grateful Greetings(retired)
Ink: Basic Black and Basic Gray
Paper: Pumpkin Pie, Basic Black, Very Vanilla and Howlstooth and Scaringbone DSP
Accessories: 1" Circle Punch, 1 1/4" Circle Punch, Modern Label Punch, Dotted Scallop Ribbon Border Punch, Googlie Eyes, Sponge Dauber, and candy
As you can see, this is an easy tri-fold card. It folds up nicely to hide the candy treat inside. I chose to use a retired sentiment set because it fit the card so well.
The hole for the mummy to peek through was made by the 1 1/4"Circle Punch punched on the fold only halfway in. This gives you the perfect size to pop him in and it opens easily around the mummy.
Of course, one of the Googlies were used for his eye. Having that extra touch just makes the card perfect. And I saw the candy out for Halloween already and thought the orange color would work well with this idea.
Ok, here we go again with the twisted picture! I really don't know why some of my pictures keep posting on their side. When I take the pic and label it, it's always correct. But as soon as it's posted, there it is laying down on it's side again! What frustration! I'm about ready to start pulling my hair out, but I don't have enough to spare so I better not! grin
Thanks for stopping in for a peek. Hope you have a great week ahead. The weather's been gorgeous with sunshine and blue skies - perfect fall weather. I need to get outside tomorrow and enjoy it instead of hiding in the stamp cave.
Happy stamping - Sharon
Stamps: Googly Ghouls and Grateful Greetings(retired)
Ink: Basic Black and Basic Gray
Paper: Pumpkin Pie, Basic Black, Very Vanilla and Howlstooth and Scaringbone DSP
Accessories: 1" Circle Punch, 1 1/4" Circle Punch, Modern Label Punch, Dotted Scallop Ribbon Border Punch, Googlie Eyes, Sponge Dauber, and candy
As you can see, this is an easy tri-fold card. It folds up nicely to hide the candy treat inside. I chose to use a retired sentiment set because it fit the card so well.
The hole for the mummy to peek through was made by the 1 1/4"Circle Punch punched on the fold only halfway in. This gives you the perfect size to pop him in and it opens easily around the mummy.
Of course, one of the Googlies were used for his eye. Having that extra touch just makes the card perfect. And I saw the candy out for Halloween already and thought the orange color would work well with this idea.
Ok, here we go again with the twisted picture! I really don't know why some of my pictures keep posting on their side. When I take the pic and label it, it's always correct. But as soon as it's posted, there it is laying down on it's side again! What frustration! I'm about ready to start pulling my hair out, but I don't have enough to spare so I better not! grin
Thanks for stopping in for a peek. Hope you have a great week ahead. The weather's been gorgeous with sunshine and blue skies - perfect fall weather. I need to get outside tomorrow and enjoy it instead of hiding in the stamp cave.
Happy stamping - Sharon
Saturday, September 22, 2012
Halloween Medallions
How strange it is when creative minds are thinking alike! The past 2 weeks I'd been playing around making some new Halloween decorations. You have to understand about this. You see, Halloween isn't my favorite holiday, but I have an evergreen swag with twinkle lights draped on the top of my entertainment center that stays up all year. I just change out the little treasures that are nestled or hung from it every season. And it was getting to be time for the ghosts and goblins to come out, but the old ones were looking a little droopy and faded. So I've been working on new DSP medallions to go up there. I wanted them two-sided so they could be for Halloween and the rest of fall too. They were about finished with just a few fall ideas for the back to finish when the latest "Stampin' Success" came in the mail. Imagine my surprise when I saw exactly what I'd been working on featured in the magazine!! Wow! Deja vu and all that, you know?
Anyway, here are mine - a little bigger, but very similar!
I've no idea why 2 of the pictures flipped sideways and can't get them to behave themselves. What a hassle! Anyway, you can see just how cute they turned out and I can't wait to get them hung upstairs.
After seeing the layout in the magazine, I made the little one like one that was pictured there. It was made with black cardstock that was cut 1" wide. All the rest were made with Howlstooth and Scaringbone Designer Series Paper that was cut 2" wide. I also used the Silver Glimmer paper to add some glitz to them because most of them looked on the dark side. As you can see from the back of one, I added pumpkins and/or fall-toned leaves, so I can just flip them over to the backside and they'll do double duty through November. These are so easy to make using the Simply Scoring Tool. The larger ones were all scored every 1/2" and the little black one was every 1/4". All the embellishments were stamped and punched with whatever seemed to fit nicely with the paper colors and prints. I think my favorite is this one here to the left with the Tangerine Tango and Black striped DSP. Love how it turned out with two layers of scallop punched circles layered on under the stamped bat. (After I saw the magazine, I added a rhinestone to the bat like they had done.)
I can't tell you how much fun these are to make. You can use any paper, in any color, for any holiday or special theme. I'm already thinking up ideas to update my Christmas danglies (that's probably not a word, is it?). Anyway, it's lots of fun, so give it a try.
tip: With the Silicone Craft Sheet in the mini catalog, it's so easy to glue these medallions together with your hot glue gun without worrying about sticking to everything. You can even squeeze out a glob of glue right onto the sheet and work from there to put the medallion together! Easy peasy for sure!
Okay, I'm done fussing with this post. The entire layout has gotten jazzed and I'm too tired and frustrated to figure it out. I am soooooo not computer literate!!! Arrrrgggghhh! Oh well, at least you can see the pictures and get and idea what I did. Have fun stamping! Sharon
Saturday, August 25, 2012
Spooky Canning Jar
I finally got around to sitting down to work with the stamped pieces that wouldn't come together several days ago. Hey, they finally worked together with some Cajun Craze and Midnight Muse. What an interesting color combo - a little dark, but it fits in with that 'dark & dreary' line from Poe! Who would have guessed? Anyway, here's what I ended up with today...
Stamps: Perfectly Preserved, Googlie Ghouls, Wicked Cool, and Wacky Wishes
Ink: Cajun Craze, Midnight Muse, Basic Gray, and Crumb Cake
Paper: Midnight Muse, Cajun Craze, and Whisper White
Accessories: AquaPainter, Big Shot with Spider Web TIEF, Cajun Craze Dotted Grosgrain Ribbon(ret), Sponge Dauber, and Dimensionals
As soon as I saw the canning jar, I just knew I wanted to make an empty one with cobwebs in it for fall. Yes, I know, it's a little weird, isn't it? I was pulling just about every Halloween stamp I own off the shelves to figure out what would work together. I wasn't going to stamp a spider inside the jar 'cuz it was too big, but changed my mind at the last minute.
One thing that I always try to do is stick with one style of font on a card. Welllll.... as you can see, that idea didn't work here at all. Three different fonts on one card! How crazy!!
Before putting all the pieces together, I gave them a soft sponging with Crumb Cake so it wasn't so stark white. I was surprised to see how nicely it also worked sponging the edges of the Cajun Craze spider web layer. I really didn't think it'd show up much at all, but I was wrong. Just enough darkening on the edges.
So that's it for today. I'm so excited that I also finished a card for classes next month already! I can't show you yet, but it's darn cute! Stay tuned, I'll be sharing it in about two weeks. I don't want to ruin the surprise for the class ladies, now do I?! Have a great week end. And keep stamping, Sharon
Stamps: Perfectly Preserved, Googlie Ghouls, Wicked Cool, and Wacky Wishes
Ink: Cajun Craze, Midnight Muse, Basic Gray, and Crumb Cake
Paper: Midnight Muse, Cajun Craze, and Whisper White
Accessories: AquaPainter, Big Shot with Spider Web TIEF, Cajun Craze Dotted Grosgrain Ribbon(ret), Sponge Dauber, and Dimensionals
As soon as I saw the canning jar, I just knew I wanted to make an empty one with cobwebs in it for fall. Yes, I know, it's a little weird, isn't it? I was pulling just about every Halloween stamp I own off the shelves to figure out what would work together. I wasn't going to stamp a spider inside the jar 'cuz it was too big, but changed my mind at the last minute.
One thing that I always try to do is stick with one style of font on a card. Welllll.... as you can see, that idea didn't work here at all. Three different fonts on one card! How crazy!!
Before putting all the pieces together, I gave them a soft sponging with Crumb Cake so it wasn't so stark white. I was surprised to see how nicely it also worked sponging the edges of the Cajun Craze spider web layer. I really didn't think it'd show up much at all, but I was wrong. Just enough darkening on the edges.
So that's it for today. I'm so excited that I also finished a card for classes next month already! I can't show you yet, but it's darn cute! Stay tuned, I'll be sharing it in about two weeks. I don't want to ruin the surprise for the class ladies, now do I?! Have a great week end. And keep stamping, Sharon
Thursday, October 27, 2011
Last Halloween Card
Last night I finally finished up the last of the Halloween cards I'm sending out. Ladies in class made a version of this card earlier this month as one of the projects. It just took me a little while to get around to making mine up to send out. This card is pretty much copied from "Stampin' Success" which is Stampin'Up!'s magazine for demonstrators. They showed a card using the new Simply Scored Scoring Tool which I totally luv!! Of course I changed it so I could use what I had on hand to give me a similar look. This is the finished card...
Stamps: Batty For You and Grateful Greetings
Cardstock: Concord Crush, River Rock, Old Olive, and More Mustard with Brights Pattern Pack of Designer Series Paper
Ink: Basic Black
Accessories: Simply Scored Scoring Tool, 1 3/4" Scallop Circle Punch, 1 3/8" Circle Punch, Paper Snips, Sticky Strip, and Multi-Purpose Glue

I just love the color combination of purple and orange. They are just perfect foils for each other. And the River Rock is a good accent color instead of either White or Vanilla.
I think I've mentioned how easy and fun the Simply Scored Tool works. Using the stylus does a great job of keeping the lighter weight DSP from tearing through when you score. I've found that using the smaller end for cardstock and the larger end for all your lighter weight papers works just right. This piece was scored every 1/4". For larger medallions, it's fun to score every 1/2" for a much more substantial piece like ornaments or extra bling for your gift packages. Just something to think about since Christmas seems to be just around the corner and creeping up fast. (now that's scary!)
Have fun putting the final touches on your Halloween decorations and costumes. If the weather is cooperating, we'll be joining our kids taking our grandson out for trick or treating this year. Doesn't that sound like fun? Spooooky greeeeetings! Sharon
Stamps: Batty For You and Grateful GreetingsCardstock: Concord Crush, River Rock, Old Olive, and More Mustard with Brights Pattern Pack of Designer Series Paper
Ink: Basic Black
Accessories: Simply Scored Scoring Tool, 1 3/4" Scallop Circle Punch, 1 3/8" Circle Punch, Paper Snips, Sticky Strip, and Multi-Purpose Glue

I just love the color combination of purple and orange. They are just perfect foils for each other. And the River Rock is a good accent color instead of either White or Vanilla.
I think I've mentioned how easy and fun the Simply Scored Tool works. Using the stylus does a great job of keeping the lighter weight DSP from tearing through when you score. I've found that using the smaller end for cardstock and the larger end for all your lighter weight papers works just right. This piece was scored every 1/4". For larger medallions, it's fun to score every 1/2" for a much more substantial piece like ornaments or extra bling for your gift packages. Just something to think about since Christmas seems to be just around the corner and creeping up fast. (now that's scary!)
Have fun putting the final touches on your Halloween decorations and costumes. If the weather is cooperating, we'll be joining our kids taking our grandson out for trick or treating this year. Doesn't that sound like fun? Spooooky greeeeetings! Sharon
Sunday, October 23, 2011
Grandson's Halloween Card
Thought I'd share another Halloween card with you since there's another week to go before the 'spooky day' arrives. I just did a simple little card for my grandson. As he's just under 18 months, I didn't think he'd care about fancy techniques or lots of embellishments. So this card is sweet and simple in the extreme! And I confess I went scrounging around in my retired stash looking for a cute purple cardstock to use. So, here it is...
Stamps: Jack of All Trades, and Autumn Apparitions (retired)
Cardstock: Basic Black, Tangerine Tango, and Vintage Violet (retired)
Ink: Tangerine Tango, Old Olive, and Basic Black
Accessories: Paper Snips and Dimensionals

It's so funny that I can't even tell you the names of the DSP that I used! They were from the time when our DSP was printed only on one side and white on the back. How long ago was that? And I only had a few smaller pieces still left. So what was it I used - I have absolutely no idea!! But it went nicely with the Tangerine Tango that I wanted to use for the pumpkin, and that's all I needed to know.
I forgot to take a pic of the inside where I used the spider and bat along with the sentiment from the Autumn Apparitions set. Hope he likes his little card. It's only a 4 1/4" square little card - just his size.
Thanks for stopping in and seeing what's new (or sometimes old!). Hope you're having a serene and relaxing Sunday. There's something so refreshing about going to church in the morning and then relaxing on a Sunday afternoon. It's my favorite day of the week! Enjoy! Sharon
Stamps: Jack of All Trades, and Autumn Apparitions (retired)Cardstock: Basic Black, Tangerine Tango, and Vintage Violet (retired)
Ink: Tangerine Tango, Old Olive, and Basic Black
Accessories: Paper Snips and Dimensionals

It's so funny that I can't even tell you the names of the DSP that I used! They were from the time when our DSP was printed only on one side and white on the back. How long ago was that? And I only had a few smaller pieces still left. So what was it I used - I have absolutely no idea!! But it went nicely with the Tangerine Tango that I wanted to use for the pumpkin, and that's all I needed to know.
I forgot to take a pic of the inside where I used the spider and bat along with the sentiment from the Autumn Apparitions set. Hope he likes his little card. It's only a 4 1/4" square little card - just his size.
Thanks for stopping in and seeing what's new (or sometimes old!). Hope you're having a serene and relaxing Sunday. There's something so refreshing about going to church in the morning and then relaxing on a Sunday afternoon. It's my favorite day of the week! Enjoy! Sharon
Tuesday, September 20, 2011
Spider Web Greetings
Today I wanted to share a Halloween card that could be done two different ways, depending on which you prefer. It's a very simple card to make, but it's fun. The sketch could be used for any number of different occasions by just changing up the tag that's tucked into the card. I'm sure you'll get all kinds of ideas for this sketch once you give it a little thought. Now, on to the card!
Stamps: Grateful Greetings and Wicked Cool
Cardstock: Crumb Cake, Early Espresso, Pumpkin Pie, and Very Vanilla
Ink: Pumpkin Pie and Early Espresso
Accessories: Big Shot with Spider Web Embossing Folder, Pumpkin Pie 1/4" Grosgrain Ribbon, Word Window Punch, Sponge quarter, and a stapler
The embossed web design was lightly sponged with Early Espresso ink to make it stand out more and give it more of an eerie feeling. The Word Window had to be punched again partially to open up the slot wider. And I loved adding the little spider webs from the Wicked Cool set onto the tag, the envelope, and also the inside of the card.
Now comes the fun part. Depending on how you slide in the tag, you can either have it showing like I did in the original above, or it can slide in to hide the greeting as shown here. Either way, the ribbon stapled on the side makes an excellent pull-tab for the tag. For this version of the card, I'd really like to find a small 3-d spider to add to the web. Wouldn't that be da-bomb?! Guess I need to hit one of the craft type stores to see if I can find any.
Happy stamping! Sharon
Saturday, October 23, 2010
A Different Type of Ghost
Yes, Halloween is almost upon us (only 8 more days if you're counting) and I'm trying to share everything with you all before it's too late. Well, I guess it's never too late to share an idea, but I'd prefer to share the ideas before the holiday has come and gone. So without further ado, on with the sharing! This card is a punchy ghost. He's almost completely punched with the large oval punch. Hope you like it...
Stamps: All Holidays
Cardstock: Naturals White, Whisper White, Basic Black, and Elegant Eggplant
Ink: Elegant Eggplant
Accessories: Big Shot with Top Note die, Large Oval Punch, Modern Label Punch, 1/2" Circle Punch, White Gel Pen, and Dimensionals
This scary dude was fun to put together. Once you got the pieces punched and everything sponged with the Eggplant ink, it was a snap to put together. By changing the placement of the eyes and eyebrows, you can get all kinds of expressions! Everything from mad, to scared, to surprised.
One little trick I especially liked was attaching the top of the nose directly to the card, but using a Dimensional under the end of the nose to make it stand out a bit. Just a little extra bit of whimsy to make someone smile.
Well, that's it for today. Thanks for dropping by and saying hi to my little scary dude!
Sharon
Thursday, October 21, 2010
Scaredy Ghosts
A while back (when I had more time on my hands), I was blog surfing and saw such a cute idea that I had to case it. The creator of this cute idea is Carrie Gaskin. I remembered to get her name, but I omitted to get her blog address so I can't send you there - sorry! Needless to say, my card is similar to hers, but I did make a few changes like omitting the ribbon (I didn't think they needed any ribbon), changed the cardstock colors, and I changed the stamps I used. The ghosts are totally her idea though, and aren't they just the cutest?
Stamps: Circle Circus and All Holidays
Cardstock: Naturals White, Pear Pizzazz, Elegant Eggplant, Pumpkin Pie, Basic Black, and Whisper White
Ink: Elegant Eggplant, Basic Black Pads and Basic Black Marker
Accessories: Big Shot with Leaves #2 Die, Paper Snips, 1/4" Circle Punch, Dimensionals, and tiny googly eyes

Didn't I tell you they were cute? I wouldn't steer you wrong here. When I realized the ghost shape was the leaf die, that was a real 'duh' moment for me!! How quick and easy to get a great ghostly shape! All you need to do is get those cool eyes and just add the little lines around the mouth and eyes to get the bestest ghosties yet!
Hope you enjoy them. There's still time to make some of these quick cards for Halloween. Thanks for stopping by today.
Sharon
Stamps: Circle Circus and All HolidaysCardstock: Naturals White, Pear Pizzazz, Elegant Eggplant, Pumpkin Pie, Basic Black, and Whisper White
Ink: Elegant Eggplant, Basic Black Pads and Basic Black Marker
Accessories: Big Shot with Leaves #2 Die, Paper Snips, 1/4" Circle Punch, Dimensionals, and tiny googly eyes

Didn't I tell you they were cute? I wouldn't steer you wrong here. When I realized the ghost shape was the leaf die, that was a real 'duh' moment for me!! How quick and easy to get a great ghostly shape! All you need to do is get those cool eyes and just add the little lines around the mouth and eyes to get the bestest ghosties yet!
Hope you enjoy them. There's still time to make some of these quick cards for Halloween. Thanks for stopping by today.
Sharon
Thursday, September 2, 2010
Halloween Swap
Well, actually it wasn't a Halloween swap, but a Holiday Mini Catty swap that I participated in. I chose to use the Fang-tastic set, hence the 'Halloween Swap' name. Anyway, the cards arrived today , yippee!! So I figured it was safe to share my card for the swap now that I'm done drooling over all the fabulous cards I received. Oh yes, there were some awesome ideas in that little bag of swaps and I can't wait to share them with my customers! Anyway, back to what I'm sharing with you today. I hadn't gotten the bat punch yet, so I made do with the Round Tab Label punch. Look and see....
Stamps: Fang-tastic
Cardstock: Rich Razzleberry, Pumpkin Pie, Basic Black, and Whisper White with Nite Owl Designer Series Paper
Ink: Stazon Jet Black, Basic Black, and Rich Razzleberry pads, and Real Red Marker
Accessories: Big Shot with Spider Web Textured Impressions Embossing Folder, AquaPainter and Wonderful Watercolor Crayons, Round Tab Punch, Large Oval Punch, Scallop Oval Punch, Cutter Kit, Sponge Daubers, Mini Glue Dots, and Dimensionals
After writing out all the 'ingredients', I was surprised at how many products were used to make this little card. But it really is all the little things that make a difference when making a card. Sometimes it's the extra layers, or ribbon, or other doo-dads. Sometimes it's something really simple like sponging the embossed layer to make the embossing stand out. Or adding little droplets of blood coming from dracula's mouth.
Whatever you need to do to make it special, always keep it fun. It took a couple of tries to get some 'bite' marks on the sentiment layer, but I thought it would make it look cuter. I ended up using the Scallop Oval punch and just punched it in different directions from the inside of the punch. Something simple, but still fun.
Hope this card inspires you to play with this Fang-tastic set. It really is cute and you too can make adorable cards for kids (or those young-at-heart) this Halloween.
Happy stamping....
Sharon
Saturday, August 28, 2010
Witchy Girl
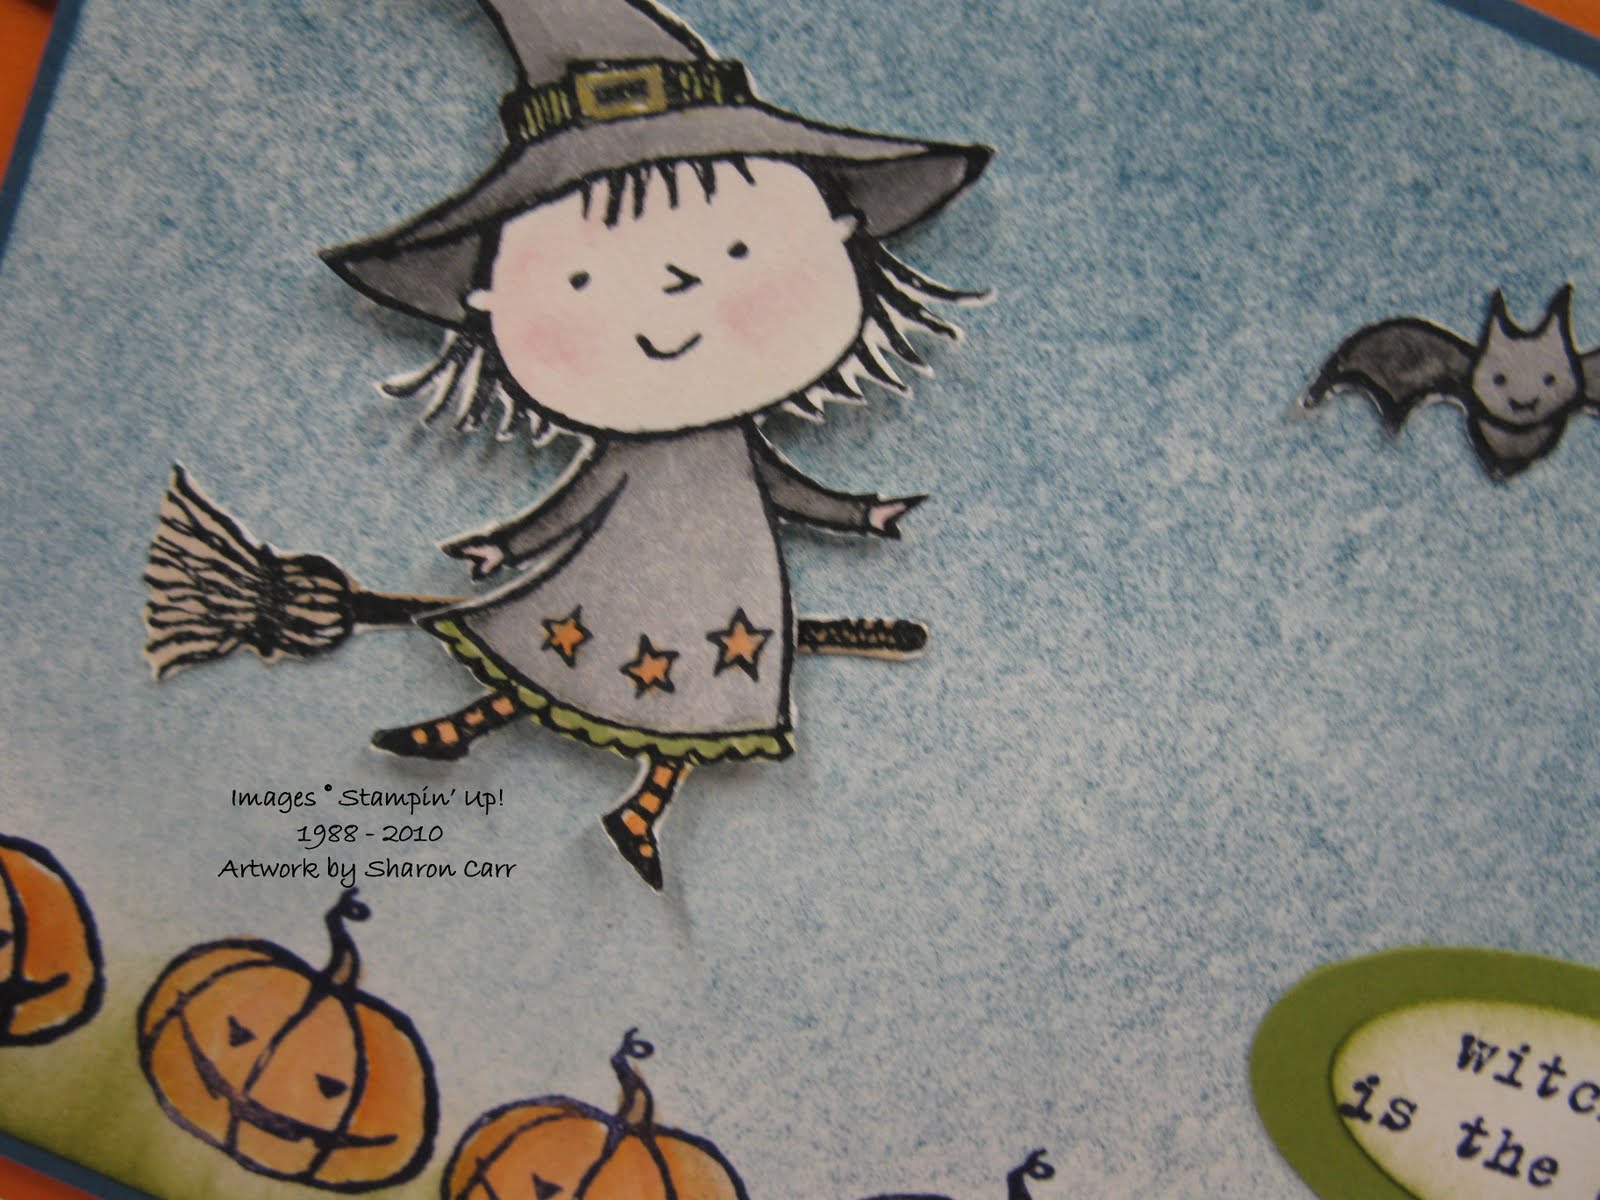
Have I mentioned lately how much I like SU!'s cute little kids? They have some of the cutest ones available, and I'm such a sucker for them! Today I have another sneak peak of a set coming out in the new Holiday Mini Catalog. (If you don't have one yet, I'd be happy to mail one out to you - just contact me about it!!) Anyway, the cute little witch in the Fang-tastic set is my muse for today. She might be a witch, but she looks pretty darn cute and not scary at all.

Stamps: Fang-tastic
Cardstock: Pumpkin Pie, Not Quite Navy, Old Olive, and Very Vanilla
Ink: Stazon Jet Black, Not Quite Navy, Pumpkin Pie, Old Olive, and Blushing Bride
Accessories: Neutrals Watercolor Wonder Crayons, AquaPainter, Sponge quarters, Basic Black 1/4" Grosgrain Ribbon, Champagne Shimmer Paint, Large and Small Oval Punches, Paper Snips, and Dimensionals

Thank heavens for those Paper Snips. It's the only way to cut out all those little pieces, especially that little girl. Her arms and legs are so skinny and then there's her hair and her broom. Whew. I think I need glasses that are a bit stronger to see that little detailed stuff now that I'm getting a little bit older. Notice I didn't actually say I was old, just getter older. There's a big difference there that I want to make very clear!!
Anyway, back to the card! The background was sponged on, just using different styles for the sky and grass. The grass was just sponging in from the edge, but the sky was lightly sponged all over and then layers of darkness built up. Still sponging lightly, just more layers.
Just a little side note here. When I heard SU! was taking away Blush Blossom and giving us Blushing Bride instead, I was really unhappy. But now that I've been using the Blushing Bride color for all skin tones instead, I'm so very happy with the new color! It works out just great. For my little girl, I used the Blushing Bride ink for both her skintone and the blush! It's really a great color and I have to say "kudos" to SU! for this new color.
I wish the picture showed the smidgeon of Shimmer Paint on the buckle of her hat. IRL it adds just a cute touch of glimmer. Hmmm... maybe I just might go back and add a touch to those stars on her little dress. That might be nice.
Hope you like my little witchy girl today and maybe get your Halloween stamps out to play. You know, time's running out to get these made and in the mail on time. Thanks for stopping by. Please leave your comments on my little witch - they are very appreciated.
Sharon

Stamps: Fang-tastic
Cardstock: Pumpkin Pie, Not Quite Navy, Old Olive, and Very Vanilla
Ink: Stazon Jet Black, Not Quite Navy, Pumpkin Pie, Old Olive, and Blushing Bride
Accessories: Neutrals Watercolor Wonder Crayons, AquaPainter, Sponge quarters, Basic Black 1/4" Grosgrain Ribbon, Champagne Shimmer Paint, Large and Small Oval Punches, Paper Snips, and Dimensionals

Thank heavens for those Paper Snips. It's the only way to cut out all those little pieces, especially that little girl. Her arms and legs are so skinny and then there's her hair and her broom. Whew. I think I need glasses that are a bit stronger to see that little detailed stuff now that I'm getting a little bit older. Notice I didn't actually say I was old, just getter older. There's a big difference there that I want to make very clear!!
Anyway, back to the card! The background was sponged on, just using different styles for the sky and grass. The grass was just sponging in from the edge, but the sky was lightly sponged all over and then layers of darkness built up. Still sponging lightly, just more layers.
Just a little side note here. When I heard SU! was taking away Blush Blossom and giving us Blushing Bride instead, I was really unhappy. But now that I've been using the Blushing Bride color for all skin tones instead, I'm so very happy with the new color! It works out just great. For my little girl, I used the Blushing Bride ink for both her skintone and the blush! It's really a great color and I have to say "kudos" to SU! for this new color.
I wish the picture showed the smidgeon of Shimmer Paint on the buckle of her hat. IRL it adds just a cute touch of glimmer. Hmmm... maybe I just might go back and add a touch to those stars on her little dress. That might be nice.
Hope you like my little witchy girl today and maybe get your Halloween stamps out to play. You know, time's running out to get these made and in the mail on time. Thanks for stopping by. Please leave your comments on my little witch - they are very appreciated.
Sharon
Tuesday, August 17, 2010
Batty Halloween Card
It's still a little early in the season, but I've been doing lots of thinking about Halloween ideas. I'm not a huge Halloween fan, but like I mentioned in an earlier post, I'm a sucker for cute. Now this one isn't really cutesie, but I do think it falls on the cuter end of the Halloween "ghoulish meter". Wonder if there really is something like that??! Anyway, it was fun to make and that's what counts, right? BTW - Connie, this one's for you!
Stamps: All Holidays set, and Frightful Fence Jumbo Wheel
Cardstock: Old Olive, Pumpkin Pie, Daffodil Delight, and Basic Black
Ink: Basic Black, Daffodil Delight, Peach Parfait, and Old Olive
Accessories: Jumbo Handle, Modern Label Punch, 1 3/8" Circle Punch, Round Tab Punch, Sponge quarters, Brights Brads, Mat Pack and Piercing Tool, and Dimensionals
I didn't pre-order the new Bat Punch, so I made do with bats made from repeatedly punching the side of the Round Tab Punch. I love the look of these. They have this slightly sinister look, but totally harmless. Just the way I like my Halloween!
For the grasses on the bottom, I used the direct-to-paper technique with Old Olive ink. If you're not a fan of that technique, I think using a marker and just drawing in the grasses would work just as well. Without anything on the bottom it looked a little bare. I was lucky enough to get the spider web from the wheel onto the card front this time. Half the time it didn't make it, but this time it worked. Guess I've got to practice where to start my wheel on the paper better.
When I was working on the moon, I wanted to have it look rounded but then almost blending into the background. To accomplish that I sponged the circle with a good amount of Daffodil Delight ink about 1/2" in on all the edges, then went back with Peach Parfait and added a little more sponging on the edge. This starts to blend the edge into the Pumpkin Pie background, but still keeps it separate.
Anyway, hope you have fun with the idea. This was one of the cards in my Punchy Class today. If you're in the Detroit area and are looking for a fun class, come join us! We're always looking for people who like to have fun and love chocolate. Well, I guess the chocolate part is optional, but expect to meet some great ladies and have a good time. Just contact me and I'll get you the information for upcoming classes.
Have a great week!
Sharon
Stamps: All Holidays set, and Frightful Fence Jumbo WheelCardstock: Old Olive, Pumpkin Pie, Daffodil Delight, and Basic Black
Ink: Basic Black, Daffodil Delight, Peach Parfait, and Old Olive
Accessories: Jumbo Handle, Modern Label Punch, 1 3/8" Circle Punch, Round Tab Punch, Sponge quarters, Brights Brads, Mat Pack and Piercing Tool, and Dimensionals
I didn't pre-order the new Bat Punch, so I made do with bats made from repeatedly punching the side of the Round Tab Punch. I love the look of these. They have this slightly sinister look, but totally harmless. Just the way I like my Halloween!
For the grasses on the bottom, I used the direct-to-paper technique with Old Olive ink. If you're not a fan of that technique, I think using a marker and just drawing in the grasses would work just as well. Without anything on the bottom it looked a little bare. I was lucky enough to get the spider web from the wheel onto the card front this time. Half the time it didn't make it, but this time it worked. Guess I've got to practice where to start my wheel on the paper better.
When I was working on the moon, I wanted to have it look rounded but then almost blending into the background. To accomplish that I sponged the circle with a good amount of Daffodil Delight ink about 1/2" in on all the edges, then went back with Peach Parfait and added a little more sponging on the edge. This starts to blend the edge into the Pumpkin Pie background, but still keeps it separate.
Anyway, hope you have fun with the idea. This was one of the cards in my Punchy Class today. If you're in the Detroit area and are looking for a fun class, come join us! We're always looking for people who like to have fun and love chocolate. Well, I guess the chocolate part is optional, but expect to meet some great ladies and have a good time. Just contact me and I'll get you the information for upcoming classes.
Have a great week!
Sharon
Monday, August 16, 2010
Fang-tastic!
Yup, I had decided not to get another Halloween set because every time I do it's retired right away. How frustrating! But I just couldn't help myself when I saw what Stampin' Up! was offering in the new Holiday Mini coming out in September. Oooooh, it's just too cute and I love cute Halloween stuff. You can skip the ghoulish and gory as far as I'm concerned. Just give me the cute little kids in their Halloween costumes, and I'm an absolute pushover! So when I had a chance to pre-order from the new mini and get some samples made, well, along came the guy in the brown truck with a box for me with Fang-tastic sitting right on top!!
I was even crazy enough to sign up for a swap using this set, so I had to get creating with it. Now I can't show you the cards I made for the swap just yet. (don't worry, I did remember to take a picture before sending them off, but I have to wait a bit to share!) But that wasn't the only card I made with the set. Here's a different idea using the cute little dracula kid.
Stamps: Fang-tastic stamps, Very Vintage Jumbo Wheel
Cardstock: Basic Gray, Rich Razzleberry, Old Olive, and Whisper White
Ink: Stazon Jet Black, Basic Black, Rich Razzleberry
Accessories: AquaPainter, Watercolor Wonder Crayons - Neutrals, Large Oval Punch, Scallop Oval Punch (for the teeth marks), Distressing Tool, Jumbo Handle, Basic Black 1/8" Taffeta Ribbon, and Dimensionals
Now, wasn't I right? Isn't this just the cutest little kid dressed up like dracula? It was so easy to color him with the Neutral WWCrayons. All except for his vest - I had to use my Razzleberry ink pad for that.
How do you like the Vintage wheel design on the background? I had someone mess up their cardstock at class last week using the wheel in the wrong direction. So, since the inked, gray cardstock was just sitting there, I figured I might as well use it for something. Right?
Well, hope you like this idea using the very new
Fang-tastic set. Maybe I need to make another card or two with the set before it finds a home on my shelves. That cute little girl-witch is calling out to me! We'll see.....
Happy stamping,
Sharon
Thursday, August 5, 2010
Halloween Favorite
Oh my! Another week seems to have come and gone since I checked in last. I'm just a bit overwhelmed here lately. Seems like the days are totally focused on our grandbaby, and evenings I've been cramming in everything else that needs doing. Last week I was planning on the cards the church ladies would be making for the soldiers this week. And yes, we had a great turnout on Tuesday evening - 15 ladies and 2 preteen girls. Everyone worked like crazy to get as many cards made as possible. They actually finished 115 cards in 2 hours!! Now that's really hustling! And after finishing all those cards Tuesday night, I spent time Wednesday getting them all counted, packaged up, and then dropped at the Post Office. Whew!! Now for the duh part - I forgot to take pictures of the 6 different cards the ladies made!! How dumb is that?? I was so intent on getting them mailed out, that I totally forgot the pics. What can I say? (shrug) Anyway, I have some pics of one of the cards the ladies made for the soldiers last month. Here goes...
Stamps: Itty Bitty Backgrounds, Pumpkin Patch
Cardstock: Pumpkin Pie, Basic Black and Whisper White
Ink: Basic Black, Pumpkin Pie, and Old Olive
Accessories: 1", 1 1/4", and 1 3/8" Circle Punches, Paper Snips, and Dimensionals
Isn't it fun having the pumpkin peeking from inside a hole in front of the card? It's just so darn cute in person! I just wish the colors showed up better in the pics. The colors in the 2nd picture are much more realistic than the top one. The ribbon came from one of the craft stores and is pumpkin on one side and black on the reverse side. So cute and matched so well with the cardstock, you'd think it was made for it. Don't you love it when you have just the right ribbon or accessories for the right card??
Hope you enjoy the idea and it jump-starts some card ideas for you! See you soon (I hope!)...
Sharon
Thursday, July 1, 2010
Halloween Already??
Yeah, gotta get planning for our card-stamping night at church next Tuesday. I was looking for simple, but cute ideas and came across this one I had made last year when Dusty Durango was one of the new In Colors that I fell in love with. Yes, I'm going to miss it terribly, but I'm sure I'll find other colors that I go to all the time. It's just a matter of getting used to seeing the colors and finding what coordinates together. Anyway... back to the card I'm sharing. This card not only uses a retired cardstock, but a retired ribbon, Designer Paper, and stamp set! I guess I'm still stuck in last year's catalog and I can't get out!!! Help!

Stamps: Batty for You
Cardstock: Dusty Durango, Very Vanilla, and Early Espresso (did you notice that one's new?), and Autumn Meadows Designer Series Paper
Ink: Early Espresso
Accessories: 1 1/4" and 1 3/8" Circle Punches, Scallop Circle Punch, and Dusty Durango Polka Dot Ribbon,

As you can see, the card is super simple to make, but it's still cute. And there's lots of room inside for the soldiers to write home to their kids. And that's what is really important here. Plus the fact that I'm using up some of my stash of retired DSP, cardstock, and ribbon. Now I ask you, just what could possibly be better than that? LOL My hubby will love it! Well, truthfully, he probably won't even be able to tell. But I'll be sure to let him know before I order more of the new colors that I need!
Have a great evening!
Sharon

Stamps: Batty for You
Cardstock: Dusty Durango, Very Vanilla, and Early Espresso (did you notice that one's new?), and Autumn Meadows Designer Series Paper
Ink: Early Espresso
Accessories: 1 1/4" and 1 3/8" Circle Punches, Scallop Circle Punch, and Dusty Durango Polka Dot Ribbon,

As you can see, the card is super simple to make, but it's still cute. And there's lots of room inside for the soldiers to write home to their kids. And that's what is really important here. Plus the fact that I'm using up some of my stash of retired DSP, cardstock, and ribbon. Now I ask you, just what could possibly be better than that? LOL My hubby will love it! Well, truthfully, he probably won't even be able to tell. But I'll be sure to let him know before I order more of the new colors that I need!
Have a great evening!
Sharon
Wednesday, October 28, 2009
BOO Hanger
Well, it seems to be that time of year when all the ghosts and ghoulies are out and about. I myself, much prefer a sweeter, gentler Halloween. I know - I'm such a wuss!! Anyway I made a Boo Hanger for my wall that is cute, and definitely NOT scary! lol
It uses lots of fall colors and a few images to perk it up.
Stamps: Twick or Tweet
Cardstock: Old Olive, Pumpkin Pie, and Lovely Lilac with coordinating Prints Designer Series Papers
Ink: Stazon Jet Black, Pumpkin Pie, Old Olive, and Lovely Lilac Classic Pads
Accessories: Chipboard Basics, Big Shot with Scallop Square Die and Serif Essentials Dies, AquaPainter, Circle Brads, Earth Elements Brads, Pumpkin Pie Narrow Grosgrain Ribbon, both Basic Black and Old Olive 1 1/4" Striped Grosgrain Ribbon, purple ricrac from Ribbon Originals, Distressing Tool, Multi-Purpose Glue, and Paper Snips, and Glitter Pen (unknown)

This was so much fun to put together. My daughter and I spent time getting them together after I had gotten everything measured, cut, through the Big Shot, etc. We wanted to make several of these for family. This was a great way to spend an afternoon together. All totalled we made five of these. (Sorry I'm so late mailing yours Connie! You'll be already to use it next year!!)

It was fun to decide what accents to place on each letter. I loved how the ghosts look like they're floating up the side of the O. And the little witchy pumpkin fits perfectly inside the 2nd O.
We did disagree on whether to distress the edges of cardstock and Designer Paper. So some are distressed (mine) and some aren't (Heather's). In many ways our tastes are very similar, but we do differ on some things. And distressing is one of those things. She really doesn't care for it at all!! And on a project like this, either way works just fine.

Hope you enjoyed this project. Why don't you try one for yourself? Ooops, one tip I should have mentioned. We found it's so much easier to adhere the cardstock to the chipboard before you run it through the Big Shot. No sense in making more work for yourself having to line up the scallops of the chipboard and cardstock when gluing. So much easier when done ahead of time!
I had gone on some of my favorite challenge sites this morning and found one at Pals Paper Arts here that was "Anything But A Card". Is this project perfect for that or what!? Go check out what wonderful ideas people had for this challenge. Maybe you'll take up the challenge too!
Have a happy and productive Wednesday!
Sharon
It uses lots of fall colors and a few images to perk it up.Stamps: Twick or Tweet
Cardstock: Old Olive, Pumpkin Pie, and Lovely Lilac with coordinating Prints Designer Series Papers
Ink: Stazon Jet Black, Pumpkin Pie, Old Olive, and Lovely Lilac Classic Pads
Accessories: Chipboard Basics, Big Shot with Scallop Square Die and Serif Essentials Dies, AquaPainter, Circle Brads, Earth Elements Brads, Pumpkin Pie Narrow Grosgrain Ribbon, both Basic Black and Old Olive 1 1/4" Striped Grosgrain Ribbon, purple ricrac from Ribbon Originals, Distressing Tool, Multi-Purpose Glue, and Paper Snips, and Glitter Pen (unknown)

This was so much fun to put together. My daughter and I spent time getting them together after I had gotten everything measured, cut, through the Big Shot, etc. We wanted to make several of these for family. This was a great way to spend an afternoon together. All totalled we made five of these. (Sorry I'm so late mailing yours Connie! You'll be already to use it next year!!)

It was fun to decide what accents to place on each letter. I loved how the ghosts look like they're floating up the side of the O. And the little witchy pumpkin fits perfectly inside the 2nd O.
We did disagree on whether to distress the edges of cardstock and Designer Paper. So some are distressed (mine) and some aren't (Heather's). In many ways our tastes are very similar, but we do differ on some things. And distressing is one of those things. She really doesn't care for it at all!! And on a project like this, either way works just fine.

Hope you enjoyed this project. Why don't you try one for yourself? Ooops, one tip I should have mentioned. We found it's so much easier to adhere the cardstock to the chipboard before you run it through the Big Shot. No sense in making more work for yourself having to line up the scallops of the chipboard and cardstock when gluing. So much easier when done ahead of time!
I had gone on some of my favorite challenge sites this morning and found one at Pals Paper Arts here that was "Anything But A Card". Is this project perfect for that or what!? Go check out what wonderful ideas people had for this challenge. Maybe you'll take up the challenge too!
Have a happy and productive Wednesday!
Sharon
Subscribe to:
Posts (Atom)