Thursday, August 29, 2013

Country Cozy Card

Hello there.  Today I've got a simple cozy little card for you.  The sketch layout is very simple and I've used it often because it's so easy to get the components to work together.  There's  something good about a sketch that works every time you try it.  And this is definitely one of the good ones.


Stamps:  Kind & Cozy, and Teeny Tiny Wishes
Ink:  Island Indigo and Melon Mambo
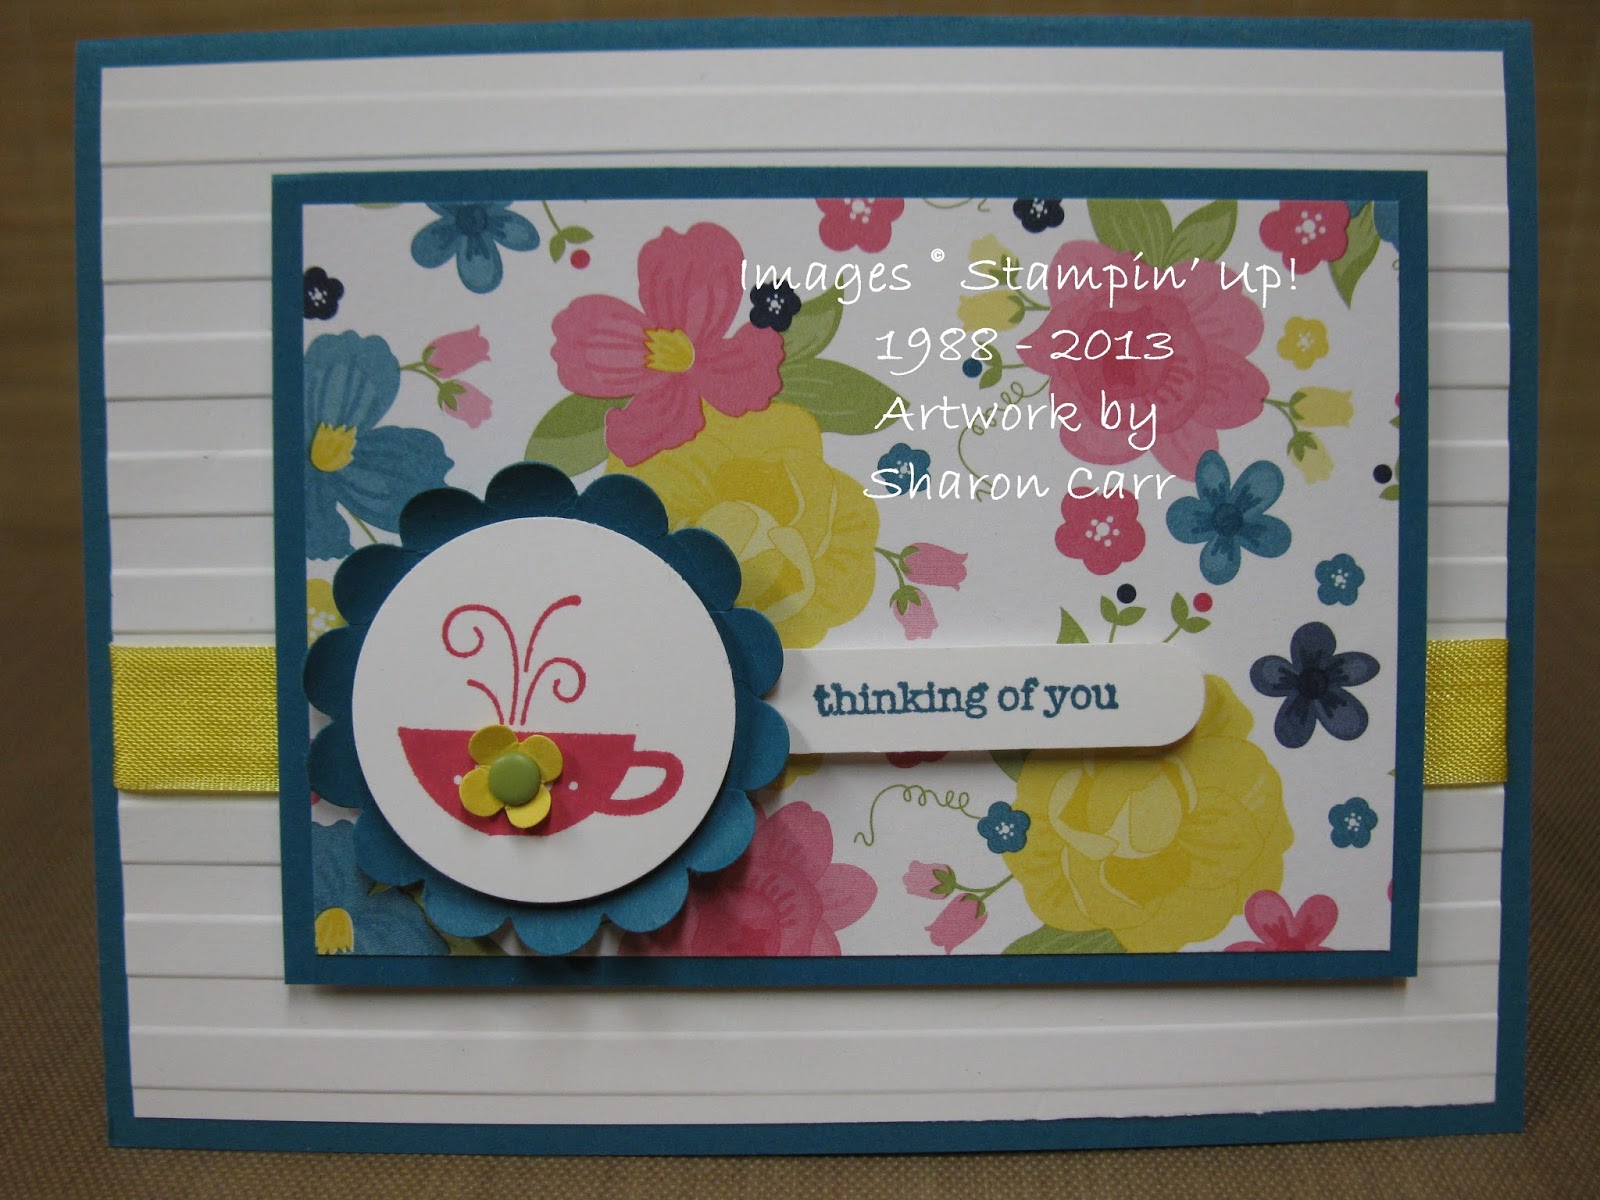
Paper:   Island Indigo, Daffodil Delight, and Whisper White cardstock with Gingham Garden Designer Series Paper
Accessories:  Big Shot with Stripes TIEF, Word Window Punch, 1 3/8" Circle Punch, 1 3/4" Scallop Circle Punch, Itty Bitty Shapes Punch Pack, Subtles Candy Dots, Daffodil Delight Seam Binding Ribbon, and Dimensionals
The colors of the Gingham Garden Designer Paper were my guide for the colors used here.  I love how crisp and clean the colors of the print paper are, so everything was left plain without any sponging to soften the layers.

The scallop circle of Island Indigo were curled up with my bone folder, then the teacup layer was added with a Dimensional under to raise it up. 

The little flower doodad was added to inject a softer color onto the Melon Mambo teacup.  Then I debated about using a rhinestone for the flower center, but decided I liked the touch of green with the Candy Dot.  (If you haven't gotten any of the Candy Dots yet, what are you waiting for?  They are sooooo much fun!)

Hope to see you back again soon.  I've definitely got more ideas to share with you!  Thanks for stopping by.  Sharon

Wednesday, August 28, 2013

Pretty One Layer Card

I was talking to a friend the other day who was complaining about needing to add so many layers on a card to make it look nice.  So my goal today was to make a card that has only one layer.  I know, it's hardly ever done anymore and could I really do it up nicely without using extra ribbons or other stuff to make it look special.  Well, I did.... and actually I didn't.  Let me tell you all about it!

Stamps:  Everything Eleanor and Really Good Greetings
Ink:  Pumpkin Pie, Always Artichoke, and Cajun Craze
Paper:  Very Vanilla
Accessories:   Big Shot and Ovals Collection Framelits, Sponge Daubers, and Pearls Basic Jewels
Yeah, I know - I used almost nothing to make the card!!  The Big Shot and Ovals Framelits were used ahead of time to cut out a mask that can be used again.  (save the cut out oval for another project!)  I sponged on an oval of Pumpkin Pie ink a little right of center to give me a focal point for the card.  It really needs something like this to pull the elements in together.  I kept the sponging heavier on the edges and none in the middle to give it more depth.  I also sponged very lightly around the outside edge of the card to add color for a faux layer.

Then on to the wonderful swirl from the Everything Eleanor stamp set.  This is such a pretty element all by itself.  It gives the card substance and frames the sentiment nicely.  Since I wanted to give an autumn feel to the card, I used Always Artichoke for the swirl.  Then I added the sentiment which was stamped with Cajun Craze ink.

At that point it was done, but I couldn't leave it alone just yet.  It needed something to make it stand out a little bit.  So... after looking around for possibilities, I chose to add several pearls scattered among the swirls for a little understated bling. 

And that's it for my one layer card.  Hope you're inspired to give the idea a try.  It's kind of freeing not having to worry about how many layers to use.  But I have to admit - I still love adding layers!!
Have a fabulous day!  Get out those stamps and give them some love.     Sharon

Wednesday, August 21, 2013

Vintage Morning Post

Hurry!  I've got a small window of time to get this posted.  The little one is taking a nap and his brother is watching a movie with Grandpa.  Don't know how long that will last, so I've got to be quick about this.  Today's post is a CASE from a swap card that my friend Janine Tinklenberg received at convention.  I thought it was awesome and needed to make one for myself.  Love, love, love it!!

Stamps:  Morning Post
Ink:  Crumb Cake, Cajun Craze, and Early Espresso
Paper:  Crumb Cake, Cajun Craze, Early Espresso, and Very Vanilla
Accessories:   Postage Stamp Punch, Pearls Basic Jewels, Crumb Cake Taffeta Ribbon,  Sponge Dauber, and Dimensionals
Not sure if these are the actual colors that were used in the original, just what I remembered.  I love that all of the stamps used for this card are all in one little set.  The postage stamps coordinate perfectly with the main image which is a lovely collage. 

The coloring of the main image was done by dividing the stamp into approximately thirds and inking each segment with the ink pad.  Start with the lightest - the Crumb Cake - then go on to the next darkest color and so on.  This way you get the awesome mix of colors on the image, but it's so quick and easy!  The three stamp images were each inked with one of the main image colors so everything coordinates.

I added the pearls in the top corner to kind of balance the stamps in the bottom corner.  I was going to use Candy Dots, but after playing around with it I thought the pearls were a better pick for the card.

Ok, that's it.  All's still quiet so I might find something else to do during this break.  Don't you just love naps?!  Yeah, me too!  Happy stamping,   Sharon

Sunday, August 18, 2013

Sketched Birthday in Blue

I haven't spent much time checking out other blogs and stamping venues lately.  Just not enough hours in the day to spend oodles of those precious hours surfing the web to see what everyone is up to in the creative world.  But today I was looking for something in particular that I thought I'd seen somewhere (and it wasn't there!).  I did discover a sketch challenge though.  Oh, how I miss doing those on a regular basis to keep me creative!!  I thought today would be a perfect day to try my hand at the challenge, so here we go.  The sketch is found here at the Clean and Simple Stamping blog.  I had an idea that I thought would work and gave it a try.  Think I like what I came up with...

Stamps:  Sketched Birthday, Sweet Essentials, and Hello to You (Paper Pumpkin set)
Ink:  Indigo pad, Soft Sky, Calypso Coral, Island Indigo markers
Paper:  Soft Sky, Calypso Coral, and Whisper White
Accessories:  Big Shot with Tasteful Trim Bigz XL Die, Paper Piercing Tool and Mat, Essentials Paper Piercing Pack, 1 1/4" Circle Punch, 1 3/4" Scallop Circle Punch, Rhinestone Basic Jewels,  and Dimensionals
It was fun having a starting place of a sketch to work with.  I changed around my color scheme a couple of times, but that's not surprising.  The sketch didn't call for the scalloped layer under the main layer, but it looked too plain for my taste.  Dare I say almost boring?  And we can't have that!   So it was added to go along with the scallop punch.  I had planned to use the cute little Candy Dots for the embellishments, but ended up liking the rhinestones better.

I love the little chevron  background stamp from one of my Paper Pumpkin kits.  It's been used several times to give a fun pop of pattern and color.  These Paper Pumpkin kits are really handy to have around.

Well, that's it for this Sunday's edition of the stamping news.   I've been working on a couple other things today as well.  We'll see if they work out as planned and get posted for your viewing pleasure.  Hope you all have a great week.  And get those stamps inked and ready - it's time to stamp!     Sharon

Thursday, August 15, 2013

Another Painter's Tape Idea

A couple of week's ago I posted a card made with a fun technique using a low-tack masking tape or painter's tape.  I still had a color combo floating around that I wanted to try using this technique.  I had my hostess club ladies make this card and I just love the colors we used!  So soft and feminine looking - sort of vintage I guess you'd call it.  However you want to describe it, it's just plain pretty.  Here's the card the ladies made...

Stamps:  Field Flowers
Ink:  Stazon Jet Black, Blushing Bride, Perfect Plum, and Pear Pizzazz
Paper:  Blushing Bride, Perfect Plum, Basic Black, and Whisper White
Accessories:   Basic Black 1/8" Taffeta Ribbon
 I ended up taking about a dozen pictures, but just couldn't get the Blushing Bride ink color to come out nicely on the photo.  It's the top color shown on the card, and is very pretty in reality.  Sometimes I hate technology when I can't get it to do what I want!!  As Lucy would say - "AAAARRRRGH!   But anyway, I hope you get the picture, no pun intended there!

Any type of  black silhouette image would work splendidly with this technique.  And it's so easy to use the tape with your ink pads to get the soft stripes of color.  In fact, I just showed 2 ladies how to do it this afternoon.  I made the background sample for them in about 5 minutes.  Now I've got another piece of cardstock with the colors already laid on so I'll have to make another card.  Right?

Quick refresher in case you don't know this technique.  Rip a piece of masking tape about 3" long.  Lay tape (sticky side down) onto your ink pad.  Press lightly with fingertips.  Lay tape onto cardstock ink down.  Rub on the tape to transfer the color.  Remove tape.  For best results use several different colors.  TIP: just remember to use a low-tack type of masking tape so the actual tape won't stick to your cardstock when you remove it.

That's it.  If you haven't tried this yet, go ahead and give it a try.  It's so much fun seeing the different stripes of color when you remove the tape and you see what's there.  Ok, time's up and it's time for me to move on.  Have a great week and get stamping!!  Sharon

Wednesday, August 14, 2013

Halloween Hexes

Hexes as in hexagons that is!  This Six-Sided Sampler set is turning into one of my favorites lately.  It can fit any occasion or season depending on what colors you use.  How handy is that?  Here's what I mean - it's my latest foray into playing with this set...

Stamps:  Six-Sided Sampler, Wacky Wishes, and Autumn Apparitions(retired)
Ink:  Early Espresso, Cajun Craze and More Mustard(retired)
Paper:  Very Vanilla  (and a retired DSP that I don't remember the name of from my stash)
Accessories:  Hexagon Punch
In many ways, this is such a quick and easy card to make.  The whole project is a mix of new and old, so this is a good reminder not to throw away the old just because it's old!  The printed Designer Paper was just a small scrap left over that I liked too much to discard and knew it would come in handy one day.  Well, this was the day.  I'm sure the color was actually Really Rust, but it worked well with this project idea and the colors I had planned to use.

The different hexagon prints are all from the newer Six-Sided Sampler that I really love!  There are just so many different possibilities available when you get this set in your hands.  The small pumpkin and spider are from a retired set called Autumn Apparitions. I keep hanging on to this set because of the cool little spider.  It's just the perfect addition to those Halloween cards and goodies I like to make.

Well, that's it for today.  Just short and sweet and quick to stamp.  Can't get any better than that.  If you don't have the retired items I've used here, just peruse the catalog and pick up something that you can easily substitute for this idea.  Have fun stamping!  Sharon

Thursday, August 8, 2013

Paper Pumpkin Possibilities

Just have to share what I did with part of July's Paper Pumpkin set.  I'm growing to enjoy this little fun package that comes every month.  I will admit there were two months that I wasn't too crazy about the packages, but I'm so glad I stuck with it a little longer.  The last several  months have been great!  July's package consisted of 2 stampin' spots, 3 cute texture background stamps, and several different banner sets.  Since I needed one for a birthday right away, it came at the perfect timing  And now I've got ideas to make some more as needed!  What a bonus!  Here's what I did with one set of banners...

Stamps:  Paper Pumpkin Kit July Edition
Ink:  Pool Party, Island Indigo, Summer Starfruit
Paper:  banner pieces from kit
Accessories:  skewers, white baker's twine, mini clothes pins, and Dimensionals (all from the kit too!)

As you can see, I stuck the banner in a batch of brownies.  In our family, seems like most of us prefer brownies to cake for our birthdays so that's what I make!  So easy and I sure don't complain about that!!

 I think my son-in-law Jesse enjoyed his birthday brownies!  If I'd really been thinking ahead, I would have made his card in a coordinating style and colors, but alas! that didn't happen!!  Sometimes I'm just lucky to get a card made at the last minute.  One of these years, I'm going to get organized and get all my birthday cards done way in advance.  Oh who am I kidding?!  That'll probably never happen in my lifetime!!  LOL

That's it for today.  I should have cards again tomorrow as we stamped cards for the military this week at church.  There's a couple I think you'll really like.  See you soon,  Sharon